 Fly RC Magazine WE LIVE RC
| FLY RC MAGAZINEFLIGHT REPORT | by Roger M. Post, Jr. |
| NITROPLANES AIRFIELD R/C
P-47D |
An RTF Mid-Size Thunderbolt With Electric Retracts |
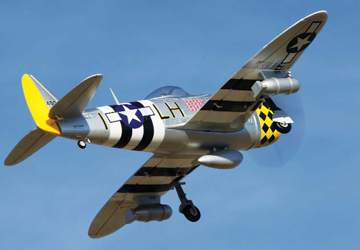
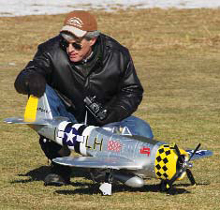 The P-47D Thunderbolt, known as the mighty Jug, first flew on May 6, 1941, with Lowry P. Brabham as its test pilot. During WWII, it was the most feared ground-attack aircraft the Army Air Force had at its disposal, as it shot up and bombed countless enemy tanks, locomotives, troop concentrations, airfields, etc., throughout France and Germany, and in the South Pacific.
Back in 1945, one Thunderbolt cost $85,000; today, the price is in the millions! Luckily for us RC pilots who like to tear up the field with strafing passes, we can do this for under $250, and live to tell about it. NitroPlanes has an AirField RC P-47D, in 1/8 scale, that not only looks great, but comes with everything you need to make it fly, except for a LiPo battery charger and leads and 8 AAs for the 2.4GHz transmitter.
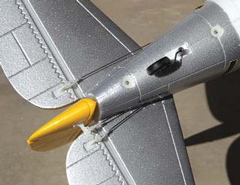
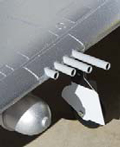 The gunbarrel exits are plastic tubes of various lengths. They seem a bit too large for this 1/12 scale Jug.
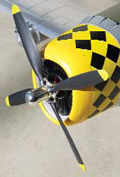
The fourblade propeller adds another nice, scale detail to this fine model.
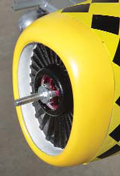
The 3648-520KV 25 outrunner brushless motor is completely encased in the non-removable cowl. The dummy Pratt & Whitney R-2800-59 adds a nice sport-scale touch.
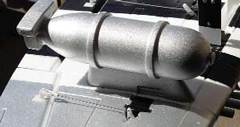
In the box, youll find the EPO-foam, pre-built parts that consist of the fuselage with the motor, ESC and servos pre-installed, the wing panels with the aileron servos and electric retracts pre-installed, the horizontal and vertical stabilizers, two 500-pound bombs with magnetic attachments pre-glued, what appears to be a 75- gallon drop tank (it is called an oil tank in the instructions), a four-blade propeller, spinner, gun tubes for the eight .50-caliber machine guns, an antenna, a hatch with the painted pilot and plastic canopy preinstalled, a 2.4GHz FHSS N-6 transmitter, a 4S 2200mAh 14.8V LiPo battery, a pre-assembled tailwheel, glue, instruction manuals for the radio, ESC and the models assembly and all the hardware, tools, control rods, etc. to complete the model. All decals are pre-applied except for the ones on the propeller. A quick search on the web found a nice frontal shot of Jackys Revenge, and I used that to accurately place those decals.
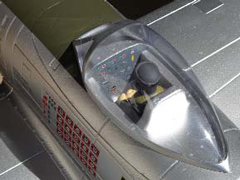
For the builders convenience, the hatch has the instrument panel, the pre-painted pilot and the canopy pre-installed”a time saver, for sure!
Now, speaking of Jackys Revenge, heres a small bit of history: it is not an actual WWII scheme. Although done up in the 350th FS, 353rd FGs markings with 20 victories under the cockpit, a thorough search for anyone achieving this amount in that fighter group turned up fruitless. Its highestscoring ace was Col. Glenn E. Duncan with 19.5, who flew Dove of Peace with various Roman numerals following Dove. And, no tail number in the groups history matched this models: www.littlefriends.co.uk/ 353rdfg.php.
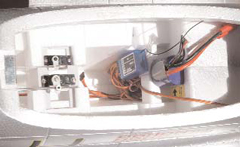
The battery has a specific slot, which is an extremely tight fit. I placed it on the flat area above the slot, which made it easier to remove and provided more cooling airflow.
What I did find was this P-47D-40RA (RA means it was manufactured in Evansville, Indiana) and was an ex-NJ ANG aircraft that was stationed at Newark Airport and then sold overseas to Yugoslavia. Luckily, it made its way back to the States and is in the loving care of the American Airpower Museum, located at the Republic Airport in Farmingdale, NY.
TIPS FOR SUCCESS
This is the fix for the spars ends. It was a tremendous help when trying to line up the spar with the wings inner clamps that were separate for main spars receptacle tube.
The P-47s instruction manual has a lot of open real estate that could have been used to benefit the builder. The photos are small and there really isnt much instructional type of which to speak; plus, when you unfold it, the entire back side is blank! However, for a builder with some experience, there is enough information to put the model together.
The screws in front and aft of the tailwheel hold the rudder in place. Each control horn comes with its own set of screws for attachment to its respective control surface.
Assembly starts with attaching the tailwheel, which has a slot filed into its wire where a set screw goes. Although the tailwheel’s separate servo was centered, the tailwheel wasnt, so I slightly bent its wire to straighten it to the fuselages centerline. Two foam wing fillets are glued into the aft root areas with the provided adhesive. As it isn’t labeled, the mystery glue smells like rubber cement. It is effective, but takes a while to dry.
The wing halves attach via a carbon-fiber, wing-spar tube and four little screws (two per side) that clamp the inner plastic brackets around the spar. If the wing halves receiving tubes for the spar were one long piece per side, inserting the spar would have worked great. But, this is not the case, and you have to finesse the spar into the separate plastic clamps. What I couldnt clearly see was the extra glue in both wings that had seeped into the outer clamp areas where the aforementioned screws go. To fix this problem, a small piece of wooden dowel was inserted into each end of the spar, which were then beveled. This fix allowed the spar to hunt for the plastic clamps and push through the excess glue.
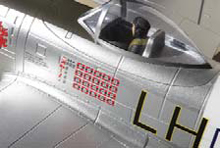
The pre-applied decals are well done, but a little inaccurate. If you carefully read the kill markings above each swastika flag, you’ll see several Fw 110 notations. That’s a new one on me!
The aileron control-horn screws are packaged separately from the aileron linkages and are labeled: PAI 7×15 and 7×18, with the 18s being used for the ailerons thicker section. I added flaps by cutting out the required areas to free them up and adding Hitec HS-65 to move them. The kit includes the flap linkages, so it made their addition an easy process.
The pre-installed aileron servos just need to have the pushrods attached to them so they can move the ailerons. The 500-pound bomb is magnetically attached.
Attach the elevator and rudder control horns before you attach the horizontal and vertical stabilizers, which are held on with screws, to the fuselage. Once in place, the pre-installed elevator and rudder pushrods with clevises are attached to their respective control horns.
Adding the flaps was as simple as cutting the control surface free from the foam and placing an Hitec HS-65 servo in the precut opening. The connecting pushrods are included in the kit. The electric retracts are solidly attached to the wing and work great!
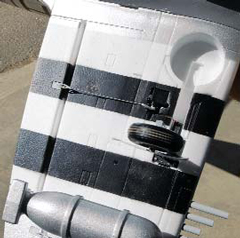
Two really nice features are the preinstalled electric retracts and the four-blade propeller. The retracts worked perfectly and withstood-without a hitch-the slightly rough grass field where the test flights took place. For scale purposes, its interesting to note that the attached wheels are opposite of what they should be. When assembling the propeller, fit the blades in the hubs front half, place the back half on this and then clamp the two pieces together with the provided bolts and plastic-insert nuts. What I found was the back hub portion didn’t quite line up with the blades’ hub ends, but once I tightened the bolts, everything lined up perfectly from the applied squeezing. I now applied the propeller decals, using the aforementioned process. The plastic spinner threads on very tightly, which is a good thing because I could only tighten it down by hand to hold the propeller on its shaft. There isn’t any way to grab the spinner with a wrench.
 Once the center fuel tank, plastic radio antenna and guns tubes (they look a little large for the scale) were glued into place and the magnetic bombs were attached, I checked out the Airfield RC radio. The 6-channel receiver has three Y-connectors coming out of it for the aileron, rudder and tailwheel servos (total of 4), and the electric retracts (2). I added another that had a servo reverser in one of the leads for the flaps. If you decide to add flaps, keep in mind you’ll need one of these.
After I lined up the wings trailing-edge surfaces, I checked the aileron and flap throws. The flaps were fine, but the ailerons seemed too much, so I moved their clevises to the outer holes in the control horns, which calmed them down. The instructions don’t have any indication of control throws, but I found some info on the Internet that has ailerons at 1/2-inch, up and down, and the elevator at 3/4-inch, up and down. I had to do the same for the elevator clevises, as there was too much throw. I couldnt get them to these exact measurements, but got fairly close with mechanical tweaking. The elevator has a split pushrod and, to achieve an even throw for the two halves, I wound up placing them at different lengths when I centered the elevator halves via the pushrods on the servo-arm connector.
The battery has a specific slot that is labeled, but once you place it in there, it is difficult to remove. I placed the battery on the forward section above its designated area, which worked out perfectly. It was difficult to find charging leads for the battery, so I eventually switched them to PowerPoles.
|
On pavement, the Jug easily taxis to the active. On grass, the tail bounces up and down a bit, so hold full up elevator. Theres plenty of tailwheel steering for ground maneuvering. At 8:15 a.m. on the day of the first flight, the field conditions consisted of a 4- to 5-mph headwind and a temperature of 37 degrees. With that 4-blade propeller spinning away up front, it doesnt take a lot of throttle to get the model to move forward. For takeoff, I gradually applied the throttle, added enough right rudder to keep the tracking straight and let the Jug fly off the runway on its own. Surprisingly, the 5-pound Jug was off the runway in about 4 to 5 feetmax! And, that was at only 1/2 throttle! I quickly leveled it off, added six clicks of down trim, let it gain some airspeed and altitude, and then hit that channel-5 toggle switch to suck-up the gear and reduce their drag. There has been some discussion on various Internet sites about this Jugs CG location. The instructions show a 90 to 95mm range, but others think 85mm is a good mark. I split it down the middle and went with 90mm. When flying, it still felt a little tail-heavy; for the next flight, I moved the battery ½-inch forward and measured at the 85mm mark. The Jug flew better with this balance set-up.
Upgrading to this Sky LiPo 4S 2650mAh 14.8V 40C battery added the extra punch the Thunderbolt needed to tear up the field. As is its full-size counterpart, the model is extremely stable and it only seemed a little sensitive in pitch”most likely the result of being slightly tail heavy. Flying around with the newly acquired Sky LiPo 4S 2650mAh 40C battery pack provided more endurance and power than the supplied 4S 2200mAh 20C. I recommend you pick up one of these packs for your Thunderbolt. After ripping around for a few minutes, it was time for some aerobatics. Nice big loops and fairl axial rolls are the order here, and it requires a small amount of forward stick to maintain inverted flight. It spins like a top, and as soon as you release the sticks, the rotation stops. When stalled at a shallow angle of attack (AoA), the Jug gently falls forward to fly again when the up input is released and some power is added. If it enters at a high AoA, the forward fall is sharper and it falls off to the right. To land, set up the standard pattern and gradually lose altitude by reducing throttle, but not too much as there is a four-blade prop out front that acts as a huge airbrake. Drop the flaps, correct for any pitching with elevator trim and then dont forget to drop the gear. Keep about 1/4 throttle until you have the runway made and then gradually decrease the power until the Jug touches down. I was able to get the Jug to fly at a crawl just after it made the numbers, and it is rock-solid in this slow-flight regime. |
 A WWII ferry pilot once told me that the P-47 was so stable that on final approach, he could fill out his logbook before the aircraft touched down. After flying this one, I would have to agree; but first, the takeoff.
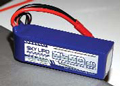
|
PLANE: P-47D MANUFACTURER: AirField RC DISTRIBUTOR: NitroPlanes TYPE: Electric warbird FOR: Intermediate to advanced pilot WINGSPAN: 55 in. WING AREA: 554.9 sq. in. WEIGHT: 5 lb. WING LOADING: 20.78 oz./sq. ft. WING CUBE LOADING: 10.58 LENGTH: 48 in. RADIO: 5 to 6 channels required, with 5 to 7 servos; flown with an AirField RC 2.4GHz FHSS N-6 6-channel transmitter, an AirField RC XY-600 FHSS 6-channel 2.4GHz receiver and four 9-gram servos (2 ailerons, 1 rudder, 1 steerable tailwheel) one 17-gram servo (elevator) and two Hitec HS-65 servos (flaps) POWER SYSTEM: 3648-520KV 25 outrunner brushless motor, 50-amp ESC with a 4-amp UBEC, Sky LiPo 4S 14.8V 2650mAh 40C LiPo Battery, 14 x 6 4-blade propeller FULL THROTTLE POWER: 45 amps, 666 watts, 8.33 watts/oz, 133.2 watts/lb. TOP RPM: 4,500 DURATION: 7 minutes MINIMAL FLYING AREA: RC field PRICE: $239 COMPONENTS NEEDED TO COMPLETE: LiPo battery charger and leads; 8 AAs for transmitter SUMMARY: These RTF complete-package warbirds are a quick and easy way for the wannabe RC fighter pilot to get immersed in air combat with his flying buddies. Their quality is good enough that you dont have to replace anything that is included. I would, however, like to see more information in their specifications’ list and better instructions that include more detail and larger photos. |
CONCLUSION
Overall, Im very impressed with models quality and the motor, ESC, battery and radio that come with it. For the asking price, it is quite a bargain and, a very inexpensive way for you to get into the warbird scene. Who knows, maybe it will entice you to build a model that could be flown at a scale competition. Top Gun, anyone?
|
NitroPlanes, www.nitroplanes.com, (626) 369-2301 West Mountain Radio, www.westmountainradio.com, (203) 853-8080 |
