 Fly RC Magazine WE LIVE RC
Clean up mounting hardware for a more aerodynamic appearance
Like many modelers, I am always on the lookout for opportunities to add a little personal touch to help make a new project my own. Even withith the latest ARF, there is usually a chance to finesse a little something here or there to satisfy this itch and exercise a little craftsmanship at the workbench. One of my favorite places to enhance a project is when mounting the cowl.
| A lot of ARF vendors recommend drilling a cowl for screws to secure it to the fuselage sides, and you certainly cant blame them. The screws are inexpensive, and the process is quick. At the end of the day, it is a process that works, and works well enough for most pilots. As an inveterate fixer though, I cant leave well enough alone. First, heres my excuse to complicate the process.As easy as it is to screw the cowl to the fuselage and go flying, those screw heads never look scale to me. They also create a focused stress point if you happen to ever tip the model up on the nose, as I have been known to do from time to time. Even with a lightly-loaded slow-moving |  |
model, those bumps and knocks inevitably cause the screws to loosen, the screw holes get larger, the gel coat fatigues and cracks, and the cowl ends up looking a bit shabby before its time. My solution is to create internal mounts for the cowl that bear against the firewall for more support. It doesnt take too much extra time, and the results look much cleaner.
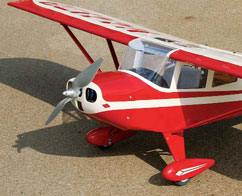 |
Mounting the cowl with internal screws cleans up the look of a model slightly, and provides much better support for the cowl. | 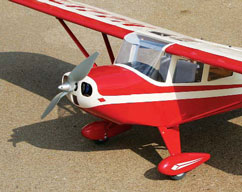 |
THE BASICS
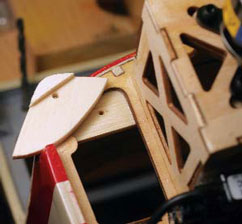
Start by checking the cowl fit, and ensure that it sits on the front of the model properly. I find the production quality of most ARFs is so high these days that I rarely need to adjust the cowl, but it is worth a few seconds to check. Next I remove the cowl, and start working on the mounts. There is nothing fancy here. I simply screw small tabs of scrap plywood to the firewall. The key is to extend these tabs so that they reach the outer edge of the fuselage, and then contour them to rest against the cowl. I find that a piece of 1/8-inch light ply about half an inch wide and about an inch long works well at each intended anchor point, though I sometimes create a larger piece that follows the cowl shape for more support. It really doesnt matter much, so the decision often becomes a function of how much bearing surface there is on the fuselage, or what structure might be in the way. What makes this process easy is that you can fit the tabs, and screw them in place, long before committing them to the cowl. If you dont like a part, toss it and make a new one that is right.
 |
 |
 |
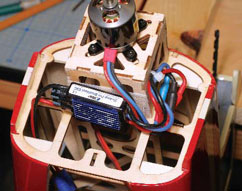
With so much material removed from the firewall of the E-flite Taylorcraft, I had to add anchors to secure the cowl. I glued a scrap of lite ply in each corner, then created anchor pieces to glue into the cowl. I glued a small shim to the upper cowl tabs to help support them when screwing the cowl in place. Dont forget the waxed paper, or some plastic wrap, to keep from gluing the cowl to the fuselage.
| Once you have the mounting tabs trimmed properly, reattach them to the firewall with a layer of waxed paper or plastic film to prevent gluing them to the firewall in the next step. Roughen up the inside of the cowl with some 80-100 grit sandpaper wherever the mounting tabs will be attached. Now position the fuselage vertically, mix up some 30-minute Z-Poxy, and apply it to each tab. Position the cowl on the fuselage as accurately as possible, with the engine or electric motor mounted to ensure that the propeller and spinner clearances are as you desire, and secure the cowl with masking tape. Once the epoxy cures, you can reach in through the front of the cowl with a screwdriver or hex driver, loosen the fasteners and remove the cowl. I then add angular braces to better support the mounting tabs. | 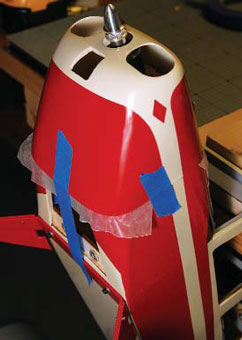 |
With all the plywood components in place, secure the cowl with tape, and apply epoxy to each mounting tab through the front of the cowl. Be careful not to glue the screws in place. |
You can also tape the cowl in place before mixing the glue, and then reach in through the nose with some epoxy on a scrap balsa stick. I actually prefer this method, as it reduces the epoxy that may smear about as I position the cowl. The downside is that this approach does make applying the epoxy more of a challenge. The biggest risk is accidentally gluing the mounting screws in place. This is why I dont recommend trying to drip CA down into the cowl instead of using epoxy to secure the tabs.
By gluing tabs and supporting brackets to the inside of the cowl, the cowl is much more securely supported, and will not suffer fatigue cracking at the screw holes. |
 |
VARIATIONS
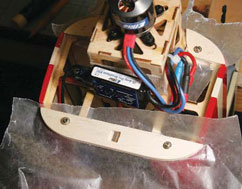
Like people, every model is a little different. Some of the newer electric models, such as the E-Flite Taylorcraft seen here, are designed with a latticed firewall for light weight and cooling airflow. This creates just a little extra work, as you will need to add some anchor pads to the firewall before you can create the cowl mounts. For some reason I felt compelled to install these pads on the aft side of the firewall. This meant also adding shims to the mounts to keep them secure when screwed in place. I could have glued these pads to the front of the firewall structure with a lot less effort. Next time.
As another example, the Maxford USA Gee Bee has five cubes molded in to the front of the fuselage to receive the cowl screws. Instead of drilling through the cowl and screwing into the sides of these cubes, I screwed the mounting pads to the faces of these ready made anchors and then glued the pads to the cowl.
| The Maxford USA Gee Bee has five cowl mounting tabs molded on the front of the fuselage. Instead of drilling through the side of the cowl, I glued 5 plywood pads to the cowl, and drilled two for mounting screws. | 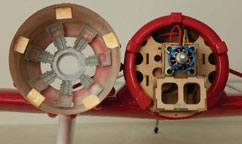 |
You can also vary the hardware you use. The original cowl screws are often too short to reach through the ply mounting tabs, so I usually swap them out with hex head servo screws from RTL Fasteners so I can use a ball driver to secure the cowl. I also often use locating pins and just one or two screws to hold a cowl in place. You can even swap rare earth magnets for the screws, as long as you have an indexing pin to keep the cowl from sliding around.
CONCLUSION
I prefer this installation technique over exterior screws because the cowl has much more bearing surface that spreads any stresses over a larger area. Yes, it does take more time, but the clean look and stronger mounting makes it worthwhile in my book. Both of these models have been up on their nose more than a few times, and the cowls remain like new. The next time you are assembling a new model, consider for just a moment whether this model is worth a little extra effort. I think you will find the results quite satisfying, and the time well invested.
Links
E-flite, distributed exclusively by Horizon Hobby Distributors www.horizonhobby.com (877) 504-0233
Maxford USA www.maxfordusa.com (562) 802-0680
RTL Fasteners www.rtlfasteners.com 800-239-6010
Z-Poxy is manufactured by Pacer Technology www.zapglue.com
