 Fly RC Magazine WE LIVE RC
One of the hardest aerobatic maneuvers to fly is the straight line. Im guessing you think I must be kidding, so Ill ask that you go out and give it a try. Fly a perfectly straight line with no variations in altitude or heading from one end of the field to the other. Not so easy is it? Now fly that perfect line straight upwards while correcting for wind, and then throw a snap roll exactly in the middle of the line. I suspect youre starting to see why I consider flying a straight line to be one of the hardest maneuvers to fly well. In this article, well learn how to fly perfectly straight, wind-corrected lines and apply that to flying a combination aerobatic maneuverthe sharkstooth.
HOW DOES IT LOOK?
That is possibly the most important question any aerobatic pilot can ask. How does it look? From a full-scale competition aerobatic perspective, one of the hardest lessons to learn is that it doesnt matter how a maneuver “felt”; rather, all that matters is how a maneuver looked from the ground. This is the main reason that aerobatic pilots use other pilots/judges to critique their flying from the ground. Model aerobatics are much easier to critique because they are always viewed from the ground by the pilot as well as the judges.
So the next question is “How is it supposed to look from the ground?” In previous articles, weve discussed the idea of symmetry, which is the concept that all looping sections in a particular figure should be perfectly round and the same size. Symmetry also dictates that all rolling maneuvers flown on straight-line segments should be placed exactly in the center of that line. In this article, well add wind-correcting lines to our list of desirable aerobatic styles. An important note: you do not need to be an aspiring or current competition aerobatic pilot to adapt and integrate these “competition” skills into your daily flying. Everyone from beginners to experts has room for a little more precision. I think youll find that challenging yourself is not only fun but also quite rewarding.
WIND-CORRECTED LINES
As you undoubtedly know, wind affects the flight path of your model airplane. When flying in a headwind or tailwind, the models ground speed is different from its true airspeed. When viewed from a fixed position, it looks as if its flying at different airspeeds faster in a tailwind and slower in a headwind. Conversely, when flying in a crosswind, the model will drift downwind. I hope youve learned to compensate for wind while flying takeoffs, landings and general landing patterns by crabbing (and slipping during the landing flare.)
Crabbing, i.e., turning the model slightly into the wind to compensate for a crosswind, is the recommended technique for level flight during both normal and aerobatic level flight. We also wind-adjust each aerobatic maneuver to more closely resemble a perfect shape during aerobatic flight.
The focus of this section is adjusting vertical uplines and downlines adjusted for wind. Imagine your model flying a straight and level line into a headwind followed by a pull to a perfectly vertical upline. When the model is flying absolutely straight up, it will begin to drift backwards slightly because of the headwind in the box. Instead of allowing the model to drift, we incline the vertical line slightly towards the wind to counter the drift. In a strong wind, this may require as much as 5 to 7 degrees of cant into the wind. The goal in model aerobatics is to have its flight path (not the models attitude) be absolutely perfect, and this requires that we adjust the models attitude.
The next example is flying the same pull to a vertical upline with a crosswind. As youd expect, an upline with a perfectly vertical attitude in a crosswind would result in the models drifting downwind, or with the wind. To compensate, well yaw the model slightly into the wind to maintain a perfectly vertical flight path. In short: focus on your models flight path, and adjust its attitude as required to compensate for any wind.
One additional note: as the model slows on a vertical upline or accelerates on a downline, you will have to change how much correction you make because of the changing airspeed. In a strong wind, it is not uncommon to be constantly correcting the line both for gusts and for changes in airspeed.
FLYING THE SHARKSTOOTH
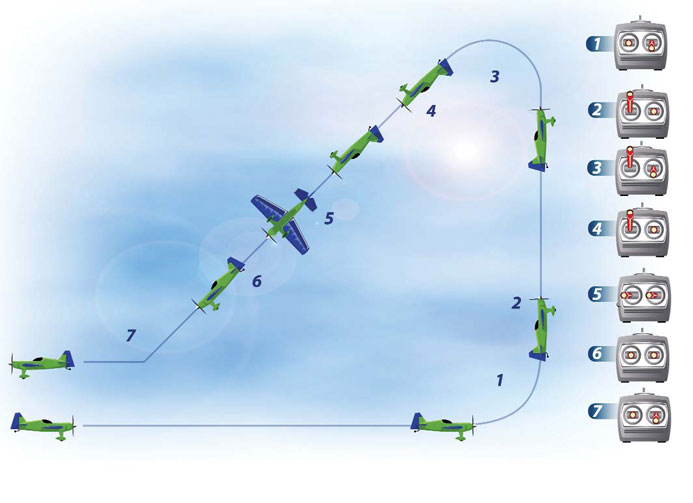
Named for its obvious figure shape, the sharkstooth makes a great turnaround or end-box maneuver. It is not only very simple to fly, but it also looks great and is a nice variation on the standard half Cuban-8 turnaround. Because of its long straight upline, it is also a great maneuver to practice wind correcting vertical lines.
The sharkstooth, in its most basic form, is nothing more than straight-line segments connected by looping segments with a half roll thrown in. The maneuver lends itself nicely to additional rolling elements on the line segments and changes in positive versus negative looping sections, so it really is quite versatile. For simplicity, we will look at a traditional sharkstooth with all positive (up-elevator) looping sections and finishing with a half-roll transition back to upright flight.
Begin from a level line with a pull to vertical. As you pull, focus on adjusting the rudder as necessary to ensure that you reach the vertical attitude perfectly straight with the wings level to the horizon. Most airplanes will require slight right rudder during the pitch change. As you reach the vertical, smoothly reduce the up-elevator input, and start looking for drift from the wind. This is your chance to practice the wind correction techniques mentioned above. If the model drifts towards or away from you, adjust the pitch attitude with the elevator. If the model drifts upwind or downwind, adjust the yaw attitude with the rudder. With a quartering headwind or tailwind, you will likely need to adjust both simultaneously!
As the model slows, add slight upelevator to pitch the model towards an inverted 45-degree downline. Be sure to focus on adding rudder as necessary to keep the nose tracking in the same vertical plane. This will ensure that you finish the maneuver at exactly 180 degrees from your starting heading. Neutralize the elevator input as you reach the inverted 45-degree line. Depending on your elevator trim setup and CG location, you may need slight down-elevator to hold the 45-degree line. Next is the half roll back to level. I find most models require only aileron rolling from this position to upright, but be sure to coordinate the rudder if your model rolls slowly or seems to require it for an axial roll.
In a perfect world, the half roll would be at the exact center of the 45-degree line. One good technique for centering rolls is to verbally or mentally count the elapsed time between each element of the figurehitting the line, starting the roll, and finishing the 1/8 loop back to level. It might sound like this: one, two, three, roll, four, five, pull. The difference in timing before and after the roll is to compensate for the increased airspeed later in the 45-degree line. Remember that the roll should be at the center of the line drawn.
Finishing the maneuver, add elevator to fly a smooth 1/8 loop back to level flight. One item I didnt touch on earlier is throttle control. Most current aerobatic models have far more power than is necessary to perform traditional aerobatic maneuvers such as the sharkstooth. Unless its necessary for performance, I see no need to fly the maneuver at full throttle. If you have an overpowered setup, be sure to reduce the throttle on the inverted 45-degree line to avoid having unnecessary airspeed.
COMMON MISTAKES
- Poor yaw and pitch control during the vertical upline; results in maneuver being dramatically off from vertical.
- Poorly centered half roll on the 45-degree downline.
- Wallowed or dished out half roll.
- Poor heading control during the maneuver. You should finish at exactly 180 degrees from your entry heading.
CONCLUSION
The sharkstooth is an extremely versatile aerobatic maneuver and a lot of fun to fly. It combines several relatively easy aerobatic elements into a more complex maneuver that though still easy to fly can be challenging to fly well. I hope you find the same joy in perfecting this aerial ballet as I do. Until next time, remember: aerobatics make the world go round.
