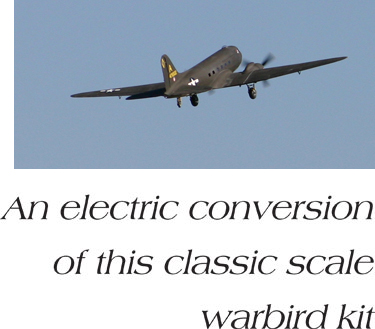
An Elecric Convesion Of This Classic Scale Warbird Kit |
 |
As a 6-year-old, I watched American Airlines DC-3s on approach to Bostons Logan Airport and knew that someday, I would need one of my own. During my modeling career, I have always been aware of Top Flites Gold Edition DC-3 kit (TOPA0500), but I have always been aggressively involved in RC scale competition flying, so I didnt pay much attention to it. Even with a wingspan of nearly 7 feet (82.5 inches), its a bit small for Top Gun-level competition. Moreover, the kit is labeled as beingclose to scale (not exact scale) with a few subtle modifications to provide easier/safer flight characteristics.Recently, I considered that as I am no longer doing much competitive flying, theclose to scale thing doesnt matter that much anymore. I thought it would be fun to build something like that without having to worry about solving onescale problem after another and whether the static judges would notice what I had missed fixing.
THE GOLD EDITION KIT
This kit has been on the market for a while, so I wont review the product. Instead, Ill concentrate on what I had to do to turn the stock Top Flite DC-3 kit into a successful electric-powered model. I will also explain the changes I made to finish it as a C-47 and to enhance its appeal as a super-scale model.
|
|
 |
 |
SPECS
PLANE Top Flite Gold Edition DC-3
MANUFACTURER Top Flite
DISTRIBUTOR Great Planes/Hobbico
TYPE RC scale
FOR Advanced builders/fliers
WINGSPAN 82.5 in.
WING AREA 750 sq. in.
WEIGHT 168 oz.
WING LOADING 32.25 oz./sq. ft.
LENGTH 55.5 in.
RADIO Minimum of 4 channels required for basic model; flown
w/Airtronics RDS8000 FHSS 2.4GHz transmitter & 92824 8-channel receiver; 7 channels used; 7 Airtronics servos used2, 94358Z (rudder & elevator), 5, 94761 (ailerons, flaps & retract gear switching); 1 Airtronics 4-cell 750mAh Ni-Cd
POWER SYSTEM 2 GP ElectriFly Rimfire 35-48-850 brushless outrunner motors, 2 ElectriFly SS 60 ESCs, 2 ElectriFly 4S 3200mAh 20C LiPo packs, 2 3-blade, 11.9-in.-diameter VarioProp propellers
FULL-THROTTLE POWER 42 amps, 620 watts/motor; 1240 watts total; 7.4 watts/oz., 118 watts/lb.
TOP RPM 9,350
DURATION Estimated 10 min.-plus cruising comfortably at 1/2 throttle;
no aerobatics or abrupt maneuvers
MINIMUM FLYING AREA Large developed RC field w/well-maintained grass or paved runway
COMPONENTS NEEDED TO COMPLETE Motors, batteries, ESCs, radio, covering & finishing |
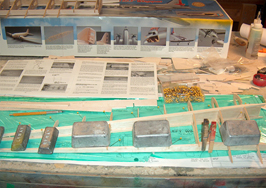
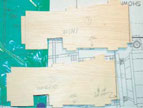
Lead weights and clothespin clamps keep the basic wing structure in line while the glue dries. I use Titebond aliphatic resin wood glue rather than CA for more strength and working time. |
With all the servo wires and lighting-system wires in place and the Robart air tank, control valve and pullthrough strings for the ESC wires installed, the wing center section is ready for top sheeting. |
|
With todays brushless outrunner motors and lithium-polymer (LiPo) batteries, I was able to build this airplane without any material substitutions or structural lightening, and with the motors I chose, the model gets into the air from our very ordinary grass strip runway before I can ease the throttles wide open. And I fly for 8 or 10 minutes without worrying about the batterys charge, and I land with power in reserve.
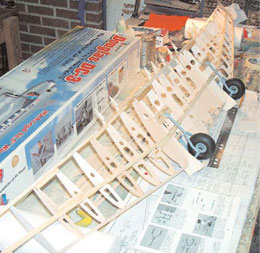
The instruction manual is excellent. Every step is explained clearly, and there is a lot of supplemental information. I began by building the airplane exactly per the instructions, and I didnt have any problems with the balsa quality or the cutting. The supplied balsa is just heavy enough to do the job, and the laser-cut parts fell out of the sheet cleanly with just the touch of a fingertip.
CHANGES FOR ELECTRIC POWER
I replaced the nitro engines with a pair of Great Planes/ElectriFly Rimfire 35-48-850 brushless outrunner motors. They operate through two ElectriFly Silver Series 60 ESCs that control two independent ElectriFly 4S 3200mAh 20C LiPo battery packs. For access, I added a top hatch to the fuselage. Support equipment consists of one ElectriFly PolyCharge 4 LiPo charger and a pair of Equinox LiPo cell balancers, which I use during every battery charge.I had to make one important change in the otherwise standard electric power system. As far as Im aware, every manufacturer of ESCs recommends that the wire leads that connect the ESC to a battery not be altered. In most scale models, that wouldnt be a problem, but with this one, it is.It was easy enough to mount an ESC in each nacelle directly behind the motor it controls to ensure a good cooling airflow, but the wings structural design and the landing gears position make it impossible to put anything else in there. Structural issues aside, the LiPo packs have to go as far forward in the fuselage as they can go to balance the airplane, but the power leads are too short. I had to change something, so I conferred with the technical department at Great Planes. They agreed that my best choice would be to lengthen the battery-pack leads, and they explained that the trick to making this work would be to keep both extensions exactly the same length and to use the heaviest possible wire gauge to minimize added resistance. I made a separate 12-inch extension of 12- gauge wire and Deans Ultra connectors for each motor circuit and plugged them in between the existing pack connectors and the ESC leads. It worked great on my airplane. |
 |
The Top Flite engineers invested a great deal of effort in designing out two common sources of danger for multi-engine scale models: downthrust and out-thrust. To give each engine several degrees of downthrust, the firewall/engine-mounting plates were set at an angle to minimize the tendency for models such as this one to nose up sharply when full power is applied for takeoff. They also built in several degrees of out-thrustleft offset on the left engine; right offset on the right one to prevent severe yaw and probable loss of control in the event of an engine failure.
I gave this one a lot of thought. For me, the odd propeller appearance that would result from this thrust offset would matter. I already knew from a lot of experience that I could deal with the downthrust. Full-size DC-3/ C-47s do it every time they fly. The pitch (elevator) trim control wheel has a clearly marked takeoff setting, and confirming that the trim is set correctly is on every preflight checklist. I am not comfortable with the idea of manually adjusting the elevator trim on my transmitter immediately after every takeoff, but thethrottle-to-elevator mixing function of my Airtronics RDS 8000 system made it easy to program in a touch of downtrim at high throttle settings. |
The framed-up wing with the Robart retract units in place and ready for the sheet-balsa lower skins. |
|
The basic engine nacelle structures are made with laminated balsa sheets and light-ply parts. This shows where I have marked for the cuts that will eliminate the downthrust I elected to remove. |
The out-thrust issue exists in response to the probability that sooner or later, when a glow-powered airplane is flying, one engine will quit before the other. The left-right offset makes the pilots job in an engineout emergency much less critical, but it has an effect on scale appearance thats hard to ignore. I chose to bet on the reliability of my ElectriFly electric power components to keep me out of trouble.
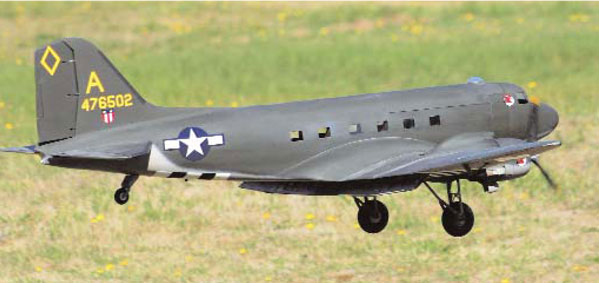
SCALE STUFF
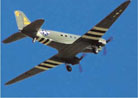
I found a full-size C-47 at the McChord Air Force Base Museum about 25 miles from where I live in western Washington state. That airplane is actually a TC-47D restored to represent a C-47Athe definitive WW II version of the airplane. That aircraft served during Operation Dragoonthe Allied invasion of southern France from the Mediterranean coast in the region of Marseilles in August 1944. Those strange, bottom- only, black-and-white invasion stripes were, in fact, standard-issue markings for Dragoon. |
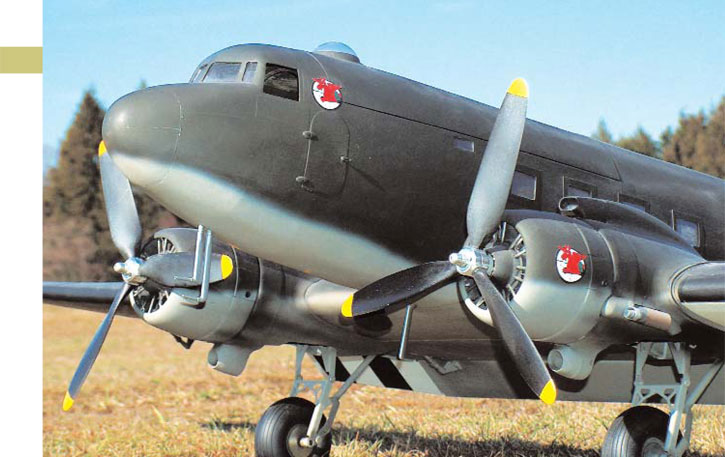
One of the Rimfire 35-48-850 brushless motors in place on its ElectriFly medium motor mount and ready for the cowl. |
|
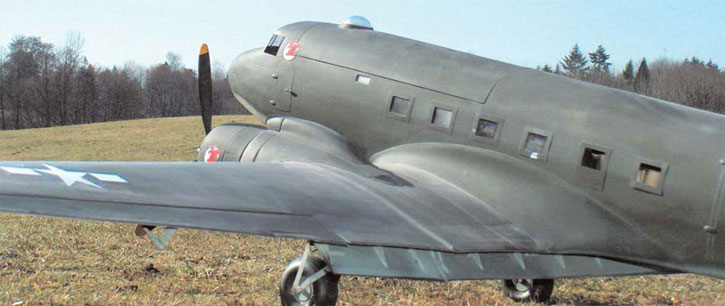
To turn my DC-3 into a credible miniature of McChords pseudo- C-47A, I had to change the overall color from aluminum to olive drab and gray, remove the airliner tail cone fairing (to allow access to glider tow fittings on C-47s), replace the left/front cabin window with a tiny navigators station window, make a navigators sighting dome and add the wide, military cargo door at the left rear. A lot of C-47s were DC-3s that had been confiscated from civilian airlines and converted. Depending on the airline that had operated it, specific details of cabin window arrangement, door position, engine-cowl shape, air intakes, exhaust stacks and antennas varied widely from one DC-3 to another, and a lot of these variations followed the airplanes into military servicewith one exception: all the details on my models engine nacelles are specific to my museum aircraft and might not apply to the model you choose to build.
The kits molded-plastic engine cowls have the trailing-edge cowl flaps molded in the open position to provide good cooling air exit for glow engines. Regardless of whether an electric conversion is finished as an airliner or a C-47, the cowl flaps have to be rebuilt in a closed configuration so that air will be forced to exit through the wheel wells to provide sufficient cooling flow across the ESCs in the nacelles mid-section. |
 |
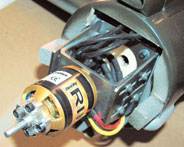
The main structure of theno. 2 (right) nacelle with the ElectriFly SS-60 ESC temporarily installed to check clearances. When the nacelles are finished, I will pull the wire leads in through the wing by pulling on that yellow string. Right: theno. 1 (left) nacelle, all finished and ready for the ESC to be installed by pulling the bundled wire leads through to the wing center section. The rectangular blocks are for the cowl-attachment screws (original kit design). |
|
|
|
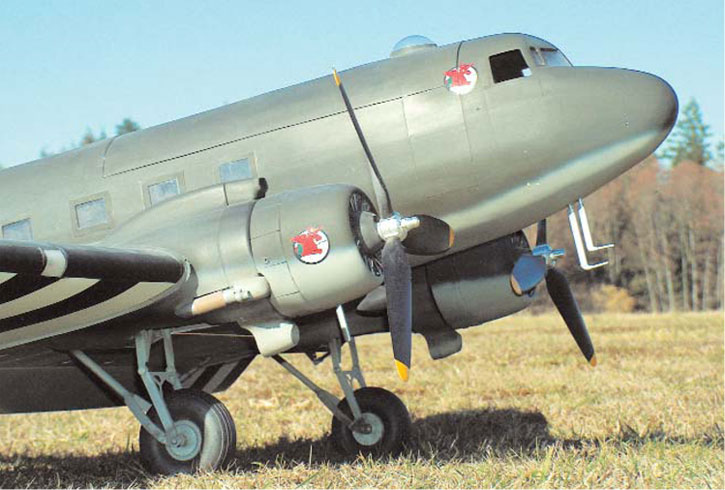
| After going to all that trouble to make the propellers in the correct shape, it was an easy call to add one final touch: VarioProp adjustable-pitch multi-blade propellers for e-powered airplanes. Theyre made in Germany, and one of the U.S. distributors, E-Flightline Hobby in Port Orchard, WA, is about an hours drive from where I live (which made the decision to use them easier). I used a pair of the size 8B 3-blade hubs fitted with 11.9-inch scale profile blades. Trimming 1/4 inch off each blade, rounding each tip to match the fullsize blades and rebalancing them gave me a pair of 3-blade propellers that look nearly perfect and fit the nacelle-to-fuselage clearance exactly. So far, my best performance has been with a blade-pitch setting of 8 inches. |
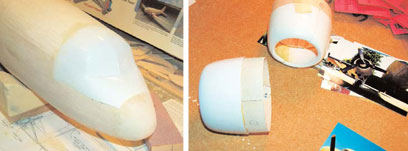
When you sand all the sheets, strips and blocks to blend with the molded-plastic cockpit enclosure, it starts to look exciting. Right: I added a collar of 1/32-inch plywood to the base of each nacelle and attached the separate cowl flaps in the closed position over them. |
|
 |
I sent photos of the McChord AFB C-47s 4th Troop Carrier Squadron insignia to Michael Gross at Red5 Design Inc. He made a set of pressure-sensitive vinyl markings that match all those on the full-size airplane, but once I had started the scalegoodies, I couldnt stop there. The image of a tough old C-47 switching on its landing lights as it turns onto final approach was too much to resist. I got a complete set of working LED lights from Dan at Lazertoyz Discount Electric RC Supplies, and now my C-47 flies with three-position red, green and white navigation lights, a flashing red beacon on its belly and dual wing landing lights that can be turned on and off by an auxiliary channel switch on the transmitter. |
|
I covered the model with balsa sheet exactly according to the instructions, and then primed the entire structure with non-tautening clear nitrate dope from AeroDyne. I then covered the control surfaces open structure and the entire sheeted structure with traditional silkspan (heavy tissue) applied wet and using dope as the adhesive. I sealed everything with several more coats of dope and then a talc-dope primer. I finish- sanded everything on the airplane obsessively and aggressively! I added all the surface color using Stits PolyTone color from Stits Lite by F&M Enterprises.
FLIGHT REPORT
An airplane like this should be flown within its scale performance envelope. There are two keys to accomplishing this: power and discipline. Power means selecting a motor/battery/propeller combination that produces only enough thrust when wide open to permit an aggressive climb, and then using just enough of that power to fly the airplane in a way that makes you think |
of a lumbering WW II-era transport. Discipline means remembering that this is a C-47 and not a P-47.
The DC-3/C-47 should always look as though it should be going a little faster by RC model standards; a climb should look as though the airplane is working really hard to maintain it. Two parameters that full-size pilots never forgot were the standard rate turn (360 degrees in 2 minutes) and the maximum bank angle (15 degrees). Any maneuver in which the angle of bank exceeds 30 degrees would be considered aerobatic and was not approved for these airplanes. That doesnt account for some of the things wartime pilots had to ask their C-47s to do to get out of trouble, though. If you keep those full-size limits in mind while flying, I can pretty much guarantee that the spectators will be telling one another how realistic it looks, even if they dont know why. The instruction manual recommends a half-flap extension (20 degrees) for takeoff. I agree. I have enough experience flying scale models for it to be natural for me to ease the throttle open for takeoff. My C-47 breaks ground at a safe airspeed just as the power is coming up past 1/2 throttle. |
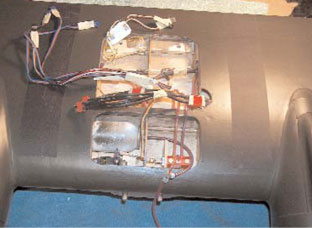
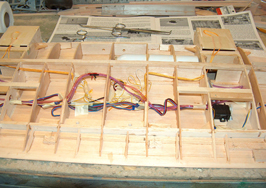
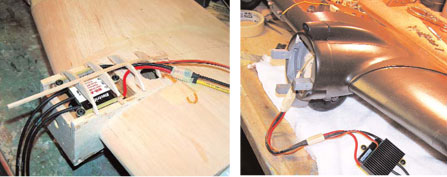
This is the wing center section with everything in place. The black two-wire leads with Deans Ultra connectors run from the two LiPo packs in the fuselage to the ESCs in each motor nacelle. The white cylinder is the Robart retracts air tank. The red Robart selector valve is visible at the lower right of the opening. Theextra white thing at the top on the left is the Lazertoyz lighting-control module. |
|
Controlling any excursions in pitch with a little subtle stick input seems like a very natural thing to do. After a couple of flights, I removed the throttle-elevator trim mix entirely.
So far, I have not experienced what having a motor failure feels like. If you build this model with electric power and you trust your ability to set up a reliable motor installation, you probably dont need the out-thrust feature. If you use glow engines, dont change it. Whether or not you take advantage of the downthrust or remove it in the interest of esthetics will depend on your ability as a pilot and how much surplus power you built into your model with your choice of motors and propellers.The instruction manual offers useful flying tips: study that material carefully, as theres a lot of great information packed into those few paragraphs. I must emphasize one characteristic of this model: this DC-3/C-47 will spin if you let it get into an uncoordinated turn at low speed. This means allowing adverse yaw, i.e., the nose points away from where you have told the ailerons you want it to go, or not using enough coordinated rudder as you bank and turn the airplane. The airplane also responds nicely to standard spin-recovery techniques if you know how to apply them.
Things like this are part of the challenge of flying a scale model of a complex airplane. I made sure that my C-47 wont be able to get ahead of me by making two subtle adjustments: I set the ailerons mechanically for differential throwmore updeflection than downand programmed in aileron-to-rudder coupling that is always on when I fly.
DEBRIEF
I hope this will help you if you decide to build this great Top Flite Gold Edition DC-3 kit or convert it to electric power. You wont have to go all-out with the detailing as I did, but it does add scale realism. Even though it only has a close-to-scale outline, it stills catches everyones eye and garners many compliments. Im very pleased with the results. |
Links
|
 Fly RC Magazine WE LIVE RC