 Fly RC Magazine WE LIVE RC
Traditional Techniques To Enhance Any Scale ARF
|
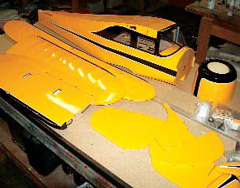
Here’s the SIG WACO SRE after I finished my scale-out and electric conversion. It’s the same airplane… BUT… there are subtle changes everywhere you look.
|
Fly RC is thrilled to bring you this article, the first of many planned features from Bob Benjamin on traditional modeling topics. Benjamin is well known as an exacting craftsman and successful scale competitor, as well as noted author. His recent title, Hey Mister, Will it Fly? , is a captivating account of his modeling career, culminating in being the first to successfully campaign a giant scale electric model at the highest levels of competition. While Benjamin features the SIG Waco in this article, the techniques he describes are universal and can be applied to most ARFs with a wood structure. We may not all share his workshop talents, but it is our hope that you find yourself inspired by this article and consider your next scale ARF not as a final product, but instead as a springboard for your own creative expression. For more on Benjamin’s book and his modeling, be sure to visit his workshop at www.rcmodel.com. The editors
caling Out? What is that? It offers a new category of RC model maybe, and certainly a super way to increase your modeling skills without taking the deep plunge into scarycomplex building from traditional kits or even plans. Im not sure who invented the term, but caling Out has come to mean choosing an RC scale ARF (Almost-Readyto- Fly) airplane, stripping it down to bare balsa, modifying and adding details here and there to bring it closer to an accurate scale appearance, and then re-covering it, often with a more realistic painted finish in place of the original plastic film.
 Out of the box it looked like this.
The SIG Waco SRE ARF is an impressive 1/6 scale rendition of a classic Waco cabin biplane from just before World War II. With an upper wingspan of 69.5 inches, a fuselage diameter at the firewall of nearly 8 inches, and a predicted flying weight on the order of 10 pounds with a .90 to 1.20 4-stroke engine, this is a model to be taken seriously. So, why would you want to change anything?
There are plenty of good reasons aside from my conversion to electric power and the obvious change from plastic to fabric covering. There are dozens of subtle external features that were eliminated from the ARF design and as many details of cross section and outline that were simplified in the interest of economy. This is not to fault SIG in any way. A truly scale ARF would be exorbitantly expensive to produce, and a very tough sell. Economics demand that a cale ARF be “good enough for the market, yet still be affordable for most. If you have the desire and some time to invest, you can fix as many of those scale shortcomings as you like, developing the required skills along the way.
The first step after deciding what would be changed was to strip off all the plastic covering.
The first step was to get my hands on some reliable three-view drawings as well as photos of one specific WACO SRE that had the colors and markings I wanted to replicate. In my opinion there is only one place to go for this kind of thing…I got in touch with Bob Banka at Bobs Aircraft Documentation and ordered a full set of drawings as well as Foto Paak No. 1206/28 detailing the full size Waco NC 247E.
DECISIONS, DECISIONS
Right away there were decisions to make once I had Bankas documentation in hand. To transform any ARF into a truly accurate competition scale model it would be necessary to change just about everything and start from scratch. What should I change on this model to improve scale appearance and what should I leave as I found it in the interest of practicality?
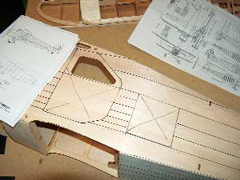 Use your scale drawings as a guide to laying out the positions of the fuselage stringers, door outlines, and any other surface details you choose to incorporate.
For starters, I got rid of all the exposed external servo mountings and put the servos back inside where I feel they belong on a scale job. Like all the classic cabin Waco designs, the SRE featured a stout, deep fuselage subtly rounded out with lots of stringers. I brought those back and then added representations of the sheet aluminum nose skins just behind the radial cowl and the cabin and baggage doors as well. I modified the windshield attachment so it looks like part of a real airplane, not just a chunk of clear plastic stuck on as an afterthought, and included a dummy scale radial engine where the stock ARF shows no hint at all of engine detail. I did some research and came up with an authentic paint scheme featuring colors that are way different from what comes out of the factory-standard box. I filled out the Plain-Jane flat horizontal and vertical tail surfaces to represent the fat, symmetric full scale airfoils, I added some fabric covering details that are characteristic of most Waco airplanes, and then just to make myself feel good, I also included some interior detail and an instrument panel.
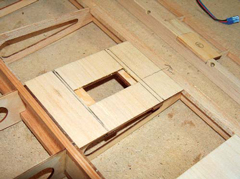 This is the stock flap servo mounting plate as it appears with the covering removed.
GETTING STARTED
What comes first? Once I decided what changes I would make, it was time to determine what would have to be removed from the stock airplane. On the SIG Waco all I had to do was remove the pre-applied film covering. Next it was time to study the instructions to decide where I might have to depart from the ARF assembly sequence to make everything go together the way I wanted it to.
The ARF instructions tell you to first assemble the horizontal and vertical tail surfaces into the fuselage. I had decided to modify these parts by adding 1/8-inch strips of balsa to match the full scale ribs and thus fill out the airfoil section by about 1/4-inch on each surface. 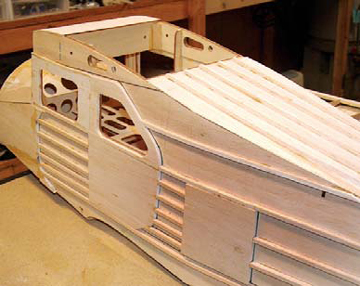 These strips would then be block sanded to an airfoil shape. This would have been easier to do prior to assembly, but with the thicker horizontal stabilizer would have necessitated cutting new mounting slots in the fuselage and risked altering the incidence, so I glued the stock tail surface in place and then added the ribs.
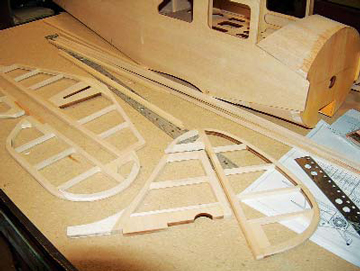
Here all of the stringers as well as the cabin and baggage door as well as the fill-in sections around the windows and behind the firewall are all in place. I used soft 1/4 inch balsa sheet for the panels and stripped 1/4 inch square balsa for the stringers. None of the new stuff has been sanded to final contour yet.
Just as obvious as the ARF flat tail surface sections is the absence of any fuselage stringer detail. The fuselage sides and top come dead-flat and thats not what a WACO SRE is supposed to look like. Using the various drawings I got from Bob Banka I drew all the stringer positions along with the locations of the cabin and baggage doors as well as the lines where sheet aluminum meets fabric covering on the full scale airplane.
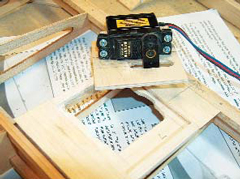
This is the left flap servo on its mouting plate.
My best job of extrapolating from the drawings suggests that the stringers need to be about 3/16-inch wide and that a depth of 1/4-inch provides a good approximation of the rounded out contours. I stripped the necessary stringers and the various door panels and sub-cowl nose fairings from 1/4-inch balsa sheet. Relatively soft (light) balsa was best for this job, to permit easy sanding of everything to an accurate finished contour as well as to save weight. Strength was not as issue since the pre-existing fuselage structure would still carry all the important loads. There is no way for me to explain exactly how to carve and plane and sand all that added fuselage structure into the right shape. You will have to study your documentation to understand the subtle details of what is happening to and get it right on your own. A sanding block and razor plane will quickly shape the revised structure. If you go too far, you can always add a sliver of wood back onto a stringer and start again to get it right. That is a large part of what building scale model airplanes is all about.
RADIO REINSTALLATION
Perhaps the most obvious revision I made was to move the elevator, aileron and flap servos inside the airplane. There is already provision for mounting the rudder servo on a plywood tray in the cabin area. Putting the elevator servo next to it was only a matter of drilling the appropriate screw holes and then making up a new, full length pushrod to the elevator. I replaced the furnished elevator horn with a custom made unit that includes a ball link extension and permits the pushrod connection to be on the centerline,
 The rudder is controlled via a closed loop cable per the standard ARF instructions. The external elevator servo has been moved inside the cabin area (where it belongs) and connected by a push rod made from 1/4 inch carbon fiber tube and a 4-40 ball joint rod end hardware that is concealled in the fuselage.
inside the fuselage. Redesigning the flap and aileron servo mountings was a bit more involved. In the ARF setup, all four servos are intended to be mounted to 1/8-inch plywood frames that form part of the bottom wing surface. I cut away a section of each frame, fitted a new base plate into the opening recessed 1/8-inch from the outer surface, and then made new plywood servo mounting plates. These screw to the base plates and fit flush with the covering. Check out the photos… its easier to show than it is to tell.
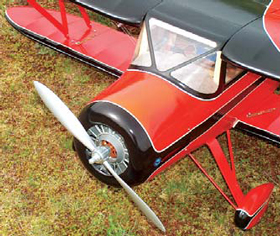
This is the business end of the airplane, ready to fly. The stock kit cowl is attached exactly per instructions. The dummy P&W 450 radial engine was built from a Frank Tiano Enterprises 1/6 scale generic resin casting. The propeller in this shot is the VarioProp 2-blade “C” hub with 15 in. diameter scale blades set at 8 in. of pitch.
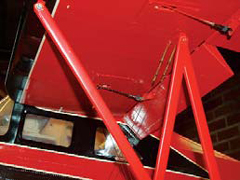
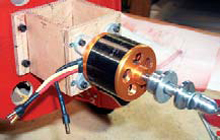
Next comes figuring out a way to mount an electric motor. The ARF WACO is designed for four-stroke glow power and comes with an excellent engine mount ready for assembly. I was not able to adapt that mount for use with the high performance Scorpion 4025-12 brushless outrunner motor from Innov8tive Designs that I chose. I measured the required stand-off distance to align the motor with the standard kit cowl and built a simple open box mount of 1/4-inch aircraft plywood reinforced with countersunk 5/8 inch flat head wood screws. To mount the FMA RevoLectrix 6S 5300mAh LiPo motor battery, I trimmed out a portion of the forward fuselage cabin former and then extended the existing radio battery tray all the way to the inside of the firewall with a piece of 1/8 inch aircraft plywood. I boxed it in by adding side walls of 1/4 balsa sheet to prevent the pack from shifting to either side under flight loads, then added a strip of sticky-back Velcro to the plywood floor.
Heres what the complete flap and aileron servo installations look like. You can see the sheet metal attachment screws at the corners of each mounting plate.
The Scorpion Commander 90 amp ESC mounts with a strip of Velcro on the fuselage floor beside the battery mounting box. With the unit in that position the three motor leads extend forward through one of the cooling holes in the firewall and the input and signal leads easily reach their respective battery and receiver connectors. The unique Scorpion IR (infrared) receiver unit plugs directly into the radio receiver and can be mounted alongside using more Velcro, where it is easy to access with the IR keypad. Both the IR receiver and the keypad are supplied with the ESC.
Now is your last chance. Take some time to make sure everything fits, everything works, and that everything is sanded to your desired finished shape and as smooth as you can get it before you begin finishing. I used the Stits Poly-Fiber covering process to get a realistic finish, but well get to that in part two, along with detailing the radial engine from FTE and flying the finished model.
|
The FMA CellPro 10s charger is the best LiPo charging setup I have owned. There is far more to say about it than I have room for here…check out the FMA website at: www.store.revolectrix.com/Products/BLACKLabel-LiPo-Batteries and www.revolectrix.com/10s_charger.htm for lots of additional data on both these products. |
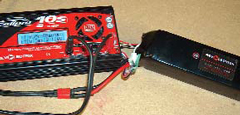 I got my very first LiPO cells from FMA Direct and they are still my preferred source of batteries. The Revolectrix 6S 5300mAh Black Label pack I chose for this project weighs 29 ounces, which is comparable to the weight of a full tank of fuel. In any event it turned out to be not heavy enough…in the end I had to add weight to the nose to achieve the balance I wanted.
|
|
 I chose to use the Scorpion 4025-12 in the SIG Waco, running on a 6S LiPo pack and turning several props ranging from 15×8 to 16×8. This combination turns out way more than enough power to fly the model with real authority, and way outside the scale performance envelope if you want to do that. However, if
 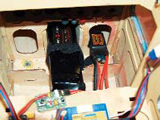 you prefer to fly in that Golden Age Classic style for which this model was designed, you can expect flight times well in excess of ten minutes with serious reserve power for those bad moments. Another benefit is that the motor battery and ESC will barely be warm at the end of a flight.
|
PLANE: Waco SRE ARF MANUFACTURER: SIG Manufacturing Company, Inc. DISTRIBUTOR: SIG TYPE: “Golden Age sport scale cabin biplane ARF FOR: Intermediate or better pilots WINGSPAN: 69.5 / 48.3 in. WING AREA: 756 / 354 sq. in. (1110 total) LENGTH: 56.5 in. DESIGN WEIGHT: 10 lbs. DESIGN WING LOADING: 20.75 oz./sq. ft. DESIGN WING CUBE LOADING: 7.48 FINALWEIGHT: 13.25 lbs. FINAL WING LOADING: 27.5 oz. / sq. ft. FINAL WING CUBE LOADING: 9.9 RADIO: 5 channels required; flown with Airtronics RD8000 72MHz transmitter, Airtronics 92777 receiver and 7 Airtronics 94757 Digital servos radio powered via Scorpion Commander ESC POWER SYSTEM: .90 – 1.20 4-stroke or .75 – .90 2-stroke recommended; flown with Scorpion 4025-12 brushless outrunner motor, Scorpion Commander 90 amp ESC and FMA Direct Revolectrix 6S 5300 mAh LiPo battery FULL THROTTLE POWER: VarioProp 15×8; 67 amps, 1474 watts, 6.95 W/oz., 111.4 W/lb. TOP RPM: 9,500 FULL THROTTLE POWER: Custom 17×6 wood prop; 65 amps, 1430 watts, 6.75 W/oz., 108 W/lb. TOP RPM: 7,000 DURATION: 10+ minutes MINUMUM FLYING AREA: RC club field COMPONENTS NEEDED TO COMPLETE: A scale-out is a custom conversion and as such will require the experienced modeler to make his/her own decisions regarding hardware and accessories. The list of items required provided in the instruction manual serves as a good starting point. |
|
Airtronics, distributed exclusively by Hobby People, www.airtronics.net , (800) 854-8471 Bobs Aircraft Documentation, www.bobsairdoc.com , (714) 979-8058 Callie Graphics, www.callie-graphics.com , (505) 281-9310 E-Flightline Hobby, www.e-flightline.com , (877) 252-2653 F & M Enterprises, www.stits.com , (817) 279-8045 FMA Direct, www.fmadirect.com , (800) 343-2934 FTE, Inc., www.franktiano.com , (863) 607-6611 Innov8tive Designs, www.innov8tivedesigns.com , (760) 468-8838 SIG Manufacturing, www.sigmfg.com , (800) 247-5008 |
