 Fly RC Magazine WE LIVE RC
Rule The Sky This Weekend!
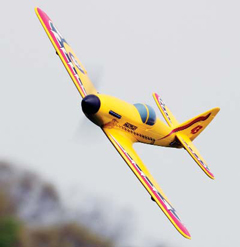
Multiplex is well known for their line of precision molded foam RC airplanes, including easy-flying trainers and gliders, twin-engine transports, seaplanes, nimble aerobats and high-performance sport flyers. The new DogFighter brings the excitement of WWII style aerial combat and post-war air-racing to the Multiplex lineup. While not a scale model of any one particular historic aircraft, with a little personalization it can easily it resemble your favorite prototype, real or imagined.
TIPS FOR SUCCESS
A typical Multiplex project, the DogFighter looks deceptively simple when you take it out of the box. Multiplexs extensive engineering and precision molding gives us just five foam pieces to create the airframe; two fuselage sides, the wing, horizontal stabilizer and detachable canopy. Okay, six if you also count the foam spinner. It shouldnt take you more than a few seconds to hold them all together enough to start making airplane noises and thinking about your color scheme. Actual construction takes a little longer as you add molded and composite reinforcing as well as control hardware to both the fuselage and wing.
Take a few moments to make sure everything fits together before applying any glue. Multiplex recommends using traditional medium CA when bonding their Elapor foam and I used Zap-A-Gap medium CA with the Zap Foam-Safe kicker. Simply mist kicker onto one side of a joint, apply glue to the other, then press and hold the pieces together until the bond sets.
The wing features molded spar slots for reinforcing strips. The main spar is a carbon fiber blade capped with fiberglass rod spar caps. Two additional fiberglass caps create a rear spar as well. This reinforcement greatly stiffens the wing and should give it plenty of strength for any reasonable airborne stresses. I installed these components before painting, to help disguise them a bit further. If you are doing the job properly, there will be glue squeeze-out when installing the spar components. I didnt use any kicker on these joints until after installing the components and wiping the excess glue free with a paper towel. Be sure to use a clean area of the sheet for each pass to avoid scarring the foam with a glue-hardened towel.
The DogFighter is designed for an optional rudder servo, which I also installed. This means opening a small section on the right side of the fuselage to expose the molded servo pocket. The rudder comes locked in place with two small wedges of foam on each side of the hinge line. Be careful to not cut through the hinge as you remove the wedges. I slotted a CA hinge into the bottom of the fin and rudder to reinforce that joint as recommended in the manual. You will also need to separate the top of the rudder from the fin. I made a second pass with the razor blade here to create a little clearance.
The rudder and elevator servos feature a unique mounting system. The kit includes two plastic sleeves that surround the servos. Glue the sleeves into the fuselage then simply press the servos in place. Small tabs engage the mounting lugs, securing the servos without further adhesives or hardware. The servos can be removed with care, using a small screwdriver.
With the servos and motor and wing mount components in place, it is time to join the fuselage halves. Secure the servo leads with tape and make one final check for fit, then apply glue and mate the halves. I used some blue painters tape to hold them securely while the glue cured. You will need to install the battery-mounting plate, along with its hook and loop seatbelt strap for the battery. The first time I glued this plate in place it came right back out the first time I pulled out the battery. I removed some of the hook tape and added more glue and a little kicker with better results. Since there is a battery strap, you will not need or want a full piece of the hook tape included in the kit. Use just enough to keep the battery from sliding and reduce the stress on the glue joint when changing batteries.
I used four of Hitecs new HS-5055MG digital servos for control. These have the same case size as their popular, and more economical, HS-55s. I opted for the digital servos for their improved precision, torque and holding power, as well as the durability of the metal gears.
Two molded servo pockets snugly hold the aileron servos. The stock servo leads are a few inches shorter than the molded wire routing channels, so I cut off the connectors and soldered 9 inches of a 12-inch servo extension to each aileron servo. This gives a comfortable length to reach through an access hole in the wing center section and into the fuselage to mate with the receiver. As recommended, I used a few drops of the Zap-A-Gap and kicker to secure each of the aileron servos.
Assembly goes very quickly. In my first work session I mounted the rudder and elevator servos, joined the fuselage halves and mounted the stabilizer. I also added all the wing reinforcements and control horns. At this point I masked off the two installed servos and threaded a cardboard core from an old roll of covering through the nose to provide a handle while painting the fuselage. I also used two drywall screws to attach a length of scrap 1×1 pine to the wing for the same purpose. I wanted a custom racer scheme to take advantage of the whimsical and colorful decals in the kit. A second set of camouflage decals are included to easily recreate a military color scheme.
Before I added any decals, I laid down the bright yellow base coat using a can of Rustoleum enamel spray paint. A quick test confirmed that the paint was compatible with Elapor. Two light coats with the spray patterns oriented 90 degrees to each other ensure even coverage. I also gave the servo arm covers a quick coat then left everything to dry until after dinner the following evening.
Night two consisted of brushing paint onto the canopy, exhaust pipes and the retracted wheels molded into the underside of the wing. I used Nelson Hobbys water-reducible polyurethane paints, mixing a base shade of gray and adding a little blue for the canopy. These paints flow and cover well and are essentially odor-free. Once cured, they are completely fuel and waterproof, so you dont need to protect them further.
I cut out the decals while waiting for the paint to dry. While it isnt really that big a deal, the one thing that does irk me with Multiplex ARFs is that their pressure-sensitive decals are not die cut. Considering how well the designs are executed, I am surprised that they leave us the task of cutting the decals by hand. I used a single edge razor as well as an X-Acto knife. Both blades were new, unwrapped specifically for this task. In my mind, this is not the time to try to save a few pennies. The System Three / Nelson paint dries very quickly. I find I can usually handle a part in 10-15 minutes, so the wing and fuselage were ready for decals before I was.
The assembled airframe complete with glue, paint, decals and 4 Hitec HS-5055MG digital micro servos, weighs 13.9 ounces. While most pilots are likely to want a high performance setup, dont forget that such a system also means more weight and a higher stall speed than a more modest setup. If you prefer more mild performance and fly in smaller spaces, even a lightweight power system in the 200-watt range can provide enjoyable sorties.
Count on two easy evenings for all your assembly, with possibly another thrown in if you are going to paint the airframe as I did.
SETTING THE CG
One important point of setting up any model is achieving the proper CG location. I have settled on a final CG location 70mm aft of the leading edge at the fuselage sides and find It very flyable plus or minus another 5mm either way. Once finailized, I marked the inside of the fuselage to ensure consistent battery placement for each flight.
I set up my Aurora 9 with the high rate control throws carefully matched to the recommendation in the manual. After the first couple of circuits I landed and added 20 points of exponential, along with low rates at 70 percent throw with 15 percent expo. These settings give the DogFighter a wide performance range for both smooth high speed runs and predictable aerobatic handling. I found these control settings very comfortable and recommend them for your first flight.
I did embed a couple squares of balancing lead in the fuselage sides beside the motor to establish the CG. This airframe is a preproduction sample though and it is quite likely that the production parts will not need the additional ballast. The DogFighter was quite flyable before I added the lead, so the weight shown in the specs is without the additional half ounce.
 AIRBORNE
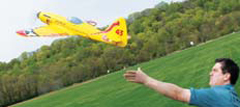
The recommended tuning power package for the DogFighter delivers about 500 watts, which most pilots will find plenty in this airframe. That kind of power makes launching a breeze and I was soon comfortable with my favored underhand launches for high performance low wing models like this. Just throttle up to about half while holding the fuselage securely above the wing and then give it a smooth push forward and up. If the trim and CG are close to right, you should have plenty of time to get your hand back on the sticks for full control.
At nearly 50 amps, the recommended 2200mAh pack wont last long. My math says about two and a half minutes of full throttle time. Much like the FunJet Ultra I reviewed in the December 2010 issue, there is no real reason to stay on the power for more than a few seconds at a time when sport flying. I only use full power for maximum performance rolling climbs, sky-high loops and high speed passes. The rest of the time I back off to no more than half stick, and often find I am coasting with the power fully off, such as when maneuvering for the next pass.
Holding back the power reduces maneuver size considerably, which helps keep it in close and greatly extends your flight duration. I am very comfortable flying with my timer set at eight minutes. I typically find that Ive used just over half the pack at that point, and usually relaunch for a few more passes before coming in for a fresh pack. My initial outing clocked over 12 minutes in the air and used 70 percent of the battery capacity. I was not just loafing for these flight photos the entire time either. I thoroughly tested the climb performance several times and ran through a full set of aerobatics between photo passes.
This bird excels at carving long fluid lines and tracing graceful arcing aerobatics. A 3D hovering machine it is not, but it will easily fly any traditional maneuvers you can muster out of your thumbs. It will loop all day long both inside and out, soar stably from horizon to horizon while inverted, and roll with the nose pointing wherever you want. It also spins nicely with just rudder and elevator, recovering instantly when you release the controls.
I was not able to find any tendencies to snap out of a pylon-type turn no matter how hard I pulled. The low speed handling will also surprise you. Landings are relatively easy. Essentially you just hold the wings and fuselage level, letting the energy bleed off until it settles into the grass. No question, the DogFighter will make a great club racer or combat flyer.
The recommended 10×7 APC propeller gives great low speed pulling power for quick acceleration and easy launching. While the theoretical pitch speed is right around 70 mph, it is clearly going much faster. I expect the power system is unloading and turning faster in the air than the static testing shows. Be sure to visit www.flyrc.com to see the DogFighter in action and review our in flight performance data.
 SPECS
SPECS
PLANE: DogFighter
MANUFACTURER: Multiplex
DISTRIBUTOR: Multiplex USA
TYPE: High performance sport flyer
FOR: Intermediate and advanced pilots only
WINGSPAN: 34.75 in.
WING AREA: 296 sq. in.
FLYING WEIGHT: 29.25 oz.
WING LOADING: 14.3 oz./sq. ft.
WING CUBE LOADING: 9.9
LENGTH: 32 in.
RADIO: 4 channels required; flown with a Hitec Aurora 9 transmitter, Hitec Optima 7 receiver, 4 Hitec 5055MG digital servos
POWER SYSTEM: Himax HC3516-1350 brushless outrunner, APC 10×7 prop, Castle Creations Thunderbird 54 brushless speed control, Thunder Power 3S 2250mAh LiPo battery.
FULL THROTTLE POWER: 46.9 amps, 477.4 watts, 16.32 W/oz., 261.2 W/lb.
TOP RPM: 10,560
DURATION: 8-10 minutes with throttle management
MINIMAL FLYING AREA: Club field
PRICE: $129.99
COMPONENTS NEEDED TO COMPLETE: 200-500 watt brushless motor, 50-amp speed control, prop, 4-channel radio
SUMMARY: Molded of high-density Elapor, the Multiplex DogFighter is an inspired blend of many warbirds that lets you easily create your own favorite combat flyer or postwar Reno-style racer. The DogFighter features Multiplexs exacting engineering for a quick-building, durable airframe that gets you into the air quickly with minimal hassle and maximum high-adrenaline performance. This is definitely another winner from Multiplex.
CONCLUSION
Multiplex has carved out a unique niche with their new DogFighter. While not officially part of their popular FunClub series, it easily could be. It would not surprise me at all to learn that FunFighter was considered as an alternate name. This new offering reinforces the Multiplex mission to provide exceptional RC models that not only look and fly great, but also stand up to the inevitable knocks and scrapes of daily flying. The DogFighter delivers tremendous performance and promises a wide smile for anyone looking for a realistic model in this category. The intentional absence of a full scale prototype only encourages you to personalize your model with a fanciful color scheme to differentiate it from any others that show up at your flying field. And theres no question, they will, after your first flights. In the meantime, you will have a great time tearing up the local sky until your club mates get their own DogFighters.
Links
Castle Creations
www.castlecreations.com, (913) 390-6939
Hitec USA
www.hitecrcd.com, (858) 748-6948
Multiplex
www.multiplexusa.com, (858) 748-6948
Thunder Power RC
www.thunderpowerrc.com, (702) 228-8883
ZAP is manufactured by Pacer Technology
