 Fly RC Magazine WE LIVE RC
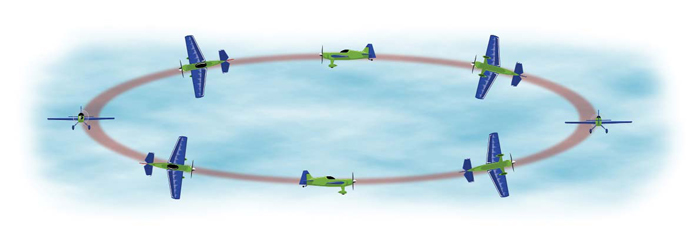
If theres one maneuver thats feared more than any other in the full-scale competition aerobatic world, its the rolling circle.
Ive actually been happy with scores of 4 out of 10 in competitions because that was better than the zero I expected! In my opinion, the rolling circle is the hardest precision aerobatic maneuver to fly consistently. Rolling circles are a combination of a turn and a rolla better name might be a rolling turn. There are many types of rollers, named according to the number of degrees in the turn, the number of rolls in the turn and the direction of roll. By definition, the rolling circle maintains a constant rate of turn, a constant rate of roll and a constant altitude. You can probably appreciate now why this is such a challenge!
As an example, lets consider the 360- degree four-turn roller, rolling inwards. In this case, there are four full rolls in a 360- degree turn, and the model rolls in the direction of the initial turn, e.g. left circle and left rolls. Each 90-degree quarter-turn contains one roll. The maneuver starts and ends on the same heading and maintains the same altitude. The aircraft also passes each cardinal heading with its wings level. Sound complicated? It is, but it isnt impossible. The only way to decode all of this information into a usable form is to break it down into base elements and then rebuild them to complete the maneuver.
Ill break it down into: level linked rolls; basic rolling circle; inside rolling circle.
LEVEL LINKED ROLLS
Linked rolls are many linked slow rolls while maintaining both altitude and heading. I find that completing one slow roll is much easier than linking several. Small errors that are masked by the limited nature of a single slow roll because its over so quickly are magnified when you repeatedly roll several times back to back.

When practicing multiple linked slow rolls, the most common mistake is allowing the model to descend during the maneuver. Inadequate top-side rudder and downelevator during the knife-edge and inverted portions will cause a slight descent during the maneuver. Be sure to emphasize the rudder and elevator controls, as these are critical elements of rolling circles.
The other important element of linked rolls is having a consistent roll rate. For a roller to look rightand, more important, score wellthe roll rate must be constant. As a barometer for success, when you are able to consistently fly 3 or 4 linked slow rolls while maintaining altitude, roll rate and heading, you are ready to move on to rolling circles.
BASIC ROLLING CIRCLES
A basic rolling circle is not heading-dependent, i.e., it isnt focused on hitting a precise number of rolls and precise headings. The goal is to try to maintain a constant roll rate, constant altitude and some turn rate. At the beginning, simply ensure that the turn rate continues, and well work on hitting precise points later.
During your first attempts at basic rolling circles, it is important to start high enough to recover from a half loop if the maneuver doesnt go as planned. (Yes, Im speaking from experience.)
Start by initiating a linked roll to the left. Focus on keeping the nose high with rudder and elevator. After 1 or 2 rolls, add a very slight up-elevator at the right knife-edge position (right wing high) and a slight down-elevator at the left knife-edge position. The slight elevator will induce a slow turn rate. For their first couple of tries, I prefer to see students climbingusing too much rudder and elevatorrather than descending during the maneuver.
Continue the linked rolls with elevator compensation for turn rate as far into the turn as you can. If you descend, be careful to stay high enough to make a recovery. The goal is to be able to maintain a constant rate of roll. It is OK if it takes you 10 or more rolls to complete a full 360-degree turn; the goal is to maintain orientation.
As you become more comfortable with basic rolling circles, try increasing the rate of turn and decreasing the rate of roll with the goal of making one roll per 90 degrees of turn. When youre able to maneuver the model safely through a full 360-degree basic rolling circle, move on to precision rolling circles.
Finally, rolling circles should also be flown outside by rolling in the opposite direction of the turn, i.e., right roll while turning left. You will have to reverse the required elevator inputs to keep the model turning during basic outside rolling circles. Definitely practice all the variations, including varying roll direction and turning direction. I tend to practice rollers with a left roll. For me, they are easier. I really have to make a concerted effort to force myself to practice right rolling circles. Be sure not to focus on rolling or turning in only one direction when you practice rollers.
INSIDE ROLLING CIRCLE
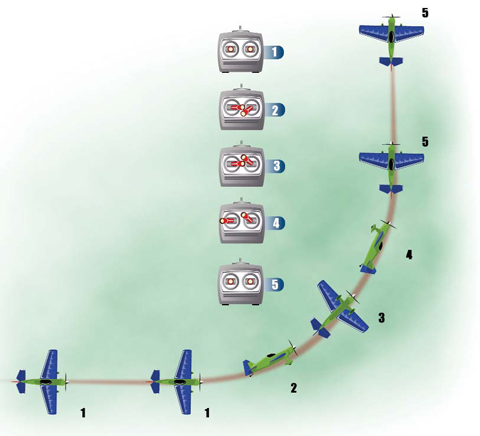 Now Ill outline the control inputs for a 90- degree inside rolling circle. The model will turn 90 degrees and complete one full roll while maintaining altitude. As you read the description of this maneuver, it is important for you to realize that I have to present this in a relatively mechanical way, simply stating the expected control inputs at each point, but the maneuver is obviously flown with constantly changing control inputs in every axis. A smooth blending of the controls is necessary but will come with practice.
Begin from an upright level line. I recommend that you fly this maneuver in the direction in which you are most comfortable. I am most comfortable with rolling circles that turn and roll to the left, so that is what Ill use as an example.
Start the roller by adding left aileron to initiate the left roll. Use enough right rudder to keep the nose slightly above the horizon. Add a little up-elevator to start the left turn rate.
The model should pass the knife-edge position at the exact midpoint between the entry heading and the 45-degree-turn point. As you transition through the knife-edge position toward the inverted position, keep the same right rudder input and add some down-elevator to maintain altitude. The rudder input will help to continue the turn rate. The model should reach 45 degrees of turn at the inverted position.
Continue to roll through inverted, adding enough down-elevator to maintain altitude. Rolling past the inverted position, keep the down-elevator for turn rate in the next knifeedge, but transition from right rudder to left rudder. You need the left rudder to keep the nose up in the left knife-edge position.
The model should reach the left knifeedge position at the halfway point between 45 and 90 degrees of turn. Continue the roll rate through the left knife-edge position toward the wings-level position. Maintain the same left rudder input to keep the turn rate constant as you pass through the wingslevel attitude. Blend out the down-elevator, and add enough up-elevator to maintain altitude. The model should reach wings level at exactly 90 degrees of turn.
COMMON MISTAKES
1– Varying roll rate.
2– Climbing or descending during the maneuver.
3– Poor turn-rate control. This results in a varying rate of turn and missing cardinal heading checkpoints (level at each 90- degree point).
4– Pauses, hesitations, or varying roll rate. In some cases, the roll rate stops entirely. This usually happens at each of the cardinal bank angleslevel, knife and inverted.
By now, you can see that the rolling circle is a very complex maneuver that will take time to master. Dont let that get you down! The very fact that this is complex and challenging makes it even more intriguing to me, and its a lot more satisfying when you sort it all out. By starting with simple linked rolls and methodically progressing to complete rolling circles, youll soon be on your way toward mastering this complex maneuver. As always, remember that aerobatics make the world go round!
