 Fly RC Magazine WE LIVE RC
 Its easier than you think
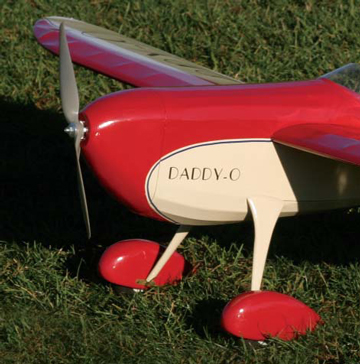
Even in todays world of ARFs, modelers still enjoy creating their own aircraft. Many of these projects require a little creativity to enclose the powerplant. It may seem old-fashioned to build a cowl out of balsa, but there are several very compelling reasons to do so. The most obvious is that balsa is light, strong, readily available and easy to shape. Yes, you will make a bit of a mess, but a shop-vac will make quick work of the cleanup. And if your model is electric-powered, you wont need to bother about messy fuel-proofing.
One great appeal of balsa cowls is that they can be finished with the same process as is used on the rest of the model. This gives a perfectyes, actually perfect; not just closecolor match to the fuselage.
The first thing you will need is wood. I mail order my balsa in bulk from suppliers such as Balsa USA and SIG, and I regularly save any larger scraps that look as if they will be useful later. This is a perfect project for clearing some out of the scrap box.
| 1 |
|
| 2 |  I cut an 1/8-inch plywood disc and backed it with a 1/4-inch ring of balsa to establish the front of the cowl. Next, I added scrap balsa sheet to rough in the cowl cheeks and a center keel to the chin area to guide the final shape. I used thin Zap CA for all construction. I cut an 1/8-inch plywood disc and backed it with a 1/4-inch ring of balsa to establish the front of the cowl. Next, I added scrap balsa sheet to rough in the cowl cheeks and a center keel to the chin area to guide the final shape. I used thin Zap CA for all construction. |
| 3 | 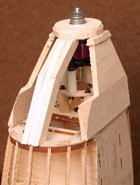 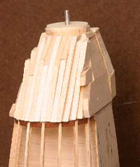 Running the balsa stock through a balsa stripper produces pieces of uniform width. This is not necessary, but it does help to keep the weight and dust down and to maximize material yield. Now start gluing pieces in, fitting as necessary to rough in the contours. Keep cutting and gluing until you have the entire cowl blocked in. It doesnt have to be pretty; youll get to that next. Running the balsa stock through a balsa stripper produces pieces of uniform width. This is not necessary, but it does help to keep the weight and dust down and to maximize material yield. Now start gluing pieces in, fitting as necessary to rough in the contours. Keep cutting and gluing until you have the entire cowl blocked in. It doesnt have to be pretty; youll get to that next. |
| 4 | 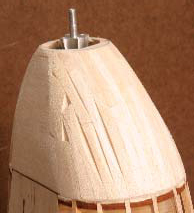 Now comes the fun part. I removed the forward plywood ring before shaping, and I traced the plywood plate with a pencil for a shaping guide. Roughly shape the cowl and dont fret about the voids; you will fix them later. I used a Master Airscrew razor plane followed by a 1.5×9-inch flat, coarse Perma-Grit hand file for the initial shaping. Now comes the fun part. I removed the forward plywood ring before shaping, and I traced the plywood plate with a pencil for a shaping guide. Roughly shape the cowl and dont fret about the voids; you will fix them later. I used a Master Airscrew razor plane followed by a 1.5×9-inch flat, coarse Perma-Grit hand file for the initial shaping. |
| 5 | 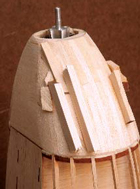 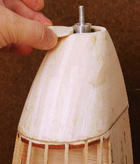 Glue more scraps into the voids, and go at it again. A few seconds with the razor plane and Perma-Grit file smoothed these inserts. Glue more scraps into the voids, and go at it again. A few seconds with the razor plane and Perma-Grit file smoothed these inserts. |
| 6 | 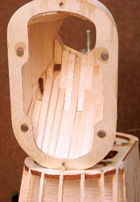 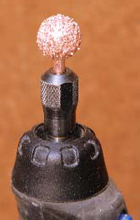 Now turn your attention to the inside. I use Robarts Rough n Tough 3/8-inch carbide ball in my Dremel tool to smooth the inner surfaces. Now turn your attention to the inside. I use Robarts Rough n Tough 3/8-inch carbide ball in my Dremel tool to smooth the inner surfaces. |
| 7 | 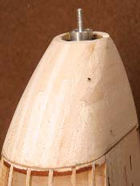 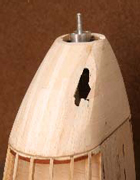 Dont worry about a thin spot or two. Repairs are very easy. Just hold the cowl up to a bright lightI used the sky, since I was working outsideand look for thin spots. I poke a hole with a pencil to mark the spot and then press the cowl against my disc sander to create a nice flat area where I attach a filler block. Dont worry about a thin spot or two. Repairs are very easy. Just hold the cowl up to a bright lightI used the sky, since I was working outsideand look for thin spots. I poke a hole with a pencil to mark the spot and then press the cowl against my disc sander to create a nice flat area where I attach a filler block. |
| 8 | 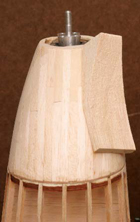  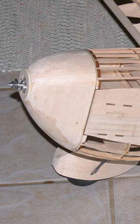 This piece is larger than I needed, but it was the first piece I pulled out of the scrap box. A minute or two later, the thin spot has been filled and smoothly faired. This piece is larger than I needed, but it was the first piece I pulled out of the scrap box. A minute or two later, the thin spot has been filled and smoothly faired. |

FINISHING UP
At this point, I glued the ply disc to the front of the cowl, opened the hole to clear the prop hub and finished sanding with fine-grit paper. In short order, this cowl was ready for covering!
 What about the glue lines? Fresh sandpaper supported by a sanding block will cut right through the CA without raising a ridge. Go lightly with any unsupported sandpaper, or you will leave ridges. The carbide Perma-Grit sanding tools act in the same way, and offer the benefit of lasting much longer than conventional sandpaper.
Gather wood and build a cowl. After learning how easy this really is, you will that find many exciting designs are more approachable, and you will have a unique model the next time you go to the field.
Links
Balsa USA, www.balsausa.com (800) 225-7287
Perma-Grit tools, distributed by Bob Violett Models, www.bvmjets.com (407) 327-6333
SIG Manufacturing, www.sigmfg.com (800) 247-5008
ZAP, manufactured by Pacer Technology, www.zapglue.com
