 Fly RC Magazine WE LIVE RC
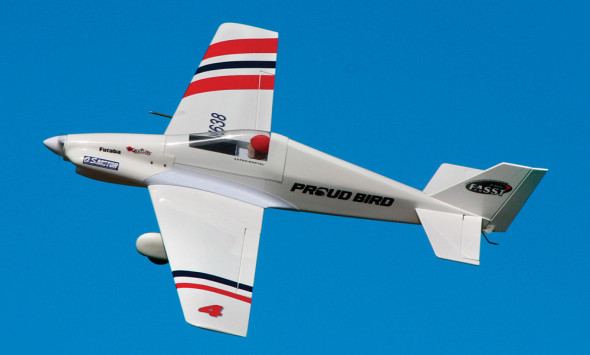
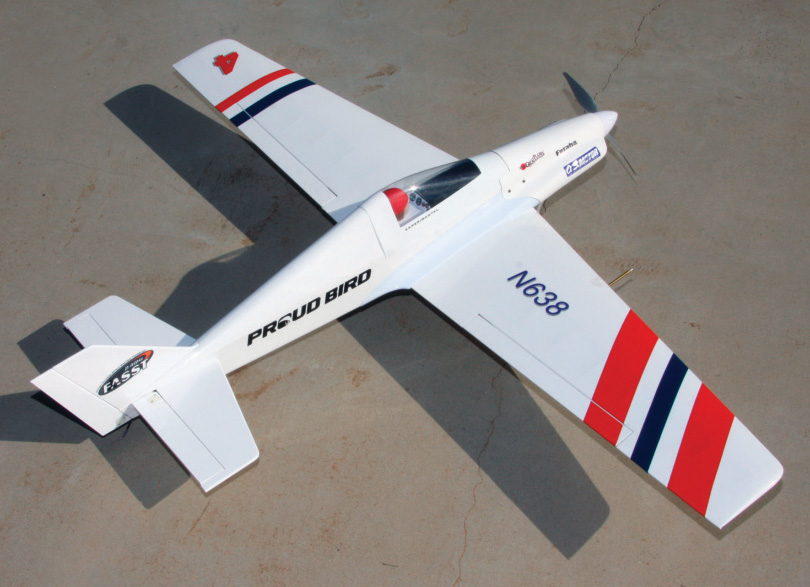
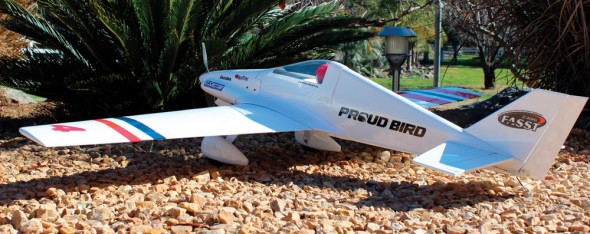
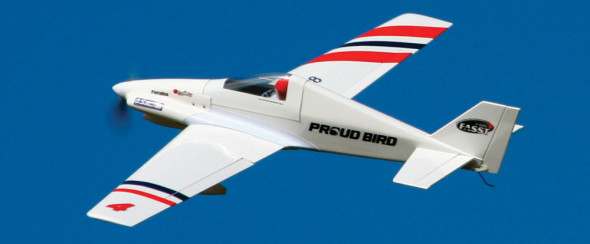
A Dual Purpose Model of the Famous F1 Reno Racer!
Yes the line is corny but “the need for speed” has always been a part of model aviation. There have been countless control line and radio control events over the years. RC racing events such as Formula 1, Quickie 500 and Q40 have been the primary events, but are always searching for new pilots. Originally Quickie 500 was the entry-level racing event, but it soon evolved into a very fast and competitive event itself.
Two years ago I decided to return to racing after a 15 year absence. As soon as the starters flag dropped for the first heat, I knew the racing bug was back to stay. By the end of five rounds, this semi-retired racer was tied for first place. By the end of the fly off, I was in second place. What beat me? The prototype of Jim Allen’s Proud Bird! Now you can own this winning electric Formula 1 racer that can also be a great aerobatic Sunday flier. The quality of the Proud Bird is the best that I have seen in an ARF model. If you pick this one up on Friday after work, you will be flying before you go back to work on Monday morning.
As battery and electric power technology advanced, it was only a matter of time before a racing event specific to electric power would be developed. Over the past five years, a dedicated group of NMPRA (National Miniature Pylon Racing Association) members worked tirelessly to develop an event that would be fun, competitive, controlled and most of all draw new people into racing. The result is an event called Electric Formula 1 (EF1) with rules controlled by the NMPRA. Motors, battery weight and airframes are clearly defined and must be approved by an NMPRA committee before they are allowed to compete.
A number of talented people took the rules and locked themselves into their design workshops. One such person is Jim Allen from Phoenix, Arizona, and the Proud Bird EF1 is the result of his work. The Proud Bird is modeled after a full-scale Formula 1 racer that competed for a number of years at the Reno National Air Races. The full-scale aircraft was competitive for it’s time, but was lost in a racing accident.
Great Planes has now introduced the Proud Bird in the form of a very high-quality ARF. The kit has been in development for over two years and the result was worth the wait.
Need To Know
MFG/DISTRIBUTOR: Great Planes
TYPE: Electric-powered
F1 sport air racer
FOR: Intermediate pilots
MIMIMUM FLYING AREA: RC club field
PRICE: $149.97
NEEDED TO COMPLETE: Brushless motor (either approved for EF1 or sport motor), electronic speed controller, three micro servos, LiPo battery pack sized to meet the motor or flying requirement and propeller
What We Used
TRANSMITTER: Futaba 12ZAP, FUTK9300
RECEIVER: Futaba 617FS, FUTL7627
BATTERY: FlightPower Pro50 4S 2550mAh 50C LiPo, FPWP5041
SERVOS: Hobbico CS115 Micro Digital High-Torque, HCAM0295
MOTOR: O.S. 3820-1200 brushless outrunner, 51011004
ESC: Castle Creations Phoenix ICE Lite 75, 010-0070-00
PROP: APC 8×8 thin electric, LP08080E
Key Features
• The Proud Bird has fantastic flight performance in both race and aerobatic modes.
• The flexible design that meets both NMPRA Electric Formula 1 rules or it can be dialed down to be a great weekend sport model.
• The model has a simple design with great structural integrity.
• The finish of the model is very high quality and wrinkle-free right out of the box.
• The cowl and wheel pants are made from high-quality fiberglass.
• The highly prefabricated design allows the model to assemble quickly. > The Proud Bird’s all-white base finish allows for easy personalization.
Specs
WINGSPAN: 52 in.
WING AREA: 388 sq. in.
FLIGHT WEIGHT: 3.5 lb.
WING LOADING: 18-21 oz./sq. ft.
LENGTH: 40 in.
RADIO: Four channel radio required; flown with a Futaba 12ZAP transmitter, Futaba 617FS seven channel receiver and Hobbico CS115 micro digital high-torque servos
MOTOR: O.S. 3820-1200 brushless outrunner (used for electric Formula 1)
ESC: Castle Creations Phoenix ICE Lite 75 brushless speed controller
PROP: APC 8X8 which is required by the NMPRA rules. Stock spinner included with the kit.
DURATION: Will fly for 4-5 minutes with throttle management but less than two minutes in the racing mode.
BATTERY: FlightPower Pro50 4S 2550mAh 50C LiPo
POWER CONSUMPTION: Static: 50amps, 650 watts at a steady 13.5 volts
Assembly Tips
The Proud Bird only took a mere 12 hours to assemble from start to finish using the highly-detailed instruction manual to guide me through the process. Note that I said “assembly” and not “re-engineering or rebuilding”. I would definitively rank the Proud Bird as the best prefabricated model that I have ever assembled.
Here are a few items that you should be aware of as you assemble the model:
• I used masking tape and a clamp to hold the wing halves together during the joining process rather than connecting the wing mount bolts together.
• Measure the diameter of the pushrod wire before drilling the holes in the servo arms. The pushrod wire in the review kit was only 0.065 rather than the described 5/64 (0.078).
• To achieve the correct throw for the ailerons, I set the torque rod horn at the top of the torque rod wire rather than the manual’s 3/16 from the top.
• I did not use any epoxy to glue the horizontal or vertical stabilizers to the fuselage. Instead, I positioned the parts and then used ZAP and ZAP-A-GAP to glue the parts in place.
• For the EF1 version, I removed the tail wheel from the wire and bent the wire into a tail skid.
• When installing the lower rudder hinge into the fuselage, drill the hole as described and then elongate with an abrasive tool to allow the hinge to be recessed providing a tight fit for the rudder.
• Great Planes provides eight spacers for the motor install. This is a very nice touch when using something other than the O.S. motor. You just use what you need to get the proper firewall to cowl spacing.
• I used a pencil to trace the cut lines on the plastic cockpit, wing fairings and belly pan. It just makes it easier to see the lines when cutting. Use of the Hobbico curved tip canopy scissors really makes this step easy. When cutting the forward cockpit make sure to leave the lip that fits under the rear cockpit. It might be easy to cut this piece off if you are not paying attention.
• Use of Poly ZAP, Plasti ZAP or ZAP A GAP work well when attaching the wing fairings and belly pan to the MonoKote.
• Make sure you clean the covering well with alcohol or acetone before attaching the parts. Do not let the adhesive leak out on to the MonoKote during this step.
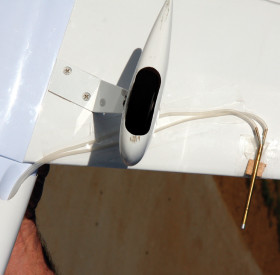
• When installing the cowl, turn the model upside down and make sure the air scoop stays outside the forward part of the wing fairing. It is easy to catch the fairing with the scoop and pull the forward part of the fairing away from the fuselage.
• The only change I made during the process was the mounting of the rear cockpit. The instructions suggest gluing the cockpit in place. I wanted this part to be removable. I cut four pieces of 1/8 inch light ply into rectangles 1/2 inch wide and 5/8 inch high. I then glued these tabs to the inside edge of the fuselage top formers in the area of the rear cockpit. The spacing is not critical.
• Finally, a Williams Brothers 1/5-scale racing pilot fits perfectly; simply adjust the height to fit in the canopy.
• Construction and covering are first class with no wrinkles out of the box
• Fast assembly with great instruction manual (finished in less than 12 hours)
• Performance in the air, fast and true along with being easy to land
Cons
• Mismatch of white coloring of wing fairings and belly pan compared to the white MonoKote
In The Air
Okay, so the fun of building is over and I dressed the model up with some red and blue trim to add a patriotic look. Before heading to the field, make sure you check the balance and control throws. I set up my review model as described in the manual. Note that there is very little elevator throw required so do not add additional elevator throw; you do not need it and additional throw with get you into trouble.
Once at the field, I installed the flight battery, did a range check, took a deep breath and armed the Castle Phoenix Ice Lite 75 speed controller. I did a few second motor run up and taxied out to the middle of the runway. Everyone at the field was now watching so the pressure was on. I advanced the throttle and added a bit of right rudder, the Proud Bird tracked true and straight lifting off in about 20 feet for a nice gentle climb out.

This being the first flight, I made a couple of large circuits around the field to set the trim. I could see that the Proud Bird was going to be a great flier during the first few seconds of the flight. A couple of slow rolls and four-point rolls showed that the Proud Bird has great aerobatic performance in addition to being fast.
Now for the fun and real purpose of the Proud Bird. I dropped down to pylon course altitude and in a little over a minute, counted off 10 laps. The Proud Bird was in its element. Turns were solid without any altitude loss. The straight away could be flown level or in a partial knife edge. The Proud Bird is like a digital camera, you just point and shoot and that is where you go.
I flew three more flights on the first day and the racing nerve inside me was active again. All of the remaining flights were flown around a simulated pylon course. With each flight, I tried to get the Proud Bird to fly with tighter turns and it never showed any tendency to snap. In fact, I went to the high rate elevator throw for the last two flights with the performance improving each flight.
The other part of racing is getting the airplane back on the ground without any damage. I set up for a standard approach with a downwind, base and final leg. I reduced the throttle to about half on the downwind and then managed the throttle for the remainder of the approach finally dropping the throttle to zero about 50 feet short of the runway. I held the Proud Bird off with some up elevator and let the airplane settle to the runway. Upon touchdown the wheels stuck to the runway without any bounce. The roll out was controlled and the steering positive. I taxied back to the pit area and the first day of flying was over.
The Last Word
I thought I left my days of pylon racing behind me back in the 90’s. That was until I got my hands on the new Great Planes Proud Bird. This kit was fun to assemble and allows creativity in finishing. The real fun begins when you get to the flying field. I have been out with the Proud Bird several times and each time it gets better. I can’t wait until the first race of the year to get back on a race course and go fast and turn left. Get yourself a Proud Bird and come join us, I am sure you will have lots of fun too.
Contacts
CASTLE CREATIONS castlecreations.com,(913) 390-6164
EAGLE TREE SYSTEMS eagletreesystems.com, (425) 614-0450
FLIGHTPOWER BATTERIES flightpowerusa.com, (217) 398-3631
FUTABA futaba-rc.com, (217) 398-3631
GREAT PLANES greatplanes.com,(217) 398-3631
HOBBICO hobbico.com, (217) 398-3631
O.S. ENGINES osengines.com,(217) 398-3631
ZAP ADHESIVES zapglue.com,(863) 607-6611
Words: Paul Stenberg Photos: Tom Atwood & Paul Stenberg
