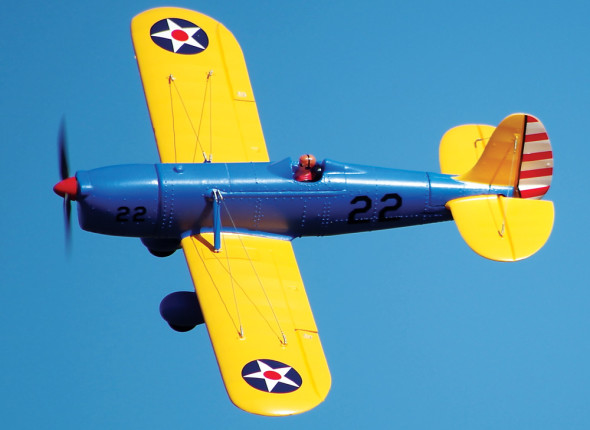
A Sport-Scale Ryan for the Park
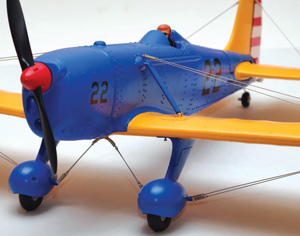
The original Ryan STA monoplanes were developed in the 1930’s. The “ST” designation was an abbreviation for Sport Trainer. The addition of the letter “A” to the model name “ST” indicated that it was a special, higher-powered aerobatic version. The vast majority of the Ryan STs were equipped with a pair of open cockpits. One Ryan STB was built, which was unique in that it featured a single cockpit, with an extra fuel tank taking the place of the second cockpit. Some pilots covered over the second cockpit so effectively that it was virtually indistinguishable. Flying wires brace the outer portions of the wings to the fixed landing gear, with additional wires bracing the landing gear to the fuselage.
Available in two different color schemes, the HobbyKing Ryan STA is a snappy looking little sport scale replica that can help you hone your tail dragger takeoff and landing skills. With a wingspan of one meter, it is perfect for an afternoon flying session at the local park. The Ryan can squeeze amazingly lengthy flight durations out of a mere 3S 1300mAh battery.
This park flyer-sized Ryan is made of EPO foam and is a Plug-n-Fly model. In HobbyKing Lingo, PNF means that the only items required to finish the model are a radio system and a flight battery. The Ryan is a four-channel airplane, but with an option to add flaps. The wing comes with flap servo recesses already molded into the bottom of the wing. It is worth noting, though, that should you wish to add the flaps, one flap servo will have to be run through a servo reverser. The flap servo recesses are flipped 180-degrees to each other, and install in the same exact configuration as the aileron servos. A four-channel radio system will cover the Ryan if you choose not to use flaps. However, should you choose to use them, you will need a five-channel radio system.
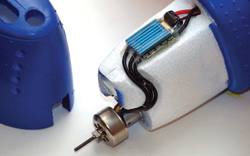
The HobbyKing Ryan STA comes out of the box nicely painted and is available in two different color schemes, a blue and yellow scheme that is very reminiscent and similar to the colors that adorned the Ryan’s flown by the U.S. Army Air Corps and U.S. Army Air Force and a red and white civilian scheme. The 3128 1100Kv brushless outrunner and speed controller are already installed, as are all of the servos. Assembly is glue-less and can be accomplished with a few basic hand tools. Mount the control horns to all control surfaces, attach the empennage, mount the wing and landing gear and connect the included push rods and this Ryan is ready to roll! Adding the flying wires takes a little time, but they really dress this little Ryan up.
Need To Know
DISTRIBUTOR: HobbyKing
TYPE: Sport-scale warbird PNF
FOR: Intermediate to sport pilots
PRICE: $77.00
MINIMUM FLYING AREA: Local park
NEEDED TO COMPLETE: Minimum four channel radio system (five channels if adding optional flaps), 3S 1300mAh LiPo battery, optional flaps require two 9-gram servos, servo reversing module and two 8-inch servo extensions
GEAR INCLUDED: Brushless power system and four 9-gram servos
What We Used
TRANSMITTER: JR X9503, JRP2930
RECEIVER: Spektrum AR600
BATTERY: Turnigy 1.3 3S LiPo battery, T1300.3S.25
Key Features
• The Ryan STA is an affordably priced, EPO parkflyer.
• The model is available in several different color schemes.
• The Ryan’s glueless construction makes for quick assembly.
• The scale flying wires look authentic in flight.
• Flaps can easily be added for the cost of a couple 9-gram servos.
Specs
WINGSPAN: 39.4 in. (1,000mm)
WING AREA: 229 sq. in.
WEIGHT: 26.4 oz.
WING LOADING: 16.5 oz./sq. ft.
CUBE LOADING: 13.2
LENGTH: 29 in.
RADIO: Requires a four-five channel radio system; flown with a JR X9503 2.4GHz DSM2 transmitter, Spektrum AR600 six-channel 2.4GHz receiver, four Topfire 9g servos (installed)
MOTOR: 3128 1100Kv brushless outrunner (installed)
SPEED CONTROLLER: Topfire 30 amp with BEC (installed)
BATTERY: Turnigy 1300mAh 3S 25C LiPo
PROPELLER: 8.5×4
• Rigging wires and wing struts add a nice scale touch
• Optional flaps feature is easy to implement
• Long flight durations on a 3S 1300mAh battery
Cons
• Instruction manual photos are thumbnail-size
• Difficult to hit recommended CG without minor modifications
In The Air
Though many of us enjoy the hobby as a way to relax when we are not busy with the routine of life, it is beneficial to have a specific goal in mind for each and every flight. Flight goals help develop and hone pilot proficiency. Though these goals are usually determined by the pilot, at times they can be set by the aircraft itself. The obvious goals of any maiden flight are to get the new model up and down in one piece and hopefully get it trimmed out for hands-off straight and level flight. As I readied myself and the little Ryan for the first flight, I reminded myself that the stance and position of the main landing gear on the Ryan, on both the full size aircraft and this parkflyer-sized replica, are a little on the narrow side. I decided that I would probably have to pay a little extra attention to the models tracking on the takeoff roll and be proactive with my rudder inputs and corrections. I cracked the knuckles on my left hand, shook it all out to get it limbered up and slowly eased the throttle forward. The stock power system, rated at around 185 watts, accelerated the Ryan down the runway in a believably scale fashion and before I knew it, it was careening straight for the edge of the hard pack. Though my left hand had failed to finesse the rudder properly, my right hand saved the day by cranking the elevator stick hard and jumping the Ryan up into the air before it could run off the edge of the runway.
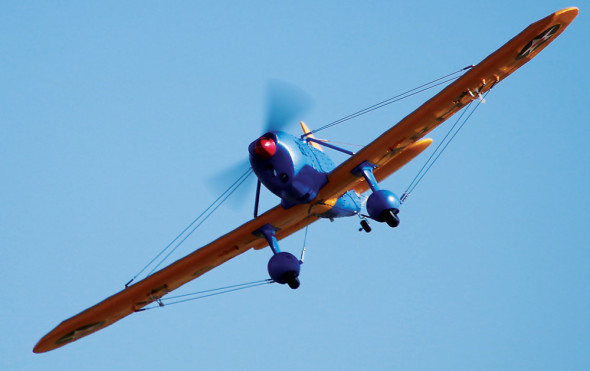
The brushless power system installed in the Ryan provides approximately 110 watts per pound worth of performance. I really enjoy flying models that are modestly powered as this Ryan is. It is a great way to improve your ability to both manage energy and fly “on the wing”. All too often, models are set up with power systems that provide 150 to 200-plus watts of power. Though it is assuredly fun to have that much power on tap, it can prevent you from truly learning how to fly. Once in the air, the Ryan happily cruised along at a throttle setting of a little over 50-percent. With a little dihedral present in this low wing design, it is both forgiving and gentle in flight. I used the recommended control surface throws as detailed in the manual, setting them up as my low rates. High rates were configured to take advantage of the full limit of the control surfaces and servos mechanical throws. As I gained a feel for the aircraft, I switched over to high rates and began to add more throttle and explore basic aerobatics. Aileron rolls benefit from the differential that is recommended in the assembly manual. Without it, they are a little less than axial. Loops require a bit of a diving entry if you want to keep them on the large side. I tried, but could not muster one of my favorite maneuvers, a runway-length knife-edge pass. The rudder size and throw and the installed power system do not yield the needed authority and performance to make that happen, but I was able to cheat a very cool looking one nonetheless by pitching the nose up slightly before kicking the Ryan over onto its side and holding it there until the nose fell back through the horizon. The more I flew the Ryan, the more I enjoyed its honest and predictable in-flight behavior. It seems historically appropriate and accurate to fly it with an electric power system that mimics the modest output of the engine and prop that powered the original full-scale Ryan’s.
Using the recommended 3S 1300mAh battery, I was able to stay in the air for durations of seven to eight minutes and still have an appropriate reserve in the battery. Determined to redeem myself for my less than perfect takeoff and with my left hand assuredly warmed up now that I had been flying for several minutes, I set the Ryan up for landing. The array of flying wires and stabilizers really make the Ryan look the part in the air. The sight of it turning base to final, with all of the symmetrical angles created by the wires bracing the gear and wings, was nostalgic looking and just plain cool. With the throttle at 30-percent, the Ryan slid predictably down the glide slope and as it neared the runway, I used the rudder to keep it aligned on the centerline. My picture-perfect approach and flare were followed by a sudden wingtip dragging ground loop within a second or two of the Ryan settling to the ground. Looking at my left hand in disbelief, I used my much more dependable right hand to grab another battery and get it ready for another flight. If you are like me, I am seldom willing to end my flying session with a less than great landing. Call me stubborn, but one of my house rules is that if I cannot stick a good landing, we power up and go around again. And again and again, until I master it. And therein lays one of the real beauties of this model. I enjoy a challenge and keeping a narrow-stance tail dragger model like this Ryan in the rotation really does help me improve my takeoff and landing prowess.
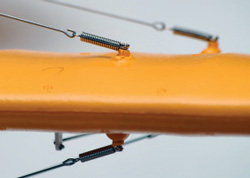
Subsequent flights saw my takeoffs and landings gradually improve. It takes a proactive and steady touch on the rudder, but it can be done and the Ryan looks superb as it gracefully rolls down the runway and heads aloft. My best landings have been of the two point variety. Keeping the power on and flying the Ryan all the way down to the runway, touching down on the mains first and rolling out, yields the best chance for that acceptably good last landing of the day. Less than perfect landings can, at times, jar the flying wires and springs loose, so conduct a quick inventory before picking the Ryan up after a rough landing. I several times spotted a wire or spring lying on the ground nearby. My flight testing all took place from hard surfaced runways. Flying from a well-manicured grass strip is definitely doable and is sure to improve the tracking by dampening out any tendencies to wander on the roll outs. The Ryan really makes efficient use of the recommended 3S 1300mAh battery. Grabbing three or four packs and the Ryan and heading down to the park makes for a challenging but eminently enjoyable afternoons worth of flying.
The Last Word
Intermediate level pilots are sure to enjoy the flight performance and challenges offered up by this EPO Ryan. Though ground handling will at times keep you on your toes, it is relaxing and easy to fly once in the air. The array of flying wires that brace the landing gear, wings and fuselage do a great job of recreating the classic lines of this 1930s vintage monoplane. The wing is molded so that functional flaps can be added. Hitting the recommended center of gravity requires a few basic modifications, but the end result is an airplane that is easy to fly and capable of many aerobatic maneuvers. Though the instruction guide is a little on the terse side and could benefit from larger illustrations, the average modeler will have no problem assembling this very modular, glue-less kit.
Contacts
HOBBYKING hobbyking.com
JR RADIOS jrradios.com, (800) 338-4639
SPEKTRUM spektrumrc.com, (800) 338-4639
Words: Jon Barnes Photos: Susan Barnes
 Fly RC Magazine WE LIVE RC
