 Fly RC Magazine WE LIVE RC
Disassembly, Bearing Replacement and General Cleaning
This month I will discuss how I overhaul a basic two-stroke glow engine. I will be disassembling an O.S. .46 SF, cleaning the various parts, doing an inspection and replacing the bearings before reassembling and test running the engine. The techniques shown are applicable to any brand of engine.
PREPARATION
Before beginning any job, you should assemble the proper tools and prepare your work area. I like to place a clean sheet of cardboard on my worktable, but an old towel also works well. Gather the necessary tools and supplies for the jobin this case, a selection of Allen keys, screwdrivers, a small pair of pliers, a scribe (for marking metal), a puller, cleaners/brushes/work tray, some shop towels and assembly oil. A soldering iron and hot-air gun are also often needed. Keep organized and work somewhere you dont mind making a little mess. This is not a job for the good dining table.
DISASSEMBLY
Taking apart an engine is not something to be feared. However, if this is your first time, I recommend you also keep a pen and paper handy to take notes that hopefully will help make putting things back together a lot easier.
First remove the muffler. If the bolts are stuck, try heating them with a soldering iron to soften any congealed oil. Make sure to use the correct size Allen wrench or Phillips screwdriver to prevent damaging the screw heads.
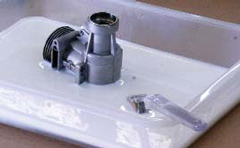
Next I remove the carburetor. Usually the carb is secured with two screws or a drawbar. Remove the prop nut and washer and set them aside. Most engines today use a split, tapered collet to hold the drive washer in place. The easiest and best way to remove a collet is with a small puller. You can fashion a set of your own from a battery terminal puller available at most automotive supply stores, or purchase a small puller as shown in photo 4.
I use a small scribe to lightly mark an X on the rear of the head, the rear face of the connecting rod and the rear side of the top of the piston. These index marks help me orient the engine components properly during reassembly.
You may find the screws securing the backplate or rear cover are packed with dirt or grime. Clean them out with the scribe to allow the Allen wrench or screwdriver tip to engage the screw completely and prevent stripped heads. Again, if the screw is especially tight, try the soldering iron trickit works! Carefully ease off the backplate and try to prevent the gasket from tearing. I use a small hobby knife to ease the gasket from the case or backplate flange. If you tear the gasket, you will have to purchase a new one or cut one from gasket stock. A leaky backplate will prevent an engine from running well.
A well-run engine will generally have a lot of burnt oil and grime caked on the head, which can be difficult to remove. Most modern engines use brass or aluminum gaskets under the head, which can leak if not seated properly. Ease off the head and try to pry the gasket free with the knife or scribe point. If it is damaged, a replacement may be necessary.
In some engines, there is a tiny roll pin inserted in the top of the crankcase that aligns the cylinder liner, preventing improper insertion. If it does not have an alignment pin, remember how the ports line up with the crankcase. The exhaust ports are usually the tallest, with the bypass and boost ports lower down. Improper liner installation will render the engine unable to run at all.
Now ease the connecting rod off the crankpin and remove the piston and rod assembly. Be extra careful not to damage the piston ring (if present) during removal. On some engines (usually modern four-strokes) the rod cannot be taken off without first removing the wristpin and piston. These engines will have an access hole in the rear of the case through which the pin is slid out. The O.S. .46 SF does not have this feature.
The crankshaft can now be eased out of the case and bearings. If the engine is bushed, the crankshaft should easily slide out. A light tap with a plastic or brass-headed hammer can tap out the crankshaft. Do not use a steel hammer or you will deform the threads and possibly ruin the crankshaft.
Now that the engine is all apart, we can take the old bearings out. The aluminum case will have to be expanded with heat to release the bearings. I use a paint-stripping heat gun to apply heat. You can also set the case in a toaster oven set at 250 degrees for 10 minutes. A propane torch should not be used. You can easily distort the case with too much heat or uneven heating. The heat gun is safer and works great. Once the case is hot enough, a sharp rap on a wooden block should allow the old bearings to fall out.
 CLEANING
I like to use a water-based citrus degreaser and an alkaline detergent when cleaning engine parts. Although solvents like lacquer thinner and even mineral spirits can be used, they are flammable, give off harmful fumes, and are not good for your skin. I buy my detergent in bulk, but similar products are sold for cleaning model engines.
Pour some citrus cleaner into a plastic container and use a toothbrush and small stainless- steel wire brush to clean the parts one at a time. I only use the wire brush for external surfaces, and the toothbrush to clean all internal parts. The nylon bristles wont hurt anything but are stiff enough to clean well.
Now I dilute some of the detergent 50/50 with water and wash the part again, before rinsing the part in clean warm water. After rinsing, set the part aside on a clean shop towel to dry.
Spray a light coating of WD-40 as a rust preventative on any steel parts such as the crankshaft and fasteners after the rinse. If you reassemble the engine soon after cleaning, the assembly oil will also take care of that issue.
Stubborn burnt-on oil can usually be removed with the stainless brush. I also lightly scrape off the heavy stuff with an X-acto blade. Heavy carbon buildup on the piston top can also be removed with a knife blade but be very careful not to nick the edges of the piston. Sometimes a small piece of a medium-grit 3M Scotch-Brite pad can also be used to clean the stubborn stuff.
Some engines may need to undergo a much more extensive cleaning, but for the majority of engines a simple hand cleaning like I am describing here is more than satisfactory.
Once all of the individual parts are clean and dry, we can move on.
INSPECTION
Look over the parts for wear and damage while the engine is apart. Inspect the piston and liner for scratches. Large grooves on a lapped ABC/ABN-style engine may mean a replacement is necessary. On a ringed engine, the ring should be clean and free in the groove. Do not remove the ring unless you plan to install a new one.
The connecting rod should not have excessive play at either end. You can measure the rod bushings for both size and out of roundness with a pair of calipers. If the lower bushing is less than 0.003 inches larger than the crankpin, the engine should run fine. The wristpin bush should have slightly less playif you measure an out of roundness, or more than 0.002 inches of clearance, consider a new connecting rod and pin.
Inspect the crankpin for any roughness or wear. If an engine has been run with adequate lubrication and not excessively lean the mating parts should be shiny and smooth. Parts that look scratchy and worn are usually signs that either foreign material (like sand) has passed through the engine, or it has been running without adequate lubrication.
The bearings can be cleaned, slightly lubricated with light oil, and checked for smoothness and play. Any roughness will degrade the engines performance and a new set of bearings should be installed. Varying levels of bearing quality are available, but even the most inexpensive bearings are more than adequate for our sport engines.
It is also important to inspect the crankcase and crankshaft where the rotary valve is located. Even on a bearing-equipped engine, the fit of the crank to case must be very close to provide a good, leak-free seal for the rotary valve, and to prevent excessive case pressure loss out the front bearing. If you have an engine with a lot of wear and scoring in this area, it may be the end of the engines useful life. Replacing the crankshaft and case usually costs more than a new engine.
Finally, inspect all the O-rings and gaskets. Replace any gasket that has a nick or break, or any O-rings that have become hard and brittle.
REASSEMBLY
Start by installing the new bearings. Wear a glove to prevent burns and heat the crankcase again to allow the new bearings to slip into their cavities. When the case is warm enough, press the bearing in and tap it home with a wooden block or a plastic hammer. Do not force the bearings in. If they are too tight, warm the case further until they slip in easily or with a gentle tap. The crankshaft should be able to slip back into the bearings now, and a gentle tap will seat it up against the rear bearing. The bearings should come pregreased, but I also like to use after-run oil on all parts during reassembly. Making sure all parts are well lubricated will prevent any chance of damage when you run the engine for the first time after its back together.
After the crankshaft is in, slip the rod and piston back onto the crankpin using your scribe marks to make sure of proper alignment. Slide the liner down onto the piston and into the case. Some liners will have slight interference fit to the cylinder so you many need to warm the cylinder. If you have a ringed engine, ease the liner over the ring while compressed with your fingers. Also, be aware of the ring pin, and align the ends of the ring to seat properly.
Place the head and gasket on the cylinder and tighten them down. Snug each head screw evenly and not too tightly. The engine should be able to be easily turned over by pinching the crankshaft nose. Uneven torque on the head bolts may distort the liner, and cause some binding when turning the engine over.
 Replace the rear cover and then the carb. Assemble the collet and drive washer and put a prop onto the shaft and tighten it with the washer and nut. Add a few extra drops of oil down the head before installing the plug and muffler to ensure adequate lubrication of all parts.
Thats it! Flip the prop overcheck for compression and leaks from the head or backplate, around the carb, etc. The engine should now be looking fine, and ready to mount and test run.
TEST RUNNING & SETUP
All that is left to do now is get the engine on the test stand (preferred, but test running back in the aircraft is also fine). Remember there is no need to break it in again, but this is about assuring the needle settings are correct and the engine is operating properly before committing to flying.
If you had taken out the carb needles to clean the carburetor, refer to my glow tuning article in the July 2007 issue of Fly RC to reset them.
I set up the O.S. .46 with a Zinger 11×6 prop, a new Tower Hobbies plug and some Wildcat 10% Premium Xtra fuel. Once started, I reset the high-speed and low-end needles and ran a tank of fuel through the engine while checking the throttle, idle ability, and top-end power. I also check for leaks at the head muffler, backplate, and front bearing. Any leaks should be dealt with immediately.
CONCLUSION
Working on your engines doesnt have to be intimidating. With some time, patience and a little experience you can do it. Once you have the engine back together and set up, you are ready to remount it and hopefully enjoy many more years of service. Please send any comments, questions or suggestions for future articles to myself or the editors at Fly RC.
Links
O.S. Engines, dist. excl. by Great Planes Model Distributors, www.osengines.com , (800) 682-8948
Wildcat Fuel, www.wildcatfuel.com , (859) 885-5619
Zinger Propellers, www.zingerpropeller.com , (310) 539-2313
