Most modelers consider the Dremel tool to be a must-have accessory for the workshop. They use them for any number of routine tasks, from trimming music wire to sanding, drilling, grinding and shaping. Many modelers I have talked to dont ask their Dremels for much more than that though, and this is a shame. Like many tools, these wonders gain increased versatility with additional accessories. The two accessories I seem to use the most are Dremels #231 Shaper/Router Table and the #335 Plunge Router Base. Here are a few photos showing how I recently used these accessories to expand the tools basic functionality and improve my results while working on some foamie flying wings and a scratchbuilt quarter-scale sailplane.
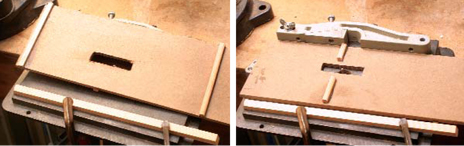
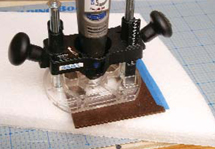
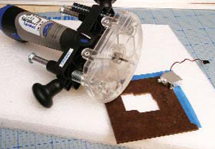
PLUNGE ROUTER BASEWhile building a few foam flying wings recently with some friends, we came up against the age-old question of how to pocket the wing cores to mount the servos. Usually we just trace around a servo with a knife then dig out the pocket. Someone even suggested melting a hole with a hot soldering iron and bedding the servo in hot melt glue. While these approaches work, you will probably need a good dose of hot melt glue or Goop to ensure the servos stay put. They also leave little accommodation for pride of craftsmanship, and add unnecessary weight. Instead, I offered up my #800 cordless Dremel tool in the plunge router base. I mounted the 5/8-inch guide bushing, included with the base, and chucked a 1/8-inch high-speed cutter.
I measured the bushing-cutter offset at 1/4- inch, and then made a hardboard template with a hole that mirrored the servo outline plus this offset. The easiest way to do this was to hold the servo down on the middle of the template stock with a scrap of double stick tape, and trace around it using a piece of 1/4-square stock to guide a pencil. Be sure to accommodate the output arm as you trace the outline. I used my scroll saw to make the cutout inside the line. By leaving a little extra material, I was able to fine-tune the fit of the servo into the pocket with a few strokes with a file. Filing closer to the line increases the size of the hole and eases the fit. Now set the bit depth to match the thickness of the template stock and the width of the servo.
|
The template in place on the wing core.
No secrets here, just follow around the template with the bushing against the template and rout out the middle afterward.
I manually cut slots for the mounting arms to keep everything snug. I also cut a slot for the servo lead that will later be extended to the receiver.
With the depth set, I taped the template to a test block of foam and powered up the Dremel. I lowered the router base onto the template, and traced the outer perimeter using the guide bushing. Once I had the outline cut, I made a few side-to-side and foreand- aft passes across the middle of the pocket to clear the inner foam.
After just a few seconds, there was a perfect servo pocket and we moved on to the wings. Making the template only took a few minutes, and the results were well worth it. If this technique and its results appeal to you, but you dont want to bother making templates, a very economical option is available via SkyKing RC Products.
|
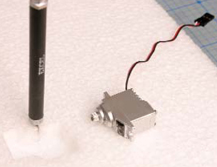
All the bits together. Note the guide bushing around the cutter.
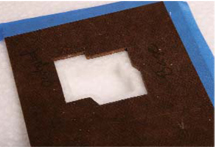
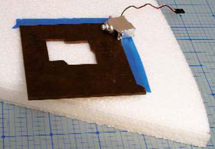
A perfect pocket. Note the 1/4-inch difference between the template and the pocket.
The servo fits flush to the outer wing surface and is held tightly by the surrounding foam. We used only the lightest bit of adhesive on the vertical faces of the pocket so we can slice the servo free later if needed.
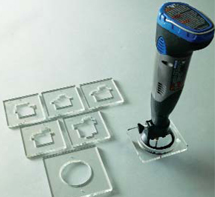
Available from Sky King Products, the Perecman Dremel router base and template system is manufactured from laser-cut acrylic and saves you the trouble of making your own templates for some common servos. |
 Fly RC Magazine WE LIVE RC