 Fly RC Magazine WE LIVE RC
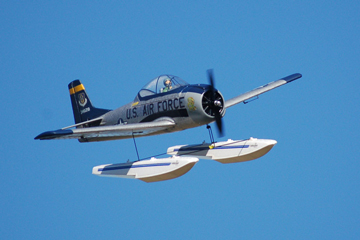
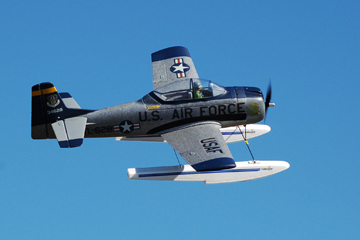
ParkZone T-28 Float Conversion
by Terry Dunn
Photos by Fitz Walker
 Items needed:
ParkZone T-28 Trojan(any version)
HobbyZone Super Cub Float Kit
Two 1/8 x 14-inch Carbon fiber rods
Two 1/8-inch Landing gear straps w/mounting screws
GOOP adhesive
Two pieces 1/8 x 3/4 x 1-1/2-inch lite-ply
1/16 and 1/8-inch drill bits
Throughout history, engineers have added floats to proven aircraft designs in an attempt to make them more versatile. In some cases, such as the Piper Super Cub, the results are spectacular and the floats become a common fixture to the design. In other cases such as the Supermarine Spitfire and Douglas C-47, their attempts at water-borne operations are nothing more than interesting footnotes to otherwise stellar pedigrees.
 As far as I know, no one ever gave much thought to the idea of adding floats to a full-scale North American T-28 Trojan. In terms of practicality, a floating Trojan would probably be closer the Spitfire than the Super Cub. But don’t let that stop you from mounting floats to your ParkZone Trojan. When it comes to the pursuit of RC bliss, you sometimes have to shove aside things like historical accuracy. After you’ve flown your T-28 off the water, I think you’ll agree.
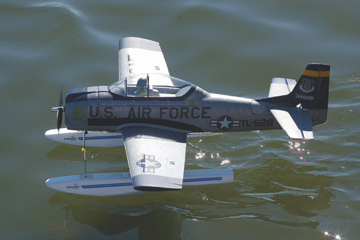
One of the things that I appreciate most about the ParkZone T-28 is its robust simplicity. So as I set forth to add floats, I kept in mind that minimalism would be key to success. I had previously installed Multiplex’s Easy Cub floats on one of my Trojans. That set-up worked well enough, but I wanted to try out the HobbyZone foam and plastic floats that are designed for their Super Cub park flyer. These lightweight floats are prefinished and include mounting hardware. I already had the few other items that I needed to adapt the floats to the Trojan. However, someone starting from scratch could easily modify their Trojan for about $30, including the floats.
MOUNTING THE FLOATS
Each float has a plastic spine that includes mounts for the struts and spreader bars. The stock configuration doesn’t mate up to the Trojan so you’ll have to perform a few simple tweaks. First, make a mark on the spine 2 inches forward of the rear spreader bar mount (measured from the center of the mounting hole). Next, mount a landing gear strap so that it straddles the mark. I predrilled the mounding holes with a 1/16-inch bit and used the included sheet metal screws.
Another landing gear strap will have to be mounted on each float forward of the spine. The foam is a little thin here, so you’ll need a hard mount that will adequately distribute the load. I used a piece of 1/8-inch lite-ply that measures about .75 x 1.75 inches. To waterproof the wood, I saturated it with thin CA, and then gave it a light coat of spray paint. Next, I mounted a 1/8-inch landing gear strap to the middle of the wood. It is very important to get a solid bond when attaching the plates to the floats. CA is too brittle to use in this joint. I used a liberal amount of GOOP adhesive and then added a fillet of GOOP around the border. I mounted the wood to the top of the float so that the middle of the strap was 4.75 inches forward of the front strut mount. Note that CA and GOOP will eat many types of foam, but not the floats’ EPP foam.
The included spreader bars are a little too short to be used on the T-28, so you’ll have to make new ones. There are probably numerous options here, but I chose 1/8-inch diameter carbon fiber rod. The carbon fiber is lighter and doesn’t rust like music wire. The carbon fiber rod also does a good job of resisting the bending loads seen by the front spreader bar. Always be careful when cutting carbon fiber. The dust and splinters can be very irritating if you don’t wear gloves and clean your work area carefully.
Once you’ve finished modifying both floats and cutting the spreader bars, it is time to mount them to the airframe. But first, you have to remove the stock wheels. The wheel nuts are threaded, so just twist counter-clockwise to remove them and then slide the wheels off of the axles. Next, remove the nosewheel steering pushrod from the rudder servo. If you forget to do this, the servo will bind and you won’t have any rudder control. I stuck a short piece of bamboo skewer into the foam next to the servo to keep the pushrod away from the servo arm.
I opened up the rear spreader bar mount of each float with a 1/8-inch drill bit. Next, I placed the rear spreader bar in the right float and slid the rear landing gear strap over the axle for the right main wheel. Then, I slipped the left float into place. The straps are a loose fit on the axles even after tightening the mounting screws, but that’s ok. Things will solidify once all of the mounts are in place. Be careful when tightening the set screws on the spreader bars so that you don’t splinter the rod.
Now place the front spreader bar in the front landing gear straps, but leave the screws loose enough to make hand adjustments of the bar position. The spreader bar should align with the front wheel axle. Join them together with zip ties or wheel collars. Once you are satisfied that the floats are parallel to each other and to the airplane’s centerline, you can fully tighten all of the mounting screws.
EQUIPMENT PRECAUTIONS
While it isn’t mandatory, it is a good idea to protect your ESC. Since it is located low in the cowling, it is bound to get wet sooner or later. I’ve had numerous ESCs get soaked with fresh water. Some ESCs acted funny and some didn’t seem to notice the water, but none showed any lasting effects. However, on my first outing with the Trojan, one splash of brackish water killed the ESC instantly. I located the replacement ESC inside of the radio compartment so that the water will have to work harder finding it next time. I also gave the ESC a couple squirts of CorrosionX to add further protection. CorrosionX is a corrosion inhibitor found at marine supply stores.
You may have to adjust your normal battery mounting location to keep the CG at 2.5 inches behind the wing leading edge. On the ground, the Trojan should sit level on the front part of the floats with the airframe at a slightly positive angle of attack. If needed, you can tweak the angle of attack by raising or lowering the nose strut attachment on the firewall. The step of the floats should be about .5-inch behind the CG.
ON THE WATER
Take a few minutes to taxi the T-28 around during your first time on the water. Without a water rudder, you are sometimes at the mercy of the wind, however, I can usually get it pointed in the direction that I want with the rudder and jabs of throttle. With the nose pointed into the wind, gradually add throttle and keep the elevator neutral. You’ll probably find that you need considerable right rudder to hold course. Once the plane gets “on step” it will become much more responsive to rudder inputs. Keep your turns gentle when planing, or you may flip the Trojan on its lid. My T-28 starts to skip across the water once it reaches flying speed. So I just feed in up elevator to begin a climbout.
In the air, you’ll probably notice that the Trojan flies a little differently with the floats attached. Although the differences are subtle, they are detectable. If you’re worried that the floats will make the T-28 overly docile, you can forget it. Even with the floats, it is still spunky and fun. I think that the increased side area actually makes the rudder more responsive, so it will still make great knife edge passes. Most of the aerobatics in the T-28’s repertoire are still present, though they may be a little looser than without the floats. The drag of the floats does reduce the top speed somewhat, but this plane was never meant for speed anyway.
Landing the T-28 on water is just like landing it on a runway, except that you’ll want to maintain a little more speed than usual. Ease the plane lower until the floats kiss the water. Then you can either ease off the throttle and taxi back to shore, or feather in more power for a splash-and-go fun stuff. The floats do not necessarily limit you to water flying. I’m sure snow is an option, but we don’t get much of that here in Houston. The plane easily scoots off of grass fields that would anchor a wheeled Trojan.
CONCLUSION
As I stated in the beginning, simplicity was one of my main design drivers for this project. I think that the methods I’ve shown here reflect that philosophy. The plane easily carries the extra five ounces of the floats, which open up a whole new set of potential flying sites for this versatile model. You can spend a calm morning flying the Trojan off your local lake and within five minutes, you can have stock landing gear back in place for more flying at your club field. Now get out there and let the good times roll… and float.
Perfectionist’s Addendum
 Certainly, there are some modelers out there who will be unsatisfied by taking my minimalist approach. There are a handful of other simple modifications that may enhance your float flying experiences with the T-28. Foremost among these would be the addition of a water rudder, or perhaps a sheet foam ventral fin to reclaim some of the lateral stability stolen by the floats.
There is flex in my mounting system, so it is doubtful that either float is ever perfectly aligned. You could devote considerable effort to devising a more rigid and true mount, if you’re in to that sort of thing. My main point here is that there are lots of options to take this project to the next level. I’m quite happy with my plain-Jane floating Trojan, but I always enjoy seeing the innovative ideas that others come up with. Now go forth and be creative.
