 Fly RC Magazine WE LIVE RC
Fly RC Magazine – June 2012
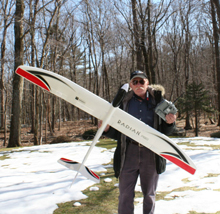
ParkZone Radian Pro BNF
It doesn’t get easier or better than this!
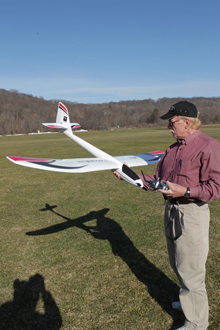
By Del Schier dels@flyrc.com
Photos By Walter Sidas
AT A GLANCE
MANUFACTURER: Parkzone
DISTRIBUTOR: Horizon Hobby
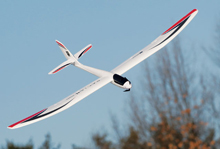
TYPE: 2 meter full-house motor glider BNF/PNP
FOR: Intermediate Sport Pilots
PRICE: BNF $249.99, PNP $184.99
NEEDED TO COMPLETE
5+ channel DSM2/DSMX compatible transmitter (6+ channel transmitter is required for advanced mixing functions)
ASSEMBLY TIPS
The hardest thing to get ready to fly is to open the box. On opening that box I was impressed that this airplane was obviously highly engineered, well thought out and with many nice details. I noticed very good cooling inlet and outlet vents to keep the power system happy. The wing is two-piece with a substantial CF joiner rod and two fiberglass spar web reinforcements almost the full length of the wing making it very stiff. It is a mid-wing design with the wing roots fitting into molded recesses on either side of the fuse. There is a strong plastic molded center piece with screws to hold the wing to the fuse.
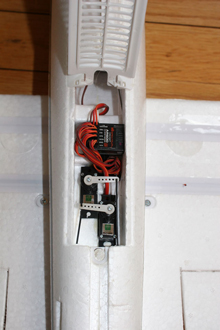
To set it up you put the rod through the fuse and slide the wings on. A somewhat tedious step is to use large tweezers to fish the wing servo wires down through molded holes in the fuse; but takes all of a minute. There is an interesting hinged magnet locking radio hatch on the bottom of the plane to allow access to the receiver and tail servos. Once you get the wires into this radio compartment you put the two wing screws in and plug in the servos.
The horizontal stab and elevator slides into a molded retainer on the fin and, without tools, you connect the elevator clevis. The stab should be held in place with some tape, I like Scotch 33 white for this. I have heard some people put rare-earth magnets on the stab retainer and the wing joiner so you don’t need any screws or tape; a nice touch.
The battery has easy access under the magnetically held canopy and slips in a molded recess secured with hook and loop fasteners. That battery isn’t going anywhere and the CG should be spot on.
It doesn’t need a radio setup for 5 channel flight using the flap and aileron Y cords, except to bind the transmitter and receiver, name the model and set the servo reverse switches for correct throws. The throw settings at 100% are good as the rigging is correct when you get it. You will have to do little or no trim settings for your first flight, not even aileron differential.
I am amazed. Getting this ship out of the box and ready to fly took less time than it usually does to install a single servo on an ARF glider.
I started to do the full house radio setup using 6 channels but after a few minutes I realized I should look on the web for help. Sure enough, Horizon was nice enough to put a step-by-step file on their page for setting up my DX7:
http://www.horizonhobby.com/ProdInfo/Files/Radian_Pro_DX7_setup.pdf
This made the setup go very quickly and easily. In the past I have spent hours with various radios and airplanes doing full-house glider setups. For this setup the flaps are connected to the gear channel with the Y cord and the right aileron goes to Aux 1. I only deviated from this setup file with some different trim and throw adjustments to get the entire trailing edge to move nicely together.
This setup is not the way I usually do my motor gliders, it puts the camber selection on flap/mix switch with camber forward, flat middle and reflex back. The gear switch operates the flaps and the Aux 2t switch enables the crow. I usually set up the radio so no matter what if I open the throttle the flaps go up and the wing goes flat for a go-around or major approach problem. I did add a 5th aileron to rudder mix on a switch for one thumb flying. There is a 6th mix left over so maybe I can make the throttle override the flaps.
Image Gallery
 |
 |
 |
 |
||
Links:
Horizon Hobby
Parkzone
Spektrum
