Make Your Own Z-Bend Pliers
Fly RC Staff
January 1, 2001
How To's
Z-bends are a traditional way to attach pushrods to control surfaces, but they can be a little tricky to make, especially when working with smaller sizes. For light models using .020 – .032 music wire, I took a small pair of jewelry pliers and notched one jaw (as shown) with a Dremel tool. Once you have the pliers notched, a z-bend is just seconds away.
Just about any pliers would work, but they should have a thin tip. The width doesnt matter. Be sure to use safety glasses, and a fiber-reinforced cutoff wheel such as the Dremel #426, #456 or an equivalent. These photos show the whole story using a piece of .025 K&S music wire, readily available from most hobby shops. |
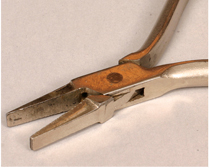
1 – These are my pliers before modifying. Note how thin the tips of the jaws are.
|
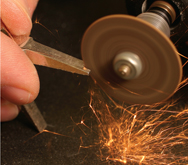
2 – Grinding the notch with a Dremel tool. Be sure to wear your safety glasses, work over a non-combustible surface, and use a fiber-reinforced cutoff wheel.
|
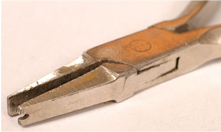
3 – The finished notch on the pliers jaws. It measures about 1/8 in. deep.
|
|
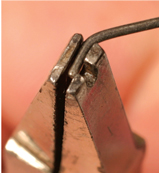
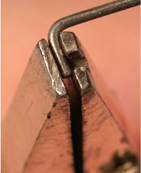
4 – Insert the end of a piece of wire into the pliers and bend up to 90°.
|
5 – The first bend is done.
|
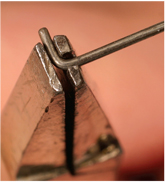
6 – Reverse the wire so that the long leg passes through your notch.
|
|
6 – Reverse the wire so that the long leg passes through your notch.
|
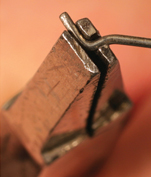
7 – Bend the second leg down to 90 degrees.
|
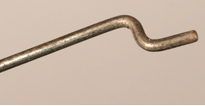
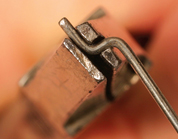
8 – Make sure the final bends are approximately 90°.
|
|
10 – Right: Z-bends make for a very neat and lightweight installation.
|
Links
Dremel, www.dremel.com, (800) 437-3635.K&S Engineering, www.ksmetals.com, (773) 586-8503. |
|
 Fly RC Magazine WE LIVE RC
