 Fly RC Magazine WE LIVE RC
Basics Of Fuel Power
We’re at a great time in our hobby. If you look back just a few short years (five are all it takes), you’ll see that flying .60- size aircraft no longer means that you are limited to flying a nitro plane. You can pick virtually any .60 aircraft on the market and install your choice of nitro, electric, or 20cc gas powerplants. I assembled the 1/4-scale Gee Bee from Hobby Lobby; it will accept an AXI outrunner with a 10S or 12S LiPo pack, a 1.08 to 1.60 2-stroke engine, a 1.20 to 1.80 4-stroke engine, or a 26cc gas engine. I decided to use the Zenoah G26ei, and I shot pictures of the engine-installation process. I chose the 26ei because gas engines have a lower fuel consumption rate than equivalent nitro engines. The downside is that a gas engine requires a bit more setup than an equivalent nitro engine: you’ll have to install a choke servo, and you’ll need to take measures to prevent the electrical interference generated by the ignition from leaking into the radio system.
 DETERMINE SPACING
The first step in installing your new gas engine is to determine the distance your engine needs to be away from the firewall. Some kits specify a distance between the firewall and propeller hub, but the early instructions for my Gee Bee didn’t have this information. I enlisted the help of my flying buddy Roy Graham to get the Zenoah properly positioned: he held it
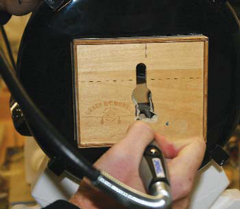
To simplify installation, we made alignment marks on the engine to coincide with the alignment marks on the firewall. Notice that the carb and intake have been removed to ease installation. I installed a socket-head capscrew at the bolt-hole location behind the carb to ease future maintenance tasks.
in place against the firewall while I slid the cowl over the fuse. It turned out that I didn’t need spacers to mount the Zenoah in the Gee Bee, and I was able to bolt the engine directly to the firewall— nice! Depending on your situation, you may or may not need to use aluminum standoffs or spacers to distance the engine from the firewall. If you do, you can make your own spacers out of a 3/4-inch hardwood dowel that you’ve center-drilled for mounting bolts to pass through.
 DRILL MOUNTING HOLES
To mount your engine, you’ll need the dimensions of your engine’s bolt-hole positions and a ruler or calipers. My Gee Bee has vertical and horizontal alignment marks across its firewall, so Roy suggested that
I had to remove a part of the firewall for it to clear the Zenoah’s Hall-effect sensor.
instead of measuring and marking each hole’s location, we mark the horizontal and vertical centers on the engine and use those marks to align the engine with the marks on the firewall. This worked well, Roy held the engine in place, and I verified that it was properly aligned and then marked each of the four mounting-hole locations. To mark the position of the hole behind the carburetor, I had to remove the carb from the engine; we decided to install an Allen-head bolt there to facilitate maintenance later. Having marked where the holes should go, I used a 1/16-inch 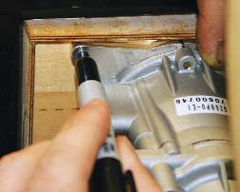 drill bit to drill pilot holes in the center of each bolthole location and followed up with a drill bit that was just large enough to allow the bolt to pass through without excess slop. I bolted the engine into place
With the alignment marks on the firewall and engine lined up, I marked where each of the four mounting holes on the firewall should go, drilled pilot holes and then drilled through-holes for the bolts.
using bolts, fender washers and locknuts. Fender washers are typically of a larger diameter than a standard washer for the same bolt and will help to spread the load across a larger area of the firewall. I used Phillips-head screws for three holes and an Allenhead screw behind the carburetor, but four Allen-heads would work, as would hex-head bolts.
 INSTALL THE IGNITION & EXHAUST
Where you install the ignition for your plane will depend on the space available, your preference, etc. I decided to install the ignition module above the firewall with heavy-duty Velcro, using the hook side on the plane and the loop side on the ignition module. With the ignition box in place, I focused my attention on installing the Slimline Pitts exhaust. 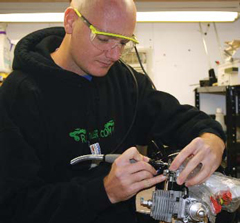
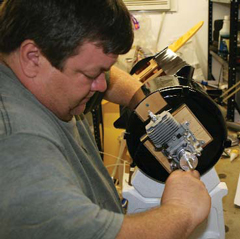
Right: Roy gets busy bolting the Zenoah to the firewall. Left: I reinstalled the carb and venturi and then removed the idle stop screw and the stock carb arm. I will use nosewheel steering arms on both throttle and choke controls at the engine.
Because of the right thrust built into the firewall, I had to remove part of the fuse to allow the exhaust to fit properly. I installed one bolt in the muffler flange, rotated it into place and marked the fuse to allow clearance around the exhaust. A cutoff wheel and a rotary tool made the task simple, and I reinforced the fiberglass section of the fuse with plywood.
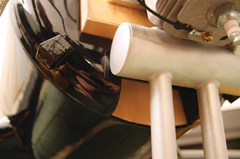
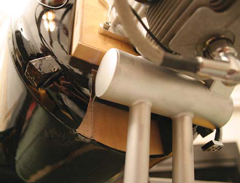
Before and after shots of the clearance that was made for the exhaust.
CONCLUSION
There are certain nuances to installing a gas engine. Unlike most nitro birds in which engine mounts are used, you have to use spacers to install the engine. Throttle servos are still used, but you’ll need to plan a mounting location for a choke servo as well. In addition to a standard receiver pack, you’ll need a dedicated ignition battery. To eliminate the possibility of ignition noise interfering with the receiver, be sure to use a non-metallic throttle-pushrod assembly such as Sullivan Gold-N-Rods. When you’ve passed the initial hurdle of “learning gas†you’ll most likely love the reliability and fuel economy that gas engines offer.
Links
Slimline
www.slimlineproducts.com (480) 967-5053
Sullivan Products
www.sullivanproducts.com (410) 732-3500
Zenoah, distributed by Horizon Hobby Distributors
www.zenoah.com (877) 504-0233
