 Fly RC Magazine WE LIVE RC
Fly RC Magazine – June 2012
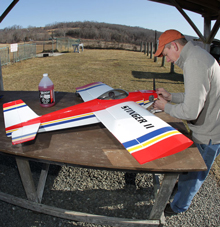
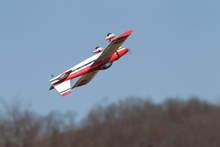
Great Planes Stinger II ARF
Classic sport aerobatic show stopper resurrected
By Kevin Siemonsen kevins@flyrc.com
Photos By Walter Sidas
AT A GLANCE
MANUFACTURER/DISTRIBUTOR: Great Planes
TYPE: Classic sport aerobatic fun fly ARF
FOR: Intermediate Sport Pilots
PRICE: $169.98
NEEDED TO COMPLETE:
Shop tools, glue, engine w/ muffler, prop, radio system, servos, glow starter
ASSEMBLY TIPS
The Stinger is primarily constructed of laser cut balsa and plywood. The airframe is covered with eye-catching Monocote with contrasting multicolor scheme. Included in the kit is an airframe with two piece wing, fiberglass engine cowl and wheel pants, aluminum landing gear, pre-painted canopy, light-weight wheels, plastic spinner, glo engine motor mount, fuel tank, control linkages, hardware bag, and detailed manual.
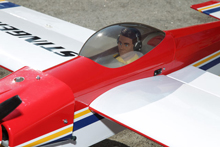
Assembly is straight forward with the biggest gluing step being the installation of the tail components. Indexed self-aligning tail surfaces go together “for intensive reasons with your eyes closed†and still end up square. Before anchoring the tail control surfaces, the steerable tail wheel gets mounted at the hinge line of the rudder. The two piece wing uses an aluminum carry through spar with an indexing dowel that prevents the wing from rotating. Nylon screws with oversize heads allow hand tightening. The aluminum landing gear mounts to the belly with machine screws and wheels and pants install effortlessly with the included hardware and predrilled holes. A detailed pilot is pre-mounted in the well finished canopy/radio hatch. Two 2-56 and a forward alignment dowel hold the canopy in position.
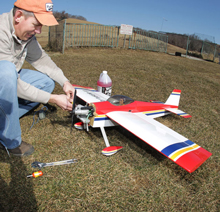
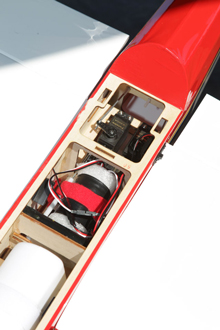
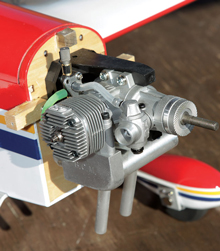
The engine installation like the rest of the kit is text book. The O.S. 46AX is a dependable power house that is right at home on the front of this little hot rod. The fire wall is predrilled with blind nuts to accept the nylon engine mount. Mark, drill, and tap the nylon mount and screw the mighty O.S. into position. Du-Bro socket head screws secured the engine in place. A Bisson.46 Pitt’s style muffler was substituted instead for the original equipment muffler that came with the engine. The Pitt’s style muffler neatly tucks under the cowl for a much neater installation. The fuel tank installation requires assembly of the tank prior to securing it with Velcro-strapping. A hole in the fire wall accepts the tank stopper and fuel lines. The pre-painted engine required some work with a Dremel tool for clearance around the cylinder head prior to installation. I centered the cowl using the spinner back plate and drilled the protruding mounting blocks for the mounting screws. I added rubber bonded washers to prevent vibration from wearing the mounting holes. The radio installation was as simple as pie with all the built-in provisions Great Planes incorporates into the design. All the fuselage servos are centrally located under the canopy hatch and each aileron gets a located half way out each wing bay. The Futaba S3004 servos are cost effective and have plenty of torque for even the most aggressive of flying. Wire push rods connect servos to their respective control surface with plastic clevises and EZ style connectors. Prior to mounting the throttle push rod a hole had to be drilled in the fire wall. I substituted ‘Z’ bends in favor of the ‘EZ’ connectors at the servo arms. For powering the Futaba R6014HS receiver, I used a light 6-volt 1000mAh NiMH battery pack. There were no difficulties mounting the receiver and battery pack with provisions for the Velcro strapping and plywood mounting pad.
Image Gallery
 |
 |
 |
 |
 |
 |
Links:
Bisson Custom Mufflers
Du-Bro
Futaba
Great Planes
Master Airscrew
McDaniel
O.S. Engines
Wildcat Fuel
