 Fly RC Magazine WE LIVE RC
A few tips for getting your airplane back in the air
Over the years that Ive been in the RC hobby Ive seen a few trends come and go, as well as a few changes in the industry as a whole. Back when I started getting into the hobby in 86, kits reigned supreme; there were no RTR cars or trucks to speak of, and ARF airplanes, aside from a few kits available from Lanier, didnt exist. Fast forward a few years and a newcomer to the hobby has the ability to get virtually any type of plane in ARF form. In the past few years theres been an influx of plug and play and RTF planes on hobby shop shelves. These RTF planes are great for introducing new folks to the hobby, but as a former hobby shop employee, Ive heard several folks comment on how if they somehow crashed a plane like Hangar 9s P.T.S. P-51 Mustang, theyd have to throw it away and get a new plane. In hopes of combating the thought that an easy-flying plane like the Hangar 9 P.T.S. Mustang would be destined for the trash bin after a crash, I decided to show the rebuild of my own crashed Mustang from a first-timers perspective.
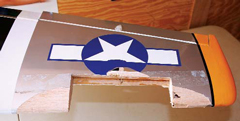
The damage to my Mustang happened because of a depth perception error. I climbed high, rolled into a full-throttle dive, and prepared to strafe the airfield. All was well until the landing gear clipped one of the pine trees that line the left side of the field. The Mustang was immediately yanked toward the ground. I held full throttle and gave the bird full elevator in hopes of recovering from the mishap, but the Mustang impacted about 80 feet later in a small bush. A limb on the bush struck the leading edge of the wing directly over a rib and continued through the wing up to the spar. Not bad, I thought as I surveyed the damage. Could have been worse. Aside from damage to the wing, the canopy was shattered into several pieces and one blade of the 10×6 Master Airscrew prop had snapped off. The damage didnt appear to be too bad. Lets get to the repair.
GETTING STARTED
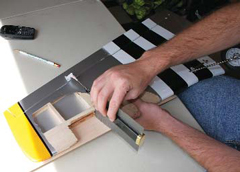
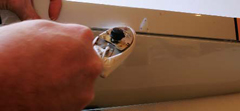
 1. Start by removing the damaged sections of the wing. I removed the crushed rib as well as any associated leading edge and sheet balsa. I also made sure to remove any debris that worked its way inside the wing.
 2. The first item I tackled was rebuilding the busted wing rib. To accomplish this I wrapped sheet balsa around the remaining portions of the wing and used a contour gauge to establish the shape of the rib.
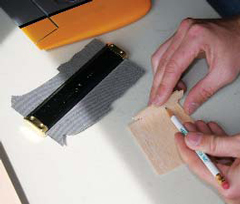
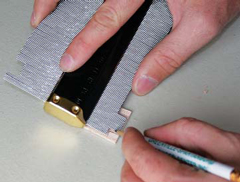 3. I laid the contour gauge on sheet balsa and simply traced the formed outline of the gauge to give me a worry-free shape for the rib. I used a hobby knife to cut the rib to shape, and then placed the rib next to the sheet balsa I planned to use for the repair and traced the thickness of the sheet balsa onto the rib so it could be removed. This ensures that the balsa sheeting will properly lie on the rib without affecting the shape of the wings airfoil.

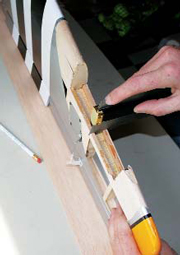
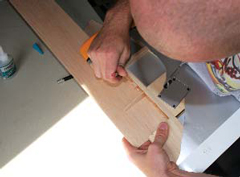 4. I glued the rib in place with thin CA from BSI Adhesives then tacked a few scraps of balsa to the wing (see left) to serve as supports for the new balsa sheeting. With the balsa sheet in place, I traced the dimensions of the area to be repaired onto the sheet, (right).
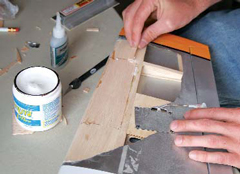 5. A small strip of spruce was glued into place to serve as a foundation for the leading edge, and then the first piece of balsa sheet was glued down. A bit of Hobbylite filler was used to smooth the patched area into the existing portion of the wing.
RE-COVERING
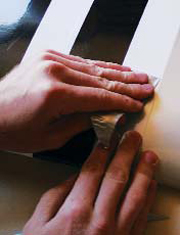
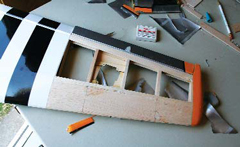 6. With the repair complete its time to re-cover the damaged section of wing. Since the P.T.S. Mustang is a Hangar 9 product, I grabbed two rolls of Ultrakote; silver and dark yellow.

 7. Follow the instructions that come with each roll of Ultrakote. Even for a rank newbie the instructions are clear and easy to follow. The great thing about covering is that if you make a mistake you can start over by peeling up the mistake and starting with a new piece of covering. Dont be fooled, covering is actually easy. (And yes, I know I need a new sock on my iron. The iron was given to my by a local RC buddy Thanks, Roy!)
 8. Lightly trim the covering keep a light touch and cut only the top layer. I slightly overlapped the new covering that I applied. When trimming the covering the absolute last thing you want to do is to cut the underlying material. To simplify the task of cutting a straight line, I used a strip of 3Ms blue masking tape as a guide. I peeled the excess covering back over itself to keep things neat and not risk pulling off new covering.
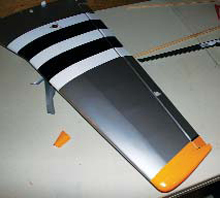 9. A little dark yellow Ultrakote was applied to the wingtip. Although not pictured, I finished the job by applying a bit of Parmas black self-adhesive pinstripe tape to the area where the two colors meet.
CONCLUSION
 So there you have it, wing repair made simple. The only other thing youll need to do is to rebalance the wing. Do this by reassembling the wing with all associated servos and linkage in place. Support the wing in the center to check balance. If your wing needs to be balanced the easiest location to add weight is inside the servo pocket. Simply place weight on the wing at this location until the wing is balanced. Remove the servo and use a bit of adhesive to attach the weight to the inside of the wing.
Links
3M, www.3m.com
Bob Smith Industries, www.bsiadhesives.com, (805) 466-1717
Hangar 9, distributed exclusively by Horizon Hobby Distributors, www.horizonhobby.com, (877) 504-0233
Hobbico, www.hobbico.com, (800) 682-8948
Master Airscrew, distributed exclusively by Windsor Propeller Company, www.masterairscrew.com, (916) 631-8385
Midwest Products, www.midwestproducts.com, (800) 348-3497
Parma/PSE, www.parmapse.com, (440) 237-8650
Top Flite, distributed exclusively by Great Planes Model Distributors, www.monokote.com, (800) 682-8948
