 Fly RC Magazine WE LIVE RC
Fly the classic Vietnam-era fighter at your club field.
Depending on who you are and your frame of mind at the time, the prospect of writing about the “Phantom” could conjure up all sorts of mental pictures. I mean, in my somewhat warped mind, it could be a guy in a tight, grey, kind of sissy-looking outfit with a chubby sidekick. I’m guessing that if you’re like most aviation enthusiasts though, the vision that crops up most readily is of a real hot rod of a jet fighter, with a love it / hate it profile, a cranked wing, full of garish markings, just flaunting its air superiority. Yes, the McDonald Douglas F-4 Phantom is one of the hottest jets of yesteryear, and one that most of us would love to fly. That’d be it B.
 There aren’t very many models of the F-4 Phantom out there, and the very few that are available are either full blown, 6-easy-payment types, or little profile, sheet foam jobs that are far from realistic. This one is neither. Even if the parts didn’t fit, which of course they do, the first impression upon opening the box is “Holy Cow Batman, how did they do that!” Yup, it’s really that nice. In fact, it’s unbelievable. So, with that tone set, you can either gallop down to the hobby shop right now to buy one, or you can finish reading my report and make notes of what else you might want to pick up while you’re there.
 E-Flite is one of those companies with a name that has become synonymous with offering us products that look good, go together well and fly with the best of them. There is simply no doubt that you are buying a product that “works” if it says E-Flite on the box and this little F-4 carries that tradition with honor! The model is very complete, and other than the usual stuff you need to purchase for most other model aircraft, the hardware that makes it work is all in the box. Remember, this is a “review”, not a blow-byblow report of how it goes together. So let me say this; it goes together very well, there were only a couple of hiccups, which by the time you read this have been treated with the best remedy available.
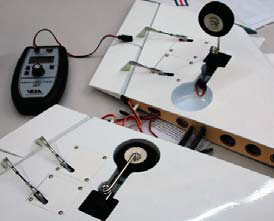
Mounting the four servos and main landing gear retracts asshown involves about 90 minutes of fun work. That gizmo is a “ServoXciter”, a novel servo tester by Vexa Control, and I strongly suggest its use.
I’d say that anyone who can read and has assembled anything from the LEGO stables will find this F-4 a piece of cake to put together. Page 4 of the 3-dozen page manual advises you what you’ll need to put this little beast together. If you have any degree of modeling experience you will have everything you need in the way of tools and supplies laying around your work area. If you are one of those guys that builds with a knife and fork, go buy a Dremel, some medium grit sandpaper, some low tack tape and some mixing sticks. The model may be built with the fixed landing gear provided or with optional electric retracts. It flies very well with either gear but the cool factor is much higher if you have upsuckable gear. The manual also recommends a specific ducted fan unit, battery, speed control and servo selection. All fit perfectly, so I’d say go with their recommendations, regardless of where your radio equipment loyalty may lie. Besides, JR, E-Flite and Thunder Power do make excellent products!
 TIPS FOR SUCCESS
First, there are some things you should know. And maybe you already do, but, for some of us/you, it is important to know that there are 25.4 millimeters in an inch. The manual references millimeters often, nah, make that most of the time, so that info is good stuff.
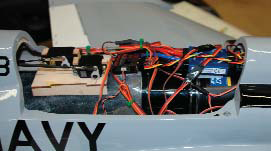
The main hatch is held in place with two very strong magnets and dowel pins. This maze of stuff is what’s going on under that hatch! Believe it or not, that is as neat as I can make it, but it is truly functional! Sort of like four pounds of Sugar in a two-pound bag.
Second, don’t skimp of the quality of the adhesives. You don’t need a lot, but when you do, the manual recommends Zap CA products and Zap’s Z-Poxy. Get some.
Third, read the manual carefully, it is not intimidating at all, just very precise. I had to re-read a couple of steps, but all became clear the second time.
Fourth, I logged every single minute of the build. It took me just six hours and 45 minutes. You should expect the same, perhaps up to 8 hours max if you are less experienced.
 It is nice that in the most important areas the model uses American hardware. Like 8-32 bolts instead of 6.25mmx2.5mmx3.75mm and so on. I replaced four of these 8-32s in the kit, used for holding the wing spars tight, with ones that were twice as long, only to make it easier to install them. If you have little hands, perhaps approaching the size of Cinderella’s, you might be able to use the ones supplied.
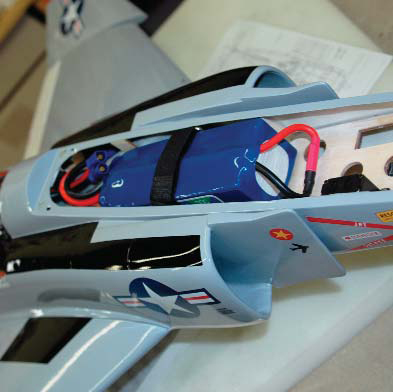
The canopy and cockpit lift off for easy access to the E-flite 6S 5000mAh LiPo battery pack.
I also found that moving the elevator servo 1/4-inch rearward made getting to the mounting screws much easier after the ruder servo was installed. And, only because of some pretty hard landings, I found that it is a good idea to add some ZPoxy to the joints of the little servo tray that holds the rudder and elevator servos. Mine popped off the mount!
And last, do not even think of changing anything. Perfection comes in various forms. In this case it comes in a box marked E-Flite F-4. Don’t mess with it!
 AIRBORNE
We, as in Sean Curry and I, arrived at the local flying field and did some taxi tests which did nothing but prove that this thing was a rocket on the ground and that I had misadjusted the steering center. Right after the first takeoff I felt that my F-4 was a little nose heavy. I had balanced it in the middle of the suggested balance range, but that may have been incorrect for my airplane. After flying around for a few laps, performing various maneuvers I thought it best to bring it home and make some adjustments. There was just something about the way it flew that I wasn’t wild about. I thought it would be almost identical to the Habu 32, but it differed and I wasn’t sure yet if I liked it or not. It took a little more up trim than I expected and it flew like it was nose heavy. Landings were like setting up the glide slope for a ’59 Buick Station Wagon. No, not really, but it came downhill faster than I thought might be cool for the average Joe. But being the dexterous and determined pilot that I am, I got the Phantom back in one piece, after a 4-skip landing which did volumes in convincing me of the strength of those landing gear struts!
After a 30-minute stint in the shop double-checking the CG, I made a decision to balance the F-4 at the rearward most suggested mark and see what happens. That decision called for three ounces of shot poured into the tail cone with some more Z-Poxy to secure it. A few hours later and we were off for another session.
WOW! It was like somebody had given me a whole new airplane! Every maneuver was silky smooth. Every turn was pretty to watch, using about 70 percent less back pressure on the stick in the turns. I was able to perform loops, rolls, inverted flight, split S and 4-point rolls with ease. The airplane is fast, and likes it there. I am suggesting that you will want to fly it at 65-percent power and above. Landings were quite different with the little bit of tail weight. I could now flare the airplane smoothly, adding power and simultaneous elevator to slow it down, with full flaps, for a really nice landing. A little practice and you can make it beautiful every time! I am so happy I stuck with it and investigated the rearward CG location! A suggestion: If you’re new to hot performing airplanes, jets in particular, you might feel “safer” with the balance right in the middle and you can add tail weight as you get more familiar and more confident with the Phantom.
One last thing. I cannot say enough about the advantages of using a radio transmitter with the capabilities and function availability of one like this JRX9503. Adding expo mixing to the elevator and ailerons took seconds, adding a little up elevator when the flaps were deployed was a simple task and then slowing the flaps so they didn’t slam up and down added a lot of visual class to the little fighter. And by the way, the JR MC35 Micro servos recommended in the manual are a perfect fit in both size and durability. They have more than enough oomph for hundreds of 100+mph sorties.
It is now the last day of September and Florida Jets is only 152 days away. I now have nine flights on the F-4 and with each one I find myself enjoying it more and more. Here’s a tip of the helmet to E-Flite for producing one hell of an airplane. I’m going Habu Hunting!
 SPECS
SPECS
PLANE: F-4 Phantom
MANUFACTURER: E-Flite
DISTRIBUTOR: Horizon Hobby
FOR: Intermediate skill level pilots, low skill level builders
WINGSPAN: 34.8 in.
WING AREA: 406 sq. in.
WEIGHT: 7.4 lbs.
WING LOADING: 42 oz./sq. ft.
LENGTH: 48 in.
RADIO: 9 channels required; flown with a JR X9503 transmitter, AR8000 8-Channel DSMX receiver receiver, 6 JR Sport MC35 micro servos, 1 DS3421 ultra torque servo for elevator
POWER SYSTEM: (All E-Flite) DF32 Brushless Motor, Delta-V 32 80mm Fan, 80- Amp Pro SB Brushless ESC v2, 5000mAh 6S 22.2V 30C LiPo, 10 AWG EC5
FULL THROTTLE POWER: 65 amps, 1495 watts, 12.63 W/oz., 202 W/lb.
DURATION: 5-7 minutes
MINIMAL FLYING AREA: RC club field
PRICE: $299.99
COMPONENTS NEEDED TO COMPLETE: 6+ channel transmitter and receiver, 6 micro servos and 1 ultratorque mini servo, Brushless ducted fan motor and 80mm fan unit, 80A brushless ESC, 6S 5000mAh 30C Li-Po Battery and compatible charger. Optional retracts
SUMMARY: Total Excellence in a Box. Perhaps not for the timid, but certainly ideal for making hot shots outta wannabes.
FINAL VERDICT
Most people reading this article will read the entire body and then skip over to what we call the Side Bars, those smaller boxes with mini-articles inside that address the specifications and how it performed. We have those, and you will find the details there, as customary. So I will make this a paragraph of my farewell statements. This F-4 is truly an awesome little hot rod. The model itself should be considered exceptional in every respect. The workmanship and parts fit is absolute perfection. The performance is far beyond what I expected. It approaches the speed of E-flite’s earlier Habu 32, even though it appears to be going even faster at full tilt. It is fully aerobatic and has some reasonable slow speed characteristics. We can’t forget that it is a scale model of an F-4, not an Ercoupe, so it flies a little faster and lands a little faster. After a little stick time you can drag it in almost like a full scale Phantom, using power and elevator in perfect harmony. I can’t say anything else that wouldn’t be considered repetitive and a bit gaggy. And I am not known for the Gaggy thing! My recommendation is this; if you are one of those go fast dudes that must have the latest in technology and the best looking jet in its class, warm up the Visa Card!
Links
E-flite, distributed exclusively by Horizon Hobby Distributors
www.e-fliterc.com, (800) 338-4639
JR, distributed exclusively by Horizon Hobby Distributors
www.jrradios.com, (800) 338-4639
Spektrum, distributed by Horizon Hobby
www.spektrumrc.com, (800) 338-4639
Vexa Control
www.vexacontrol.com, sales@vexacontrol.com
ZAP and Z-Poxy are manufactured by Pacer Technology
