 Fly RC Magazine WE LIVE RC
Simple techniques to a scale looking model
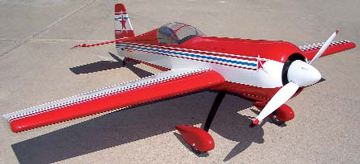
Airplanes with round engines have a unique look that appeals to many modelers and aviation enthusiasts. From the early fighters of WWI through Golden Age classics to modern aerobatic aircraft such as the Sukhoi, they have that special attraction. As almost any veteran pilot will tell you, fullsize airplanes have round engines.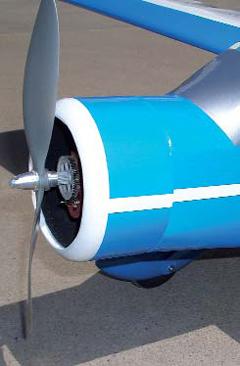
Dont get nervous. You dont need to be an experienced scratch builder for this simple project. Do you want to add a cowl to your PT-17 but cant find one the correct size? Maybe you need a new cowl for your 10-year-old Hellcat but its not available anymore or perhaps you have a basic sport flyer and would like to give it a classy look. In such cases, a nice round engine cowl may be just the thing.
Ive scratch-built a number of round engine airplanes through the years and been asked many times how I build the cowling. Its really not difficult and the technique shown here is a traditional, well-tested format. For this article, I will build the cowl for a fun-scale Howard DGA-15. Its design is a spin-off of the deBolt Live Wire Champ, a really nice flying 3-channel airplane designed in 1954. I modified deBolts original design to look like a Howard, and use electric power. I also decreased its size slightly, lightened it considerably and essentially made it a park flyer. This cowling is lightweight and happens to be perfectly round on both ends. If your model is larger, you may want to use thicker materials to suit your build. I spent about three hours building it from balsa and birch plywood. It would take considerably more time, effort and money to make a mold and either pull a plastic cowl or do a fiberglass lay-up.
 GETTING STARTED
If you dont have any supplies on hand, swing by your local hobby shop for a few sheets of balsa and some fresh CA. They likely have some Bob Smith CA with their name and address on the bottle so you wont forget where to go for more.
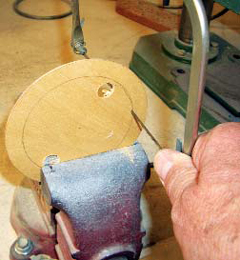
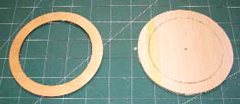 Begin by determining the diameter of the front and rear of the cowling. Use a compass to draw a circle the diameter of the rear, minus twice the thickness of the cowling skin (in this case 1/8-inch; 1/16-inch times two), on a sheet of 1/16 birch plywood. Draw an inner circle approximately one inch smaller in diameter. Saw out the circles. Youll need a coping saw or scroll saw to cut the inner circle. Draw the front outer cowl-diameter circle, minus the skin thickness, and the inner cowl-opening circle on a sheet of 1/8 balsa. Cut the outer circle. Do not cut out the inner circle. Cutting the inner circle now will weaken the piece too much.
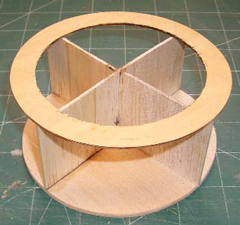
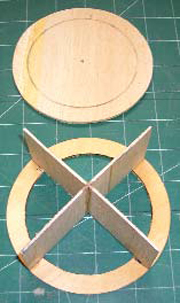 Next build an X-shaped alignment brace out of 1/16 balsa. The X-brace arms must be the same length as the diameter of the rings. Glue the brace between the plywood ring and the balsa circle at the 3, 6, 9, and 12 o-clock positions and ensure that it fits perfectly. I cut my X-brace pieces a little over size and then sand to fit. It must be square and the correct length. The Xbrace holds the front and rear cowling rings in the proper position and strengthens the assembly while you wrap it with balsa sheet. My plane has a couple degrees of right-thrust. I reduced the height of the right side of the X-brace 1/8-inch. This makes the propeller off-set less obvious and matches the cowl face.
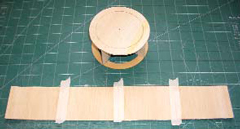
 Cut sections of 1/16 balsa sheets approximately 1/2- inch longer than the cowl and glue enough sheets together along the grain to wrap completely around the cowl circumference. You can either roll the frame on the bench to measure the circumference or do the math. Circumference of a circle is approximately 3.14 x diameter. Wrap and glue the skin around the frame assembly with CA or your preferred adhesive. Sand the excess skin flush with both ends. Now, using a hobby knife, you can cut out the inner circle you drew with the compass on the balsa end. Break it away and sand the remaining ring along the line.
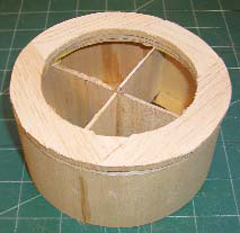
 The rounded off shape of the front is made from built up balsa laminations. My cowlings rounded front needed to be 5/16 thick. I didnt have any 5/16 balsa so I laminated one layer each of 1/8 and 3/16. I used scrap pieces, cut them to the approximate shape, and glue them to the front balsa ring. Offsetting the grain between the two layers also adds a lot of strength. Now break out and remove the inner X-brace. Grab your sanding block and round off the front to the radius you
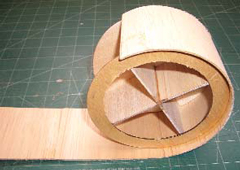 want. I attach adhesive- back sandpaper to a tube to sand the inner opening to shape. Use as large a shape as you can fit into the roughed out opening. You may want to use a Dremel tool with a sanding drum to remove excess balsa from the inside. Fill any holes or gaps with spackling or your favorite balsa filler. Your cowling is framed. Finish it as you wish, paint or film. To keep it light, I covered mine with Aero-film from
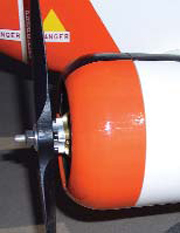
  Stevens AeroModel and painted the inside with flat black water-based paint. To mount the cowling I ran two screws through holes in the rear plywood ring into hardwood blocks behind the firewall.
 VARIATIONS
Perhaps the cowling you need is shaped differently than my example build. It may be larger in diameter on one end than the other. It may be oval like a P-47 Thunderbolt instead of round. No problem. Just change the shape or diameter of the front and rear rings to match your plane. If your cowls intake ring radius is bigger, add more laminations to the front before you sand it to shape. If your cowl curves along the entire length you may prefer to cover it with thicker strips of balsa instead of thin sheet, and then sand it to shape, as balsa sheet doesnt form to a compound curve very well. Change the X-brace size and alignment angle as needed to fit inside the end rings. If you feel one X-brace is not adequate support for a very large cowl, add more pieces at 45 degree angles  between the X arms. If your cowl is small, say less than 3.5 inches in diameter, you may have to moisten the back of the balsa skin so it will bend without breaking or use one or two layers of 1/32 balsa sheet. If I were building a 25-percent
  Howard, I might use 1/8 plywood for the rear ring and 1/8 balsa for the skin. Obviously this cowling does not have rocker arm blisters. If you need them, you could carve them out of scrap balsa or perhaps find something at a craft store that you could modify to work. Cowl flaps can be cut from thin plywood and glued in place.
 CONCLUSION
As you can see, constructing your own radial cowl is a relatively simple building exercise and can dramatically change the appearance of your model. I encourage you to stop in at the local hobby shop, pick up some wood and give it a try. Your model will thank you!
 Links
Links
Bob Smith Industries
www.bsiadhesives.com, (805) 466-1717
