 Fly RC Magazine WE LIVE RC
| An easy flourish for your next model | |
In the January 2008 issue, we looked at a quick and easy way to make a balsa cowl. Now lets build a set of wheel pants. Beyond the basic satisfaction of crafting airplane parts out of raw materials with your own hands, there are two main reasons to build these parts out of balsa: the obvious reason is that there may not be a commercial product available to suit your needs. This is usually the case with scratch-built projects and often when building from plans. Also, while kits usually have fiberglass or vacuum-formed plastic components, you might want to dress up a more basic model that didnt include such accessories.  The Park Scale Models Monocoupe is small enough for me to just glue the wheel pants to the landing-gear fairing struts. The Park Scale Models Monocoupe is small enough for me to just glue the wheel pants to the landing-gear fairing struts. |
|
| Even with kits that include vacuum-formed parts though, I am just as likely to reach for my scrap box. Building balsa replacements lets me use the same covering film as I use on the rest of the airframe. This is the easiest way I know to ensure a perfect color match, and it saves me the mess and trouble of trying to mix just the right shade of paint. If you dont have any extra wood in the scrap box, now is the time to visit your local hobby shop or call a supplier such as Balsa USA, National Balsa or SIG. I dont worry too much about the weight of the wood for wheel pants and cowls. You want these parts to be durable, and since they are ahead of the CG, a little extra weight here will help to balance your model. I recently built balsa wheel pants for two models, and both worked out well. One was a Park Scale Models Monocoupe 90a, while the second is my 150-percent Daddy-O that also got the cowl in the January issue. Dont be intimidated about making two identical wheel pants. I have a few tricks to show you below, so lets get started. |
|
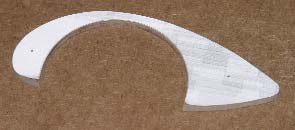
1. Start by photocopying or printing a full-size drawing for the wheel pants; then cut out a template for the basic core shape. I used 3/16-inch Masonite, and I cut just outside the line with a scroll saw before I fine-tuned it with a disc sander. I mounted my Dremel tool in a router table and used a large sanding drum to carefully smooth the concave area.
|
|
 2. Trace around the template and roughly cut the basic stock for the wheel pants. I use carpet tape to attach the template to the rough part; then I make another pass with the scroll saw, trying to stay within 1/16 inch of the template. For the pant shown, I used two 3/8-inch laminations and a 3/16-inch central core. 2. Trace around the template and roughly cut the basic stock for the wheel pants. I use carpet tape to attach the template to the rough part; then I make another pass with the scroll saw, trying to stay within 1/16 inch of the template. For the pant shown, I used two 3/8-inch laminations and a 3/16-inch central core. |
|
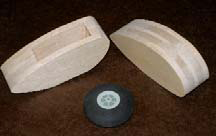
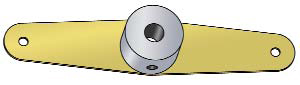
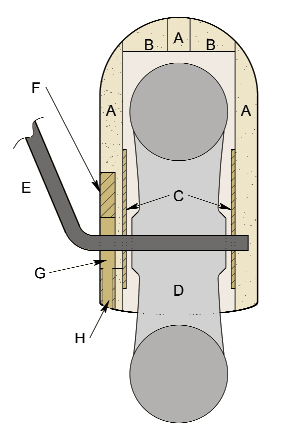 A 3/16-in.-thick balsa sheet A 3/16-in.-thick balsa sheetB 3/8-in. balsa sheet C 1/32-in. ply reinforcing discs D 3-inch wheel E 1/8-in. music-wire gear leg/axle F 1/8-in. light-ply mounting insert G Ply insert has been drilled to clear the wheel collar H Ply insert has been drilled for setscrew access |
|
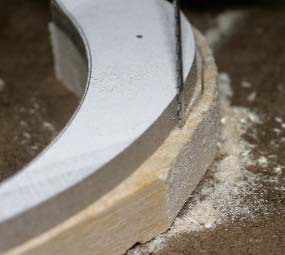  3. I hit on the idea of using a RotoZip bit to shape these parts. They are readily available at most home centers and hardware stores. Note that the template is under the part. Set the tool height so that the drill bits smooth shank is against the template. The cutting edges are the same diameter, so they can overlap the template slightly. RotoZip does offer a bit with a smooth guide tip, but I wanted to cut the wood closer to the collet for more support. You can clearly see the difference between where I used a sanding drum (to the left of the bit) and where I cut with the RotoZip (to the right of the bit). 3. I hit on the idea of using a RotoZip bit to shape these parts. They are readily available at most home centers and hardware stores. Note that the template is under the part. Set the tool height so that the drill bits smooth shank is against the template. The cutting edges are the same diameter, so they can overlap the template slightly. RotoZip does offer a bit with a smooth guide tip, but I wanted to cut the wood closer to the collet for more support. You can clearly see the difference between where I used a sanding drum (to the left of the bit) and where I cut with the RotoZip (to the right of the bit).
|
|
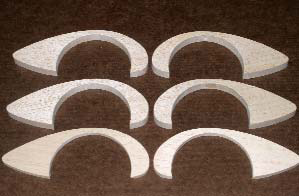 4. These are the six core pieces I needed for this project. The RotoZip bit worked wonders. It let me finish-rim these pieces very quickly. Be careful setting the speed. My Dremel vibrated with this bit run at full power, and it produced a rough cut. I slowed it slightly and everything improved. 4. These are the six core pieces I needed for this project. The RotoZip bit worked wonders. It let me finish-rim these pieces very quickly. Be careful setting the speed. My Dremel vibrated with this bit run at full power, and it produced a rough cut. I slowed it slightly and everything improved.
|
|
  5. The initial assembly: if you have a thinner core piece, keep it in the middle of the stack. You want the joints to be symmetrical about the centerline to help shape the pants. After I had glued the rough parts into place, I shaped them with the scroll saw and a disc sander. |
|
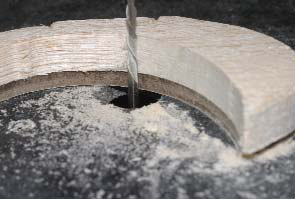
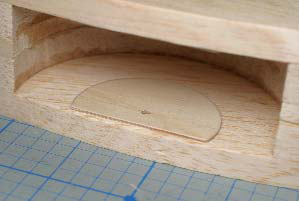
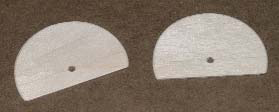  6. Once you have the pants assembled and squared up, drill the axle hole with a drill press. I made 1/32-inch plywood reinforcing plates and used the drill bit to accurately align the plates as I glued them into place. If you do not have a drill press available, drill the side pieces as carefully as you can before assembly, and then use the bit to help align them when you glue. 6. Once you have the pants assembled and squared up, drill the axle hole with a drill press. I made 1/32-inch plywood reinforcing plates and used the drill bit to accurately align the plates as I glued them into place. If you do not have a drill press available, drill the side pieces as carefully as you can before assembly, and then use the bit to help align them when you glue.
|
|
 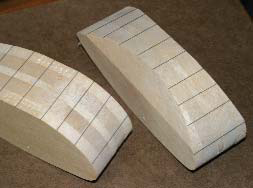 7. Here is the next tip. Mark the rough assemblies with parallel pencil lines across the laminations. These lines will help you match the two pieces as you start shaping. I created the initial bevels with the disc sander to keep things as repeatable as possible. |
|
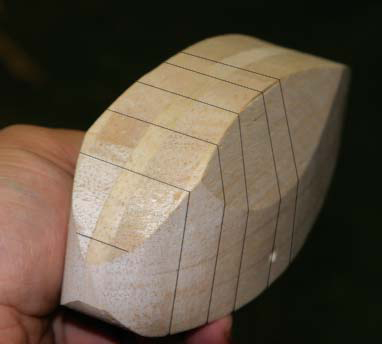 8. Now shape the top view using the lines to help match your two pieces. Extend the lines down the side faces once you have established the initial shape. 8. Now shape the top view using the lines to help match your two pieces. Extend the lines down the side faces once you have established the initial shape. |
|
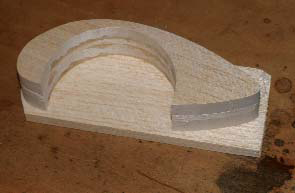
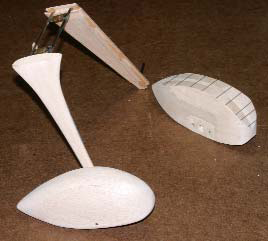
 9. I made the wheel-pant retainers for the Daddy-O by soldering a wheel collar to .020 brass sheet. When they had cooled, I drilled the brass for the axle and retaining screws and shaped it as shown. |
|
 10. Eventually, you have to give up the flat planes and guidelines and get the curves going. As I did with the cowl project, I used a Master Airscrew razor plane followed by a 1.5×9-inch coarse Perma-Grit flat hand file. A bit of final hand-sanding with 220-grit paper has the wheel pants ready for covering. |
|
FINISHING UP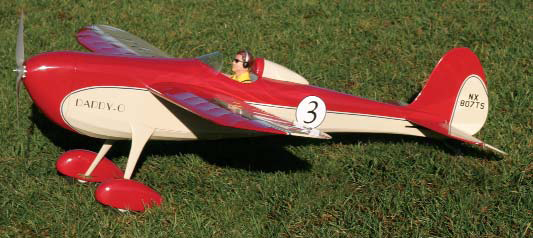
My finished Daddy-O 525 shows the advantage of having balsa wheel pants and a cowl. The color matches perfectly because the parts are finished with the same materials as the rest of the model.
|
|
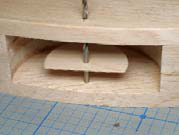
| You must consider how you will mount the wheel pants on your landing gear. I inset 1/8-inch light-ply plates for the Daddy-O wheel pants when I thought I had established the final width. I drilled these plates with oversize holes for the axles so that Id be able to hide the wheel collars within the wheel-pant walls. I drilled small access holes from below through the edge of the plywood to reach the collars setscrews with the pants in place. I soldered the wheel collars to brass anchor straps and used two 2-56×3/16 button-head capscrews to hold them to the wheel pants. I glued short pieces of nylon pushrod stock into the plywood plates as anchors for the 2-56 capscrews. I used SIG AeroKote Lite on both models. With a bit of persuasion, I was able to cover each wheel pant with two pieces of film. I then trimmed the center seam with a 1/4-inch-wide strip to give the covering job finished look. I saturated the wheel wells with thin Zap to seal them against water. If the pants are for a glow or gas model, use a thin coat of epoxy instead. As with the cowl project, the glue lines are not a real factor. A sanding block supports the paper to cut through the CA without raising a ridge. The carbide Perma-Grit sanding tools act the same with the benefit of lasting much longer.
|
|
| LinksBalsa USA, www.balsausa.com, (800) 225-7287 National Balsa, www.nationalbalsa.com, (413) 277-9500 Park Scale Models, www.parkscalemodels.com, sales@parkscalemodels.com Perma-Grit tools, distributed by Bob Violett Models, www.bvmjets.com, (407) 327-6333 SIG Mfg. www.sigmfg.com, (800) 247-5008 ZAP manufactured by Pacer Technology, www.zapglue.com |
|
