| As I approach my 50th birthday and reflect on the 35-plus years I have been flying RC models, I have decided to make things a little easier for myself. Somewhere around my fifth year in the hobby, I acquired a field box. In it, I stored just about everything I needed to fly my glow-powered aircraft fuel, starter motor, 12V battery, tools, spare props, glow plugs, etc. It was not light, even for a young man! As I became more involved with electric flight but still flew glow models, things got more complicated. I had to take even more things to the field: chargers, flight batteries, etc. The field box got heavier; I actually had two! When I kicked the fossilfuel habit, things were easier for a time. Assuming that I always used my car battery as a source for my charger power at the field, the flight box was significantly lighter when I exclusively flew E-power. |
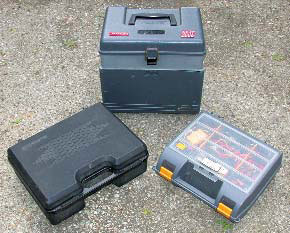 |
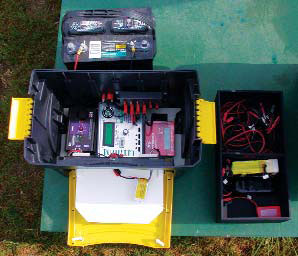
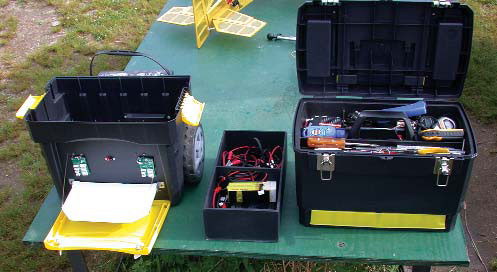
My old arrangement! I had to take a toolbox (Plano tackle box, center), a charger case (gun case, left) and a battery/cables box (Plano tool case, right) whenever I went to the field, and this required many trips up and down the basement stairs. |
|
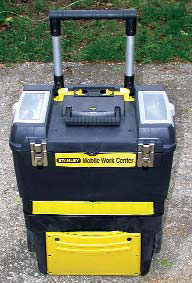
| The stock Stanley Work Center is the subject of this month’s conversion into a complete E-power field box. |
 |
|
Then as my E-power thirst intensified, my models got bigger, the batteries got bigger and heavier, the chargers got bigger, and the support equipment for all my models got more involved. I lugged three smaller field boxes to the field: a tool/accessory box, a box for the chargers and a flight battery box. I’m thankful that once there, I still used the car battery most of the time!
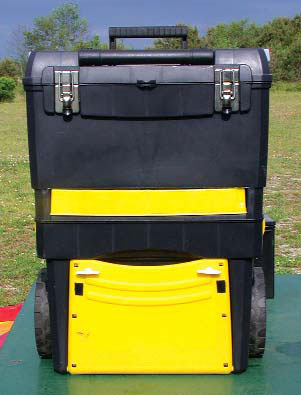
Over the years, the trips up and down the basement stairs to get all this stuff and all the models out to the van for the trip to the field became tiresome. The thought of taking it all out on the return trip was not pleasant either! Out of desperation comes ingenuity! I traded in my three boxes for onewith wheels! This article describes the conversion of Stanley’s rolling Mobile Work Center into a fine electric model field box and charging station. |
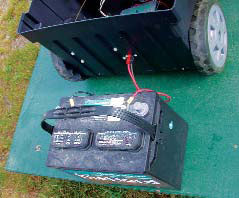 |
A deep cycle marine battery or a car battery is connected to the lower charging section to power the chargers. |
|
| I made cut-outs in the area behind the original pouch door for the charger adapters for the FMA Cell and Balance Pro chargers. I installed an APP connector through the wall for the Astro 109 charger. |
 |
|
 |
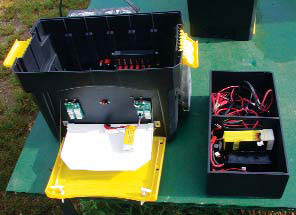
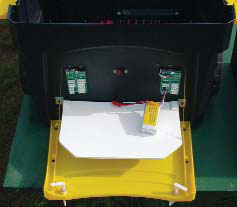
The FMA Balance (left) and Cell Pro (right) chargers and the Astro 109 (center) charger are shown in the completed lower section. A West Mountain Radio 5-port RIGrunner supplies power from the 12V deep cycle marine battery to the chargers. The cableflight battery tray I constructed is to the right of the charging section. The tray sits on top of the chargers on aluminum angles installed on the lower section’s inner walls. |
|
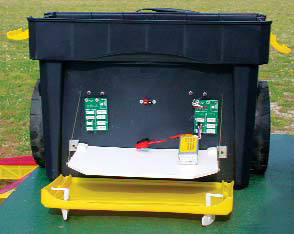
| The flip-down shelf. It stows behind the original pouch door and is supported on fine cables that retract into the lower section. The yellow clamps on both sides of the lower section secure it to the upper toolstorage section. |
 |
|
 |
Charging a battery on the flip-down shelf; never leave the battery being charged unattended. Make extension cables, and when indoors, charge in fireproof containers (and if you have to leave the equipment unattended in any environment). |
|
| THE HUNT FOR AN APPROPRIATE CONVERSION SUBJECT I knew what I wanted, but did it exist? I wanted a plastic toolbox (light, easy to clean) with enough capacity for basic tools and room to fit a charger or two and still allow easy access to everything and provide plenty of cooling for the chargers. It would be nice if it had wheels. Searching the home improvement centers, hardware stores, sporting goods stores and department stores, I found a number of different models that might be suitable, but none was completely up to the task. One day, I walked into a home improvement store and saw, collecting dust on a lower shelf, just the thing I was looking for: the Stanley Mobile Work Center. There was no sign on it and, of course, no price tag. I took it to the register. $29.99! Are you kidding? I said. You got any more! My initial enthusiasm almost got me into the business of converting and selling these gems! But wait a minute, I have way too much to do already. Home to the workshop, skipping and hopping I went, like Charlie Brown with a new, never-flown kite! |
 |
The completed floor frame tool was traced onto a piece of 1/4-inch-thick sheet plastic to make the shelf for the chargers. |
|
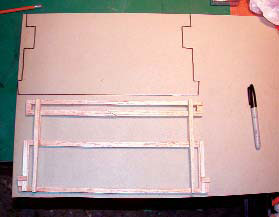
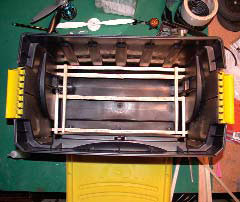
| The lower section’s inside shape was replicated with balsa sticks. This frame was then used to trace the outside edge onto a 1/4-inch-thick piece of sheet plastic to make the charger section’s floor. |
 |
|
 |
The charger shelf is ready to be installed in the lower section. |
|
| The floor was installed in the lower section by loosely positioning it and tacking with CA. Scrap-balsa sticks were used to measure the depth to the floor, and this measurement was transferred to the outside to help position the holes to be drilled for the retaining screws. The floor was secured permanently with four no. 4 sheet-metal screws. |
 |
|
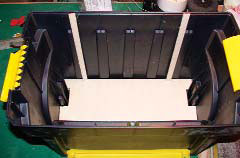
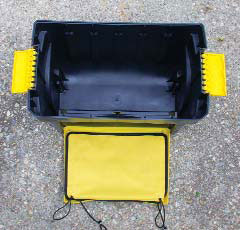
| The Mobile Work Center comes in halves connected by sturdy swing clamps. The upper half would usually contain smaller hand tools and the lower could contain items such as small battery-powered drills and saws. A shallow top tray in the upper half holds smaller hand tools such as screwdrivers, scissors and knives. Removing this tray exposes a deep cavity for storing even more stuff. In the upper half, two small compartments that are accessible from the top of the box can be used to store small items. There’s a semicircular, swingout storage-bin tray in the bottom of the top half, and it’s accessible from the front of the unit. The lower half is just a big bucket that supports the wheels. In the front of the lower section is a folding pouchpresumably for storing instructions. Instructions? Who needs instructions? This was the first item to go! |
 |
The front door pouch was removed to allow the door to swing completely down and out of the way. A battery-charging shelf brings the batteries closer to the charging adapters. I made the battery shelf out of 1/4-inch-thick sheet plastic and hinged it with aluminum angles and 4-40 bolts. The shelf stops at the right angle with the aid of two cables with wheel collars installed on the inside of the lower section. The cables retract into the lower section when the shelf is stowed behind the door. |
|
| The completed field box before use. The middle yellow tray swings out to expose small compartments. I use it to store extra nylon and steel bolts, nuts, washers and other related hardware. I made springloaded latches for the front lower door, but simple hook-and-look straps could be used. |
 |
|
 |
The completed field box in use at a flying session. |
|
THE CONVERSIONI started by converting the lower half into a charging station. I surmised that I could get one each of my three favorite chargers into the lower half bucket. The Astro 123, the FMA Balance Pro and the FMA Cell Pro would sit in the bottom. First, I had to make a false flat floor inside to mount them on. Using scrap balsa sticks, I created a framework template that crudely approximated the shape of the inside of the lower half at the level I wanted to install the floor. I then used this template to make a 1/4-inch-thick plastic deck for the chargers, and I secured this deck to the lower work center with a few no. 4 sheetmetal screws around the outside. I used scrap balsa sticks as a depth gauge to drill for the retaining screws and set the depth at which this floor sat.
I removed the instruction pouch and realized that I had a freely moving drop-down front door. This would be great! I can hide battery-charging ports behind this door to keep them clean and to avoid damaging them during transportation! I set up the chargers inside temporarily and determined the best place to install the charging ports. My FMA Balance Pro and Cell Pro chargers use an adapter to charge my Thunder Power and PolyQuest batteries. I would need a fairly large hole to pass the fairly large connector to the Balance Pro charger through. The Cell Pro adapter has a much smaller connector, but since I did not know the final arrangement of the chargers, I made both holes the same size for the larger connector. I did know that my Astro Flight charger would go in the middle, mostly because of its bulk. This would get a simple Anderson PowerPole (APP) pair bolted to the wall behind the door.
Next, I needed to secure the dropdown door in its up position. I secured the stock door with lightweight bungee-like elastic, but this limited the door to opening only about 2 inches at the topjust enough to access the pouch inside. I originally used simple hook-and-loop straps to keep the door closed, and I later made and installed a pair of rotating spring latches in the holes vacated by the removal of the pouch. |
 |
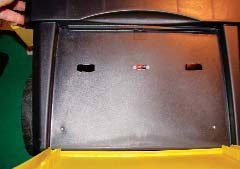
The stock lower section showing the original front door and pouch that was removed. The door was supported by two elastic bungee-like chords that I removed to allow the door to open fully. |
|
The chargers take up only about half of the available space inside the lower section of the work center. To make better use of the space, I built a deep, removable, two-bay tray to fit inside it and to hold my batteries and charger-to-battery cables. I made the tray out of 1/4-inch-thick sheet plastic called Sintra (a light, strong PVC type of material). Most commercial plastics firms have it; 3/16- to 1/4-inch Plexiglas or Lexan would also be suitable. The tray sits inside the lower section and is supported on small aluminum angles screwed to the sidewall. The tray must be removed to charge batteries, as it blocks much of the cooling air required for the chargers. Last, I needed a tray just under the charging jacks on the front face to put my batteries on. I did not want them hanging by the node connectors. I made this shelf out of 1/4-inch plastic, too. It is hinged at the bottom on two 4-40 screws that pass through an aluminum angle and into the shelf. A cable supports the shelf on either side. These cables retract into the lower section when the shelf is stowed and the front door is closed. The cables have a wheel collar on the inside end to stop the shelf at the correct position.
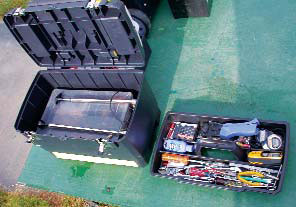
The box’s upper section didn’t have to be modified. I store all my usual tools in the top tray. The area below the tray does not have compartments, so I decided to just move two of the compartment trays in my old Plano tackle box into this section. There is still a little room left to store my retractable landing gear, hand pumps and a few miscellaneous rolls of tape, etc. The two external compartments in the top of the work center hold all the electric adapters and radio extension cords I could ever need when at an away meet. |
| The unmodified top section of the Stanley Work Center houses all the tools I need for a day at the field. |
 |
|
EXTERNAL POWERFinally, I needed to bring power into the chargers from an outside source. I still primarily use my 12V car battery or a deep cycle marine battery to supply my chargers, so I created a 12-gauge, 5-foot cable to connect the battery to the charging station. Both ends of the cable have APP connectors. I can put big alligator clips on one end to connect it to my car battery or my deep cycle marine battery (already fitted with APP connectors). The other end is connected to a pair of APP connectors through the wall on the rear of the charging station. A short wire extends this APP connector to a West Mountain Radio 5-port RIGrunner. This handy, fused, power-distribution box feeds the three chargers and possibly any other 12V accessory I care to use.
Since I made this charging station I have made extension cables to put my LiPo batteries in a fire-resistant box that’s external to the work center while they’re being charged. This is a very good idea, especially with non-balancing chargers and older LiPos without balance node connectors.
WRAP-UP
I love my new E-Field box. Though it’s heavy when fully loaded, it’s still much less trouble than having to go up and down the basement stairs. The handle and wheels make it much easier to get into and out of my van, and it’s especially useful at meets where I can’t park very near the pits. These days, I rarely go to the field without having everything I needeven for emergencies (usually, other fliers’ emergenciesnot mine!).
Well, that’s it for this month. If you choose to make your very own E-power field box, please remember to treat all batteries with the utmost care when you handle them and charge them. Until next time: fly clean, fly quiet and fly and charge safely!
|
 Fly RC Magazine WE LIVE RC
