Friday, April 19, 2024
Home » Product Reviews » Stevens Aeromodel Helium MG

Stevens Aeromodel Helium MG

Readers of my Primary Training column will already know of my love for unpowered flight. I started in RC with sailplanes and love the pure feel of soaring. That said, powered sailplanes likely offer a more user-friendly alternative by eliminating the traditional hi-start or winch. Designed to fit that niche, The Stevens AeroModel (SA) Helium MG is a kit built powered glider that offers excellent performance for the new and experienced sailplane pilot alike. What, you have to build it? From my perspective, which I believe many will share once you see one you get to build it. The experience is that much fun! If youve never built an SA model, youre in for a treat. This is an experience that absolutely should not be missed.

TIPS FOR SUCCESS – ASSEMBLY

Ive got several more tips building this kit than with a typical ARF. Youll do well to treat the Heliums assembly like a 3D jigsaw puzzle where the manual guides you to the solution. Each piece is cut to within five thousandths of an inch (.005) accuracy, so the parts fit is generally incredibly precise. If a part doesnt fit, it is either the wrong part or youve got it backwards. Youll want a perfectly flat and smooth building board to work from, and Ive found that composite ceiling tiles work great. They readily accept pins and stay flat throughout most temperature and humidity conditions.

Youll also need both thick and thin CA, although thin CA will be used for most of the construction. Thin CA applicator tips are a must to keep your gluing controlled and tidy. Each of the joints is tight enough that thin CA wicks nicely into them for a great bond

with minimal residue. In addition to following the instructions precisely, I tend to work a couple of steps between final gluing. This allows the jigging feature of the laser cut structure to better align itself as the assemblies come together.

The only area of the build where I see potential to make an unrecoverable mistake is with the joiner blades and their associated slots that join the outer panels with the inner wing section. Each Delrin joiner slots into the individual panels and requires a tight yet still removable fit. If excess CA were to be applied or inadvertently enter the slots, it would prevent the joiners from fitting correctly. Be very careful to apply only enough adhesive to get the job done in this critical step.

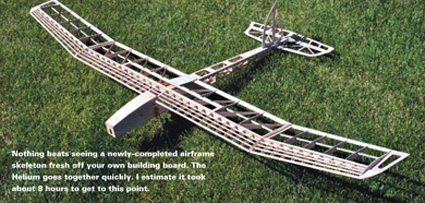
For me, basic assembly is the most enjoyable part of any kit build. Each part coming together is very fulfilling and stokes the instant gratification fire that seems to burn in me. That said, take your time and ensure each assembly is square and plumb before final gluing. Using that technique, youll be rewarded with a great flying model surprisingly quickly.

COVERING TIPS

Although youre probably itching to heat up that covering iron, the first step to a great covering job is a great sanding job. I start with 150 grit and work down to 400 grit. Stevens Aero included a really nice foam sanding block that does a great job. I supplement that with a traditional 12-inch aluminum sanding T. An easy way to check your sanding work for imperfections is by lightly brushing your fingertips over the surfaces to feel for imperfections. All but the smallest imperfections will show through the covering, so your time is well spent here. Finally, I use a painting tack cloth to remove as much sanding dust as possible.

Covering is my least favorite part of the kit building process and I this attribute my lack of covering creativity. For me, covering is functional. For the artistic in our group, it should look like a blank canvas awaiting your masterpiece. SA Aerofilm Lite is a great choice for the Helium. It is a very lightweight covering, and takes very little heat to shrink. Be sure to test your iron with the covering on a low setting and slowly work the heat higher as necessary. I prefer to tack the entire outside of each structure, including trimming and sealing the edges before shrinking. With some care, a heat gun can be used to shrink the open covering areas tight. Finally, youll want several sharp No. 11 hobby blades on hand. Aerofilm Lite tears very easily when snagged, and quickly dulls blades.

ELECTRONICS AND FINAL ASSEMBLY TIPS

The rudder and elevator servos mount upside down in the fuselage and attach to the flight controls with genuine Dubro pushrods and control horns that are included in the kit. I chose the recommended Hitec HS-65HB servos, and have been quite pleased with their centering and speed. The receiver mounts on the top of the battery tray and can be accessed with the wing removed.

SPECS PLANE: Helium MG2
MANUFACTURER: Stevens Aeromodel
DISTRIBUTOR: Stevens Aeromodel
TYPE: Electric Sailplane
FOR:
Intermediate builders and pilots
WINGSPAN: 77.75 in.
WING AREA: 645 sq. in.
WEIGHT: 30.8 oz.
WING LOADING: 6.88 oz./sq. ft.
WING CUBE LOADING: 3.2
LENGTH: 44.5 in.
RADIO: 3-4 channels required; flown with a Hitec Aurora 9 transmitter, Optima 6 receiver, 2 Hitec HS-65HB servos (flight controls), 1 Hitec HS-56 (spoiler)
POWER SYSTEM: Torque 2818T-900 brushless motor, 11×7 folding prop, Castle Creations Phoenix 45 amp speed control, Gravity Hobby 3S 2200mAh 30C LiPo battery
FULL THROTTLE POWER: 28.2 amps, 330 watts; 10.7 W/oz., 171.5 W/lb. TOP RPM: 8730
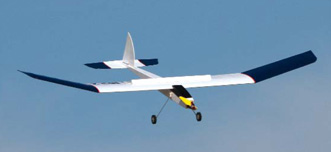
DURATION: 20+ minutes cruising flight, hours with some lift
MINIMAL FLYING AREA: RC club field or large park
PRICE: $125
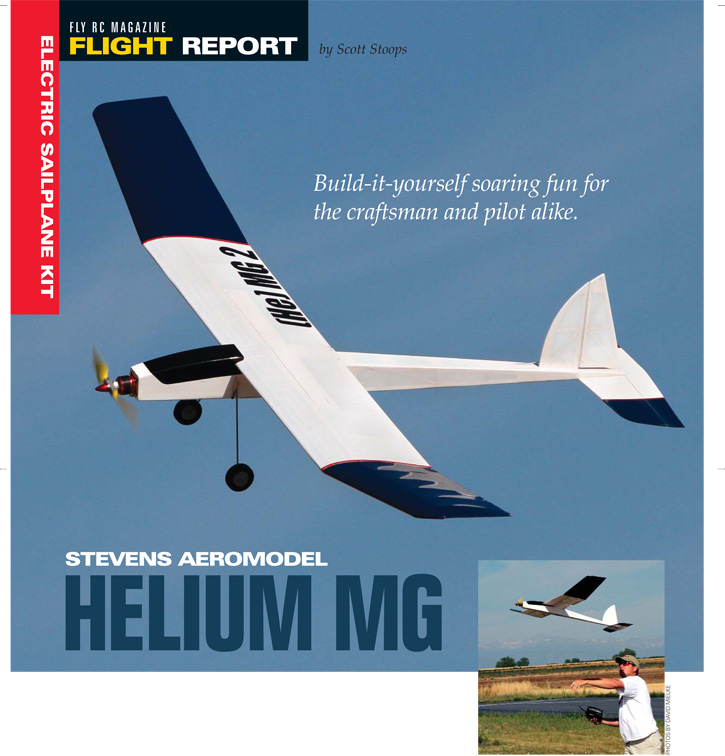
COMPONENTS NEEDED TO COMPLETE: 200+ watt electric power system including brushless motor, ESC, prop and 3S 1500-2200 mAh LiPo pack, two 6-9 gram micro servos for the flight controls, Hitec HS-56 for spoiler, two rolls Aerofilm Lite covering, various adhesives, covering tools
SUMMARY The Stevens AeroModel Helium MG2 powered glider eloquently combines modern laser engineered construction and performance with aesthetics inspired by classic sailplanes of the past. Built from only the highest quality laser cut balsa and ply, the Helium is an incredibly light sailplane that thermals well with the motor off and literally sips the electrons when cruising. Matched with a modern brushless motor and LiPo battery, cruising flights of more than 20 minutes are common, while thermalling between short bursts of power for vertical climbs can yield literally hours of soaring fun.

AIRBORNE

Assembling the Helium takes no more than five minutes at the field due to its unique magnetic outer wing panel retention system. Several rare earth magnets snap the panels in place, while either rubber bands or small Nylon wing bolts secure the main wing panel to the fuse. Swinging an 11-inch folding prop, the Helium has plenty of rudder authority for taxiing. Crosswinds can be a problem for traditional takeoffs with only rudder/ elevator controls, in which case a hand launch makes more sense. Simply power up and give a slight toss into the wind.

With such a high power to weight ratio, the Helium can climb virtually straight up to altitude if wanted although I prefer a more sedate partial power climb. Roll performance is very responsive with the sharp outer panel dihedral angle. Overall, the Helium feels quite responsive and nimble for a sailplane of its size. With the power off and the prop folded, the Helium has a reasonable glide angle and shows lift well. For pure soaring, I prefer to lower drag by removing the landing gear and hand launch the model with either belly landings in the grass or hand catches at the end of the flight.

I was a little bit concerned about the strength of the outer panel Delrin wing joiner, but it has proven to be plenty strong for traditional sailplane aerobatics. The addition of the spoiler panel adds another fun aspect to flying the Helium. The first time I deployed the spoiler I was shocked by the amount of nose down pitching moment. The manual comments on that, but it was more than expected. Ive since programmed in a 20-percent pitch bias with the spoiler extended to fully compensate for this tendency. The descent angle is extremely steep with full spoiler extension and the Helium retains full controllability. I programmed the spoiler control to a side slider on my Aurora 9 transmitter which makes it easy to reach. I prefer to approach with partial spoiler, reducing it to zero by touchdown to minimize the rate of descent for the flare. The landing gear is somewhat springy, so it rewards smooth touchdowns but will protect the model from damage if you plop it down from time to time.

Power system installation is simple as well, and includes screwing the brushless motor to the front of the firewall and running the ESC aft into the fuselage to the battery tray and receiver. Battery access is provided through the bottom of the fuselage through a magnetic hatch. Velcro holds the battery tight on the tray. Youll need to decide if you want to incorporate the optional spoiler system. Personally, I enjoy using the spoiler and recommend it. The only downside is that you cannot use the traditional rubber band wing attachment method with it. The spoiler servo protrudes into the fuselage and would not allow the wing to shift on the fuselage without damage, so a bolt-on wing it is. The manual and an online video detail its assembly and unique servo linkage and are worth a look. The pre-bent wire landing gear is held in place with two rubber bands that wrap around a dowel in the fuselage. The wire nestles into a small slot along the bottom of the fuselage and can pivot fore and aft which helps to cushion rough landings. Removal and reinstallation takes no more than a couple of minutes, making the Helium suitable for pavement and dirt with the wheels installed, or longer grass with the wheels removed. Id recommend a folding prop if you fly with the wheels removed to ensure you dont grab a blade in the grass while landing.

CONCLUSION

The Helium has been a really fun project for me for a number of reasons previously mentioned. Although I have gotten out of the kit building habit, that aspect of the process has reignited my interest in building for which I have to thank Bill Stevens. As much as I enjoy flying the models, I really do enjoy assembling them as well. I even enjoyed my simple covering scheme. Best of all, of course, are the hours I get to spend evaluating this new design at the local schoolyard where the thermals boom.

LinksCastle Creations, www.castlecreations.com, (913) 390-6939
Gravity Hobby, www.gravityhobby.com, (786) 369-1408
Hitec USA, www.hitecrcd.com, (858) 748-6948
Stevens AeroModel, www.stevensaero.com, (719) 387-4187
Torque Motors, distributed by Extreme Flight RC,
www.extremeflightrc.com, (770) 887-1794