 Fly RC Magazine WE LIVE RC
3D Jets Are Here!
Since its debut in 1983, the full-scale MiG-29 has turned heads at air shows, world-wide. Maneuvers such as the famous Cobra instantly became textbook terms for a new generation of flight. With thrust vectoring and fly-by-wire technology, the Russians took an early role in demonstrating the amazing potential of coupling vectored thrust with modern-jet technology for the future.
For our modeling, this level of performance was at first, just a dream. Look at how far we have come! Modern ducted fan designs now exceed 1:1 thrust-to-weight ratios, and most importantly, these are jets that a sport flyer can afford.
This plane is a first of its kindfor all of us to enjoy, with the performance to fly a full repertoire of 3D! This plane not only hovers, it dominates the field! I promise you that just by taking this model out of your car, all other activity on your field will stop. Once it is in the air, it may as well be the only plane on the flight line”everything else is forgotten!
 ASSEMBLY
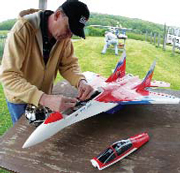
There are just a handful of steps to assemble this model. You need to glue on the wing tips, stabilizer/elevator assemblies, rudders and nose cone; it all goes together very well. The wings and stabilizers have servos pre-installed into them, so make sure you take the time to tape the connectors together while you are assembling. You may not see that connector again without cutting into the foam, and it would be a shame to accidentally pull an internal connector apart while you are working with wiring/receiver installation in the nose.
The manual is more pictures than words, and is invaluable to fast and trouble-free assembly. Take your time and don t try to combine multiple assembly steps with a single batch of epoxy. If you do, you may damage the finish if the epoxy starts to cure too quickly for careful attention to drips and drops. Make sure you have your rubbing alcohol out so that any excess epoxy that oozes out of joints can be quickly dealt with.
SET UP
Radio programming is very well shown for JR applications. For other brands of radios, the values and reasons are clear for all the mixes, and the 3 flight modes required. If you have gyro experience from flying helicopters, it will ease some of the steps of gyro set-up in the different modes.
The model uses these 3 modes for the 3 ranges of flight involved, regular flight including launching, acrobatic flight with some 3D, and hovering flight.
The modes all make perfect sense after you get in your first flights. They are all designed to maximize performance in each range and reduce pilot work load.
TIPS FOR SUCCESS
One tip that I can offer is that I cut the sides off the foam shipping box so that the bottom only would support the jet while I was assembling it. It is very well engineered to be the perfect cradle before the rudders get glued on. The fuselage nests really well into it, and creates a perfect stable platform to use when gluing on the wing tips and stabilizers, while carefully checking for alignment of the surfaces. It also keeps the foam from being nicked or dented by any stray objects that might be on your bench. Little dents and dings are easily touched up with Sharpie brand magic markers. I bought a simple set of markers that has about 10 colors, and it really makes minor blemishes vanish. With the basic bold colors of this model, you can always keep it looking great!
 AIRBORNE
When flown conventionally, this plane needs no more skill than any other jet that I have flown. It has a superb speed range, and it is remarkably stable and stalls gently.
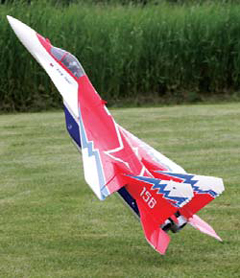
Hand launches in the normal mode are a cinch: just let it accelerate and climb. In less than a second, it is totally under control. Everyone who I have had hand-launch it, (aim it at the sky at a 45-degree angle and release it) says that if they didn t let go, they felt as though they were going to be taken along for the flight! This ship really pulls at full throttle!
For 3D, let the horses loose, and this jet just rocks! It won t stall often because it is hard to get it into a position where either just the wings are holding it up or the engine thrust is. If you get confused, though, gravity can be a cruel partner in altitude elimination!
Loops can be flips if you desire; inside or outside, it will loop tighter than wings alone can achieve! Square loops are a real treat: come in hot, and time your pulls for all four loop corners and allow enough time between the corners to maintain optimal speed. You will leave the crowd wondering how many G s the model just pulled!
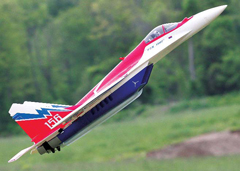 Yaw maneuvers also get supercharged. The flat spins are hysterical, and you can reverse them by just tossing the rudder the other way! This is also the first jet that I have been able to comfortably knife edge close to the deck. It does not require outrageous amounts of speed to climb in knife-edge, so go ahead: show off!
Rolling maneuvers are solid throughout the speed range. This is owing to the moving nozzles reinforcing the induced roll when the speeds get low. I suspect that in just a few flights, you will figure out some maneuvers that the other planes on your flight line just can t even dream of doing! It may create a whole new set of maneuvers!
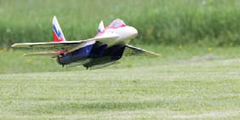
Hovering: who would have thought it possible? The MiG does it, and does it well. When you have a slight breeze, you can hover easily in the 3D mode. If you are in a calm condition or want to pirouette, then go right to the hover mode. This takes your roll and yaw inputs and puts reverse expo on them to sensitize their performance.
For landing, probably my only wish to make this model cooler would be a speed brake! It is slippery, and timing your decelerations for landings and maneuvers takes some practice. A couple of tight turns to bleed off speed from downwind to base, and base to final is one method I have been practicing. The model glides well, and has yet to show me any nasty tendencies when stall speeds are approaching. You will find it flares and slides on the nacelles very well, especially with the clever plastic runners built into the bottom of the twin nacelles. Resist the temptation to taxi, unless you really know that there isn t any debris that will be sucked into the intakes. The last thing you want to do is ruin the fan blades by sucking in some FOD (foreign object damage).
Harrier landings require a steeper attitude, but really look cool. Once you get the nose up a few degrees, you need to start to feed throttle back in to hold the nose up. A little surge of power just before touchdown arrests your decent and can make your landing appear to be nearly at zero airspeed. Use care not to drag the servos and linkages or the nacelles!
SPECS
PLANE: MiG-29OVT 3D EDF
MANUFACTURER: SebArt
DISTRIBUTOR: Thunder Power RC
TYPE: 3D multi-engine jet
FOR: Intermediate to expert
WINGSPAN: 36 in.
WING AREA: 329 sq. in.
WEIGHT: 58 oz.
WING LOADING: 25.42 oz./sq. ft.
WING CUBE LOADING: 16.83
LENGTH: 53 in.
RADIO: 7-channel transmitter and receiver minimum required; flown with a JR 11X transmitter, JR R921 Spektrum receiver, 9 servos included for flight and duct controls
POWER SYSTEM: Two installed motors with counter-rotating rotors and two 45-amp speed controls included and installed. Flown with Thunder Power RC 4S 3850mAh G6 Pro Power 65C LiPo battery for 3D and Thunder Power RC 4S 4400mAh G6 Pro Power 65C LiPo
FULL THROTTLE POWER: 70 amps, 1036 watts; 285.79W/oz., 17.86 W/lb.
DURATION: 3-6 minutes, depending upon your use of throttle, and choices of battery packs.
MINIMAL FLYING AREA: RC club field
PRICE: $499.99, without gyro; $549.99, with gyro
COMPONENTS NEEDED TO COMPLETE: Transmitter, receiver, LiPo batteries and charger
SUMMARY: WOW! This model is incredible, and when it is flying, it acts more like it has 15 oz/sq. ft. wing loading, owing to the phenomenon of additional area from the fuselage and belly. Here s a closer look at the servo set-up for the thrust vectoring. An extra nose cone is included in the kit s contents.
Online Video & Wallpaper: www.flyrc.com/091108
 CONCLUSION
This is an airplane that changes the rules. It flies like a demon and shows off like an exotic dancer. Master this model, and you will defy gravity and all the laws of physics. After every flight, you will have a big grin pasted on your mug!
Links
JR, distributed exclusively by Horizon Hobby Distributors
www.jrradios.com, (800) 338-4639
SebArt
www.sebartrc.com, (702) 228-8883
Thunder Power RC
www.thunderpowerrc.com, (702) 228-8883
