Fly RC Magazine WE LIVE RC
A Golden Age favorite for sport fliers! |
|
| All the components seemed light yet solid. The nice, vacuum-formed dummy engine also caught my eye. The cylinder details are crisp, and the part was trimmed out of its original sheet with a laser cutter. Clearly, this model came from a well-equipped shop staffed by experienced employees. The landing-gear legs are also unique to this model, and they feature functional, spring-loaded suspension to smooth your landings. Even the tailwheel bracket has a spring! The more I looked at the parts, the more eagerly I anticipated the first flight.
SPECS SUMMARY |
|
|
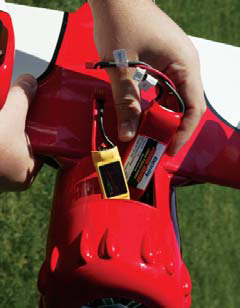
TIPS FOR SUCCESS Watch your balance. Yes, the Model Y was a successful racer, but its original calling was as a sporty, smooth handling flyer that was a pleasure to flynot one that was inclined to bite you for every slight mistake. I wanted this to be a fun flyer for daily trips to the field and not something that would cause me to hold my breath on every takeoff and landing. Consequently, I set my Gee Bee up with the equipment recommended by Maxford USA. There is plenty of power, and despite its forward CG, I was able to balance the model without adding weight or moving the battery into the wing compartment. Be mindful of the CG if you choose a larger motor or battery. The Model Y comes with a laser-cut plywood battery compartment that extends forward into the cowl area under the motor. Unfortunately, my model was almost balanced without a battery, and putting another few ounces that far forward would have been a problem. To avoid adding weight to the tail, I vertically glued a piece of 1/8-inch balsa sheet in the fuselage at the wing leading edge. Velcro holds the battery on this plate, and the model balances without additional ballast. LANDING GEAR The models sprung landing gear is unique. Note that the legs are not perfectly straight but have a slight bend to accommodate the wing dihedral. Once youve sorted out which goes where, you can epoxy the legs into the wing. The distinctive wheel pants are also molded to accommodate the wing dihedral. Carefully position them so that the wheels do not bind at the front of the cutout when deflecting the spring. Some owners report online that they enlarged the opening to prevent the wheels from binding, but I have not found this necessary. Another point to watch when installing these fairings is to ensure that the wheel stays centered from side to side. One molding was biased slightly, so I shimmed the top flange with a small balsa wedge against the wing spar. A drop of thin Zap holds the shim to the fairing.
The kit includes Phillips-head screws to secure the wheel pants. Because of the geometry of the wheel pants, I found it challenging to engage a screwdriver securely in the screw head. Instead of fighting it and possibly damaging the fairing or the wing, I used socket-head servo screws from RTL Fasteners and a ball-end driver. GENERAL ASSEMBLY The assembly process is straightforward and shouldnt take more than a few evenings, so theres no reason to rush. Check the Maxford USA website to confirm that your kit has the latest manual. The photo-illustrated manual details the construction, so you can see how the pieces go together instead of just reading about it. During my dry-fit checks, I noticed that the stabilizer mount needed a slight touch with a sanding bar to align the stab with the wing. It wasnt out that far (I have seen much, much worse) but why not take a moment to get it just right? Once I had everything set, I used 30-minute Z-Poxy to give me enough working time to realign the surfaces before the glue cured. The elevator has a conventional pushrod, and the rudder has pull-pull cable controls. The kit includes a complete set of hardware to set up the rudder control with clevises and adjustable links. I decided to clean up the look a bit, and I ran the cables directly to the rudder horns. I was meticulous about getting everything square and straight before I crimped the edges, and I havent had to adjust anything since. The penalty for this cleaner look is that Ill have to cut the cables out and replace them if I need to change something. The wing struts are not structurally necessary, but they do add a lot of character. Instead of using the screws that came in the Model Y kit (no. 4s, I think), I reached into my spares collection for the small mounting screws that come with Hitec microservos. These screws have a much lower profile, yet they still hold the struts securely. |
|
|
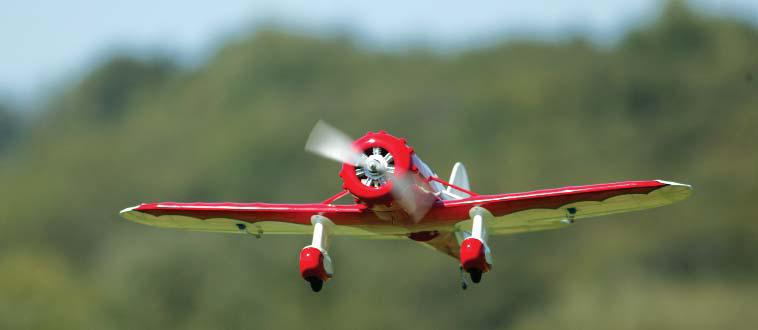
AIRBORNE This is what it is all about: lining up into the wind with a great-looking new model and pouring on the coals. I had done enough power checks and calculations to know that this would be a great flyer, but the Gee Bee myth still loomed large in my mind as I eased the throttle forwards. I didnt have long to worry. The Model Y bounced across the grass for only few feet and I was in the air. I lowered the nose to gain speed and then climbed for altitude to look for anything that might surprise me down low. I found nothing. Pulling hard in loops or steeply banked turns, it didnt show any tendency to snap roll or spin. The power-off stall is straight ahead, and recovery comes quickly by easing in power to accelerate briefly before adding a gentle pull on the stick. The Model Y is fully aerobatic with straight tracking and smooth rolls, yet it has the mild manners of a sport flyer dressed in a fancy costume. |
 Its good manners at slow speeds also makes landings stress-free. I like to keep the speed up and make a long flat approach while slowly settling onto the grass. If you lose track of time, fear not: the Model Y does not have nearly as much frontal area as its brethren, and it will glide quite well as long as you dont try to hold the nose up and stretch the glide too far. Try the glide at altitude just so you know what to expect. When landing with a little power in reserve, its just like any other sport model with a moderate wing loading. Set up your typical pattern, keep the wings level, and use power to control your descent rate. You can wheel it in or three-point ityour choice. Once its back on the ground, pin the tail down with full back stick, and it should stay upright as long as your field is reasonably smooth. Its good manners at slow speeds also makes landings stress-free. I like to keep the speed up and make a long flat approach while slowly settling onto the grass. If you lose track of time, fear not: the Model Y does not have nearly as much frontal area as its brethren, and it will glide quite well as long as you dont try to hold the nose up and stretch the glide too far. Try the glide at altitude just so you know what to expect. When landing with a little power in reserve, its just like any other sport model with a moderate wing loading. Set up your typical pattern, keep the wings level, and use power to control your descent rate. You can wheel it in or three-point ityour choice. Once its back on the ground, pin the tail down with full back stick, and it should stay upright as long as your field is reasonably smooth. |
|
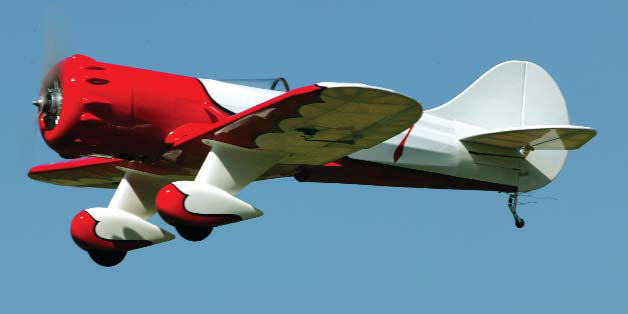
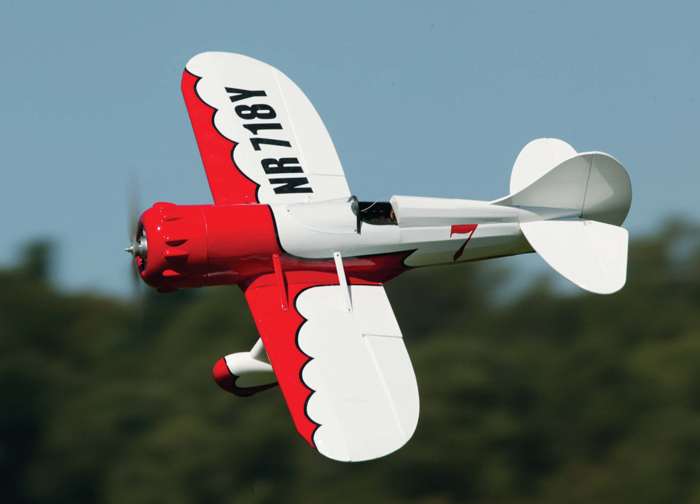
| The fuselage has four standoffs on the firewall to receive the cowl-mounting screws. I didnt want screws to go through the outside of the cowl, as this creates stress points if you go up on the nose when landing. Hiding the screws would look better, so I made internal 1/8-inch light-ply mounts and epoxied them to the inside of the cowl. I popped the motor out of the cowl, taped the cowl into place on the fuselage and positioned the plywood tabs against the standoffs. Again, I used the RTL socket-head servo screws and a ball driver to hold the cowl in place. Now, when I go up on the noseand I have done!the plywood pads push against the standoffs, and the large glued area spreads the stress in the cowl and protects it from being damaged. | 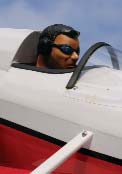 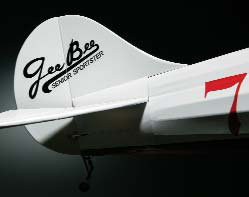 The finishing details really complete the Gee Bee. Compare these image with the flight shots. Curt from Slimline’s Xtreme pilot series fills the cockpit nicely, and the decal, which went AWOL in my workshop only to reappear after the test flights, completes the scale look of the fin and rudder. The finishing details really complete the Gee Bee. Compare these image with the flight shots. Curt from Slimline’s Xtreme pilot series fills the cockpit nicely, and the decal, which went AWOL in my workshop only to reappear after the test flights, completes the scale look of the fin and rudder. |
| Like all open-cockpit models, the Model Y Gee Bee demands a pilot. In this case, you want something in 1/9 scale. Though hes a little large, I decided that Curt from the Slimline Xtreme pilot series looked about right for a Depression-era racing pilot. I trimmed his lower torso and shoulders with a single-edge razor blaze, and managed to get him nestled in the cockpit. A few dabs of Slow Zap hold him nicely. Yes, I did deviate at a few points during assembly to clean up the models look. Though none of these extra steps were necessary, I think theyre worth the effort to enhance an already nice model.
CONCLUSION The Model Y Gee Bee is an enduring classic from aviations Golden Age, and Maxford USA has created a nicely detailed version in a very practical size. The robust construction and sparkling flight performance make this design well worth a look for anyone who has read this far. If you want an honest everyday sport flyer disguised as a famous racer, look no further. APC Propellers, distributed by Landing Products www.apcprop.com (530) 661-0399 Futaba, distributed exclusively by Great Planes Model Distributors www.futaba-rc.com (800) 682-8948 Maxford USA www.maxfordusa.com (866) 706-8288 RTL Fasteners www.rtlfasteners.com (800) 239-6010 Slimline www.slimlineproducts.com (480) 967-5053 ZAP and Z-Poxy are manufactured by Pacer Technology |
|