 Fly RC Magazine WE LIVE RC
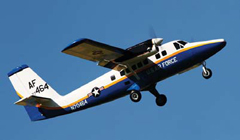
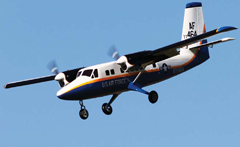
Hangar 9s Twin Otter is a scale replica of the USAFs UV- 18Bs, the military version of the DeHavilland DHC-6. The US Air Force Academy uses three of these twins for their cadet parachuting program.
THE KIT
This very complete kit was originally developed for electric power so no conversion is necessary if you plan on going that way. I chose to go the glow route and selected the Evolution .36NT 2-stroke glow engines recommended by Hangar 9. The kit is made for quick assembly as all the control surfaces except the rudder are prehinged with control horns already installed; ¦and they all have simulated corrugated surfaces that add to the scale realism. In addition, all of the servo and access hatches are pre-drilled.
The kit features painted fiberglass engine nacelles, cowls, nose cone and main gear fairings. Fixed landing gear and a functional oleo nose strut come with the wheels already installed. The Otter has a plug-in stab and plug-in wings with a Clark-Y airfoil and large, slotted landing flaps already installed. Also included in the kit are two assembled fuel tanks, glow mounts, electric motor mounting standoffs and a very complete hardware package consisting of eight individual bags sorted by use.
The 48-page assembly manual is classic Hangar 9 with detailed, step-by-step instructions and a whole lot of great photos. Instructions for installing either glow engines or electric motors are included as well as some valuable flying tips. This is a very complete and well made kit.
ASSEMBLY
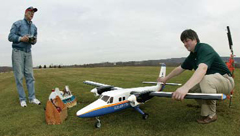
Even though its a twin, there isnt anything tricky about assembling the Otter. Like all Hangar 9 ARFs, the instructions are clear and the parts fit together without any difficulty. The plug-in wings and stab, pre-hinged control surfaces with installed control horns, landing gear with wheels already installed and assembled fuel tanks all help to reduce assembly time.
Separate micro servos located in the plug-in stab halves control the elevators and a single servo located on a tray in the cabin area controls the rudder with a pull-pull system. The wing panels contain four servos for the ailerons and flaps plus two fiberglass engine nacelles that each house two micro servos for the throttles. The most time-consuming task here is epoxying the eight servo mounting blocks to the aileron and flap servo hatches. A firewall drilling template is provided to accurately locate mounting bolts for either Evolution .36 glow engines or Power 25 electrics. I mounted the .36s at 8 oclock on the included composite engine mounts as descried in the manual. I used 11×6 Evolution props and the included white plastic spinners. The orientation of the engines places the needle valves on the right side toward the top of the cowl and the stock mufflers tucked neatly below on the left side. The assembled fuel tanks and throttle servos are located in the nacelles and are accessible through removable hatches that are held in place with a single dowel and a spring-loaded slide keeper. A clear dummy cowl is provided to facilitate making the necessary engine/muffler cutouts in the fiberglass cowls.
The fiberglass nose cone is held in place with two screws that lock into keyholeshaped slots in the front former and a 4-40 cap screw that threads into a blind nut already installed. The nose cone is removable for access to the nose wheel and the steering servo located on a forward tray. Access hatches are also located on top of the fuselage for access to the rudder servo and receiver and in the rear for access to the elevator servo lead connections. Two working doors on the left side of the fuse provide access to the interior to make hooking up the various servo extensions and Y harnesses easy. All of the graphics were already applied so there was nothing else to do but go fly.
TIPS FOR SUCCESS
Both engines are mounted with the cylinder head at 8 oclock so the throttle hook up is on the same side of the nacelle for both. However, the cutout for the throttle servo in the right nacelle is located on the wrong side and has to be moved to the inboard side so the pushrod can clear the fuel tank. The servo leads on the MC35 servos used for the elevators are not long enough to reach the access hatch in the rear of the fuselage so you have to attach the servo extension to the servo leads before the stab is attached to the fuse.
Do not use amplified Y harnesses if you are using a Spektrum radio as they are not compatible. You must either use standard harnesses or mix various channels with a computer radio.
If you use the included spinner backplate, an Evolution 11×6 prop and stock washer, you will find that the Evolution .36 engine prop shaft is too short to accommodate the prop nut. I replaced the stock washer with a flat washer from the hardware store but still had a problem so I attached the prop without using any washer.
Finally, the instructions call for the receiver battery to be located on the tray with the receiver and rudder servo. This left the Otter tail heavy so I relocated the battery up front just behind the nose wheel strut. I also added about one ounce of lead to the inside of the nose cone to get the Otter to balance where specified.
AIRBORNE
Despite some nasty early spring weather in the Northeast, we managed to catch a break between two rainy, windy days for the initial test flight. However, as Murphys Law often dictates, things started out poorly. After my initial one channel at a time bench testing, I had set up the Otter with five Y harnesses, three of which were the older heavy duty JR harnesses with amplifiers, and when I turned the Spektrum radio on it went crazy. After about twenty frustrating minutes I remembered that Spektrum radios are not compatible with amplified Y harnesses. Fortunately, I was using a 7-channel receiver, and we were able to pull the offending y-harnesses and use the DX7 to mix two of the three non- functioning controls. After several minutes of button pushing we had everything working properly except for the steerable nose wheel which we left disconnected. If you are still flying PCM and need some amplified harnesses, I know of a club field trash can where you can find some for cheap!
 The controls were set with the recommended throws used as the low rate and about 150 percent of that as the high rates. We also used 35 percent exponential on the high rates and 20 percent on low. After performing the usual pre-flight check of the controls, I set the dual rate switches to high, lowered the flaps to half, fired up the Evolutions and pointed the Otter into what little wind we had coming down our grass runway.
 Because of all the rain, this was a perfect chance to practice my soft field takeoff technique. As I started the takeoff run, I held in some up elevator to ease the load on the nose wheel and applied just enough right rudder to compensate for the torque of the two engines. The rudder and the fixed nose wheel keep the Otter tracking straight ahead. It did not take long to attain flying speed and the Otter was airborne in about 75 feet. My initial concern that the Evolution .36s might be marginal suddenly vanished. As a matter of fact, most of my initial flight was at less than full throttle and at one point I even performed a loop from level flight at half throttle.
Horizon Hobby reports that they did extensive testing with only one engine running, including takeoffs and landings, and I had no reason to doubt their claim. However, I was not about to do any such testing on my own so I didnt reduce the throttle to idle except for landings.
Low speed flight is smooth and predictable as the Otter remains responsive to control inputs over a wide range of speeds. The Evo .36s provide more than enough power for the Otter and I would not recommend installing anything larger. They pull the plane along at a good clip and power it through large loops with ease. The Otter will perform basic maneuvers such as loops, rolls and spins but since I prefer flying it in a more realistic fashion, I have not yet tried any fancy stuff. I prefer flying scale ships in a scale-like manner and this one looks great just cruising around. Besides, who wants an engine out during anything but level flight? The easiest way to describe the Otters flight characteristics is smooth, realistic and predictable.
Landings are a breeze with the Otter. The flaps are very effective and allow the plane to slow way down for landing. Just make sure you flare just before touchdown so the plane touches on the mains first and not the nose wheel.
SPECS
PLANE: Twin Otter
MANUFACTURER: Hangar 9
DISTRIBUTOR: Horizon Hobby Distributors, Inc.
TYPE: Sport Scale ARF
FOR: Intermediate and experienced flyers
WINGSPAN: 82 in.
WING AREA: 738 sq. in.
WEIGHT: 11 lbs. 2 oz.
WING LOADING: 34.7 oz/sq. ft.
WING CUBE LOADING: 15.3
LENGTH: 65 in.
 RADIO: 6+ channel w/ 8-10 servos required; flown with Spektrum DX7 transmitter, AR7000 receiver, 6 Spektrum A6000 digital servos (aileron, flaps, rudder & nose wheel) and 4 JR Sport MC35 micro servos (throttles & elevators)
ENGINE: .36 2-stroke glow or E-flite Power 25 brushless outrunner electric recommended, flown with 2 Evolution .36NT 2-strokes
PROPELLER/SPINNER: Evolution 11×6 2- blade propellers, kit spinners
TOP RPM: 9,100
FUEL: 15% Wildcat castor/synthetic blend
ONBOARD BATTERY: 6V-2300mAh NiMH
PRICE: $489.99
COMPONENTS NEEDED TO COMPLETE: Radio system, engines, props, multiple Y-harnesses and servo extensions
SUMMARY: This is a superbly built replica of one of just three UV-18s owned by the U.S. Air Force Academy. It is built up with balsa and lite-ply and expertly covered with Hangar 9 UltraCote. The kit contains everything you need to get airborne except for the engines, props, and radio system. It can be built for glow or electric and requires a total of ten servos for the glow version and eight for the electric. It builds easily, provides very enjoyable, scale-like flight performance and is pleasing on the eye to boot.
CONCLUSION
The Hangar 9 Otter is easy to build and a blast to fly. It is an easy way to get a great looking twin in the air without a lot of work and makes a great first time twin. The scale outline of this plane is outstanding and its flight characteristics are excellent. This is one plane I will enjoy for a long time.
Links
Evolution Engines, dist. exclusively by Horizon Hobby Distributors, www.evolutionengines.com , (877) 504-0233
Hangar 9, dist. exclusively by Horizon Hobby Distributors, www.hangar-9.com , (800) 338-4639
JR, dist. exclusively by Horizon Hobby Distributors, www.jrradios.com , (877) 504-0233
Spektrum, dist. by Horizon Hobby, www.spektrumrc.com , (800) 338-4639
Wildcat Fuel, www.wildcatfuel.com , (859) 885-5619
