 Fly RC Magazine WE LIVE RC
One of the most challenging individual maneuvers to fly cleanly is the snap roll. It also happens to be one of the most misunderstood of the different aerobatic elements. Also known as a flick roll in European aerobatic circles, the snap roll shares more with the traditional spin than the conventional aileron roll. Snap and spin maneuvers share an autorotation about the roll and yaw axis caused by a stalled wing and a yaw input. Both aileron and snap rolls rotate the aircraft through 360 degrees, but that is where the similarities end. The important difference is that conventional rolls are primarily an aileron maneuver flown at a relatively low angle of attack, while snap rolls are a rudder/elevator maneuver at a very high angle of attack.
INSIDE SNAP ROLLS
I can remember clearly the first time I rode through a snap roll. While I had been briefed before the instructional flight, I was taken aback by the incredibly fast roll rate, the instantaneous high g-force of the initial pitch-up, and the sudden stoppage back at wings level. I was also amazed that all that power could be harnessed by stalling the aircraft. From that point forward, the snap roll has been a favorite maneuver that I love to perform with both models and full scale. Initially drawn to its dramatic effect on the flight, I have come to appreciate the skill required to precisely execute it. There is nothing more beautiful to me than an inverted 45-degree down line with a precise snap and a half on the line back to upright flight, followed by a crisp pull to level.
To perform snap rolls, it is important to have a clear understanding of spin theory and recovery. Recovery from spins should be second nature before proceeding to snap rolls. For all practical purposes, a snap roll is an accelerated horizontal spin. If you were to allow the snap roll to continue for multiple rotations, the aircraft would bleed off energy and end up in a spin.
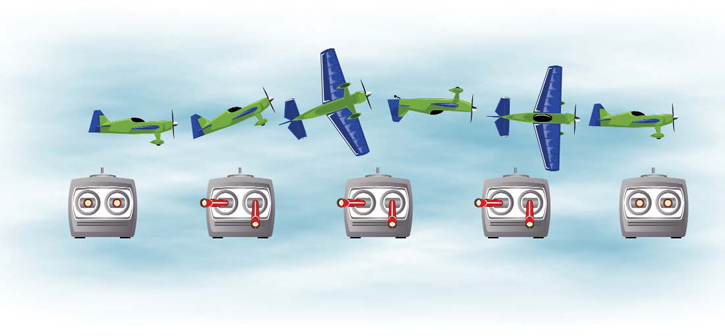
We will do the first few snap rolls from a level line. Be sure to start at an altitude that will allow a half-loop recovery from a failed maneuver. Choose the flight direction to perform the snap roll directly in front of you. A snap roll can put enormous stress on the model, so it is important to approach snap rolls with respect, increasing the entry speed incrementally as you gain experience.
Once established on the level line, add enough throttle to maintain a normal cruising speed. Rapidly apply full up elevator and full left rudder simultaneously. Aided by torque, the model will snap more readily to the left. By adding up elevator, you have instantly stalled the wing. By adding rudder, you have induced a yaw force that will cause the autorotation exactly like a spin. As the wing stalls, the nose will yaw and roll to the left. Hold full left rudder and up elevator until you are ready for the snap to stop. The rotation rate may be very high. It will be time to recover before you can blink your eyes. At approximately 45 degrees prior to wings level, neutralize the controls. This will stop the autorotation, allowing momentum to finish the maneuver for you. You will likely need to add a slight down elevator input to re-establish the level line. It may also be necessary to stop the roll rate with a small aileron input. The most challenging aspect of snap rolls for most pilots is to precisely stop the roll. Practice is the only way to perfect the technique required for your particular model.
Some models do not snap well with just rudder/elevator inputs. Some snap better with pro-snap aileron, i.e., left aileron with an upright snap roll to the left. Many pilots find that their snap rolls are easier to control using pro-snap aileron. If you find that your model is hesitant to snap with just rudder/elevator, give some pro-snap aileron a try.
There are many variations to snap rolls; most deal with modifying the roll rate (faster or slower). Here are a couple of common variations:
1– To accelerate the roll rate, many pilots add pro-snap aileron (in the direction of the snap). This will allow for incredibly high roll rates.
2– To precisely stop a snap roll, many pilots initiate recovery at approximately the second knife-edge position, and finish the rolling motion with aileron. This can be considered cheating, as transitioning to the ailerons allows a much more precise termination to the maneuver. In reality though, if it is perceived to be a snap by the judges, then it is a snap.
3– Another technique for accelerating the snap is to reduce the elevator input slightly after the snap has started. This unloads the wings slightly and, although theyre still stalled, creates a higher roll rate.
4– Some pilots use very high elevator throws to slow the roll rate. By adding high throws after the snap has started, the model will enter a very deep stall, which will slow the roll rate down. The problem with this technique is that the model may decelerate significantly and appear to wallow. Snapping too deeply causes a very large deceleration and difficult recovery.
5– While the technique I outlined above only describes a snap roll using left rudder, snap rolls can and should be practiced to both the left and right.
OUTSIDE SNAP ROLLS
Outside snap rolls share the same basic aerodynamic principals as inside snap rolls. While learning outside snaps, I recommend starting from an inverted level line and recovering to the same inverted line. This minimizes the possibility of a loss of orientation. You should be competent at inverted flight and aileron rolls before proceeding to outside snap rolls. Also, until you are comfortable with them, I recommend performing outside snap rolls at a respectable altitude. If outside snaps are allowed to develop, an inverted spin will result.
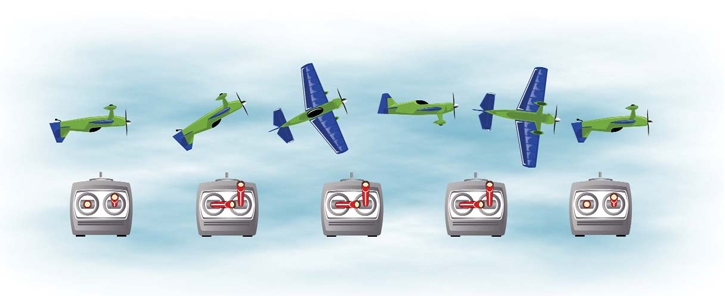
From a level inverted line, apply full down elevator, and right rudder. Thats correct, down elevator and right rudder. Down elevator will stall the wing with a negative angle of attack. The right rudder input will cause the aircraft to yaw to its right, but because it is inverted, it appears to be yawing and rolling to the left. Go ahead and hold your hand up to prove it to yourself. Outside snaps (and inverted spins for that matter) can be very confusing, which is why I recommend making a small plane on a stick. They are very helpful when trying to visualize new maneuvers.
The model will pitch nose up from the inverted position, and a traditional autorotation will occur exactly like the inside snap roll, until the controls are released. Start the recovery at approximately 45 degrees prior to inverted wings level. You may need to adjust the ailerons slightly to stop precisely at the wings-level position. Exit the maneuver in the same inverted level line.
The same variations used during inside snap rolls can be used during outside snap rolls, just reverse the control inputs. The exception is the use of aileron. In both cases (inside and outside snaps) that we have discussed, we have rolled to the left. For outside snap rolls that roll to the right, use left rudder and right aileron.
As mentioned above, there will be some models that dont snap well with just rudder/ elevator inputs. Some models do snap better (and may score better) with pro-snap aileron. Pro-snap aileron for outside snaps is slightly different than pro-snap aileron for an upright snap. For an outside snap using right rudder, pro-snap aileron is left aileron (during an outside snap using right rudder, the model rolls left). Additionally, many pilots find that their snap rolls are easier to control and recover from cleanly using pro-snap aileron. If you find that your model is hesitant to snap with just rudder/elevator, give some pro-snap aileron a try. Be sure to practice outside snap rolls to the left and right.
COMMON MISTAKES FOR ALL SNAP ROLLS
1– Inadequate or late recovery. It is not uncommon for the pilot to start the recovery too late while learning. The model can over-rotate the bank angle by as much as 90 to 180 degrees.
2– Stalling the model too deeply. This causes a large loss of energy and a slow recovery.
3– Applying either the rudder or the elevator first, rather than simultaneously, when starting the snap roll. If elevator is added first, the model will climb before it stalls. If rudder is added first, the model will yaw before it stalls, causing the snap roll and recovery heading to be offset from the intended heading.
VERTICAL SNAP ROLLS
 Vertical snap rolls are one of the more challenging maneuvers that you will fly with your model aircraft. Snap rolls, by nature, involve a large pitch and yaw motion. From level flight, the pitch and yaw assist in resuming the level line. There is a positive angle of attack prior to the snap, as well as during and after. A pitch change is necessary, but simply relaxing the stick to neutral after the snap will generally produce an acceptable flight path exiting the maneuver.
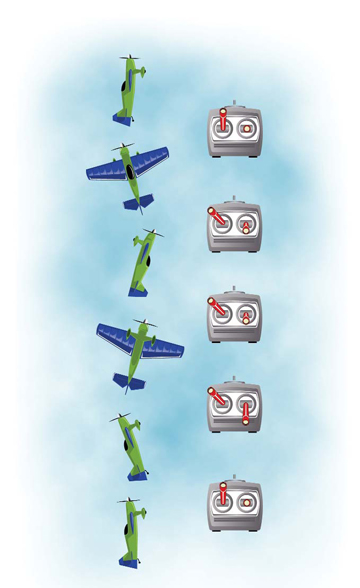
Snap rolls on vertical lines are entirely different. Once established on a good vertical line, the angle of attack of the wing is very near zero. When the snap is initiated, the angle of attack has to be rapidly increased to cause the stall and subsequent snap. When you initiate the recovery, centering the stick will stop the snap roll, but not re-establish the vertical line. The model can be as much as 15 degrees or more off vertical. To reestablish your line will require a corrective pitch input beyond neutral stick.
Here is how I fly a vertical snap roll. Establish a vertical line and initiate the snap. Accelerate the snap roll on the vertical line by reducing the elevator input after the initial rotation by about half. For a full one-turn snap roll, I start the recovery at the 3/4-roll position with an abrupt pitch down and neutral rudder. This will effectively stop the snap roll. Blend in aileron to finish the last 1/4 roll. Some may call this cheating, but if it looks like a duck, waddles like a duck, and quacks like a duck, its a duck.
Vertical snap rolls also require a significant energy increase over vertical aileron rolls. Snap rolls dissipate incredible amounts of energy when stalling the wing. Entry speed and overall total energy of the model must be much higher for a vertical snap than for a vertical aileron roll.
Finally, if there was ever a maneuver that had a high likelihood of exiting into a spin if botched, it has to be the vertical up line with a snap. The combination of a snapping autorotation, high thrust setting, gyroscopic forces and low airspeed make for a very likely stall/spin scenario. Be prepared to close the throttle and initiate recovery.
CONCLUSION
I hope at some point in your next flying session you will set aside some time to give snap rolls a try. They not only look great, but also add a new dimension to your repertoire of aerobatic figures. Flying snap rolls cleanly is challenging, but if it were easy everyone would be doing it! The biggest gain, however, is the increased confidence you will get operating your model around the stall. The ability to fly snap rolls and spins increases your comfort level pretty dramatically, making stalled flight part of a maneuver rather than part of an accident. Remember, till next timeaerobatics make the world go round.
