 Fly RC Magazine WE LIVE RC
I would love to be able to tell you why fully grown adults gave this maneuver the name Humpty-Bump. To tell the truth, I have absolutely no idea. As best as I can tell, it must have something to do with an egg, a wall, and all the king’s men. It is also commonly referred to as a Humpty. In its simplest form, the Humpty is a 1/4 loop to a vertical line up, followed by a small half loop to a vertical line down, finishing with a second 1/4 loop back to level.
There are two different kinds of Humpty-Bumps: the pull Humpty and the push Humpty. As you probably guessed, the pull Humpty-Bump uses up elevator (the pull on the elevator stick) to change course at the top of the vertical. Conversely, the push Humpty-Bump uses down elevator (the push on the elevator stick) to change course at the top of the maneuver. The turnaround at the top of the Humpty-Bump needs to be precisely timed so that it carves the right arc through the sky. It is flown at a very low airspeed, well below zero G stall speed. We use vectored thrust to pull or push the nose to a vertical down position.
There are a couple of things to note about flying the Humpty. One thing to know is that like the hammerhead, the Humpty-Bump has a high probability of a loss of control if the maneuver is flown poorly. I recommend being comfortable with spins and spin recovery before proceeding to Humpty-Bumps. The other thing to be aware of is the importance of the concept of symmetry to this maneuver; the model’s entry and exit looping segments should be the same size. For IMAC judging, the top Humpty-Bump looping segment does not need to be the same size as the entry and exit looping segments. The techniques I teach here are compatible with IMAC judging criteria.
Note: Pattern rules are slightly different. They require constant diameters throughout the Humpty-Bump. Check the end of the article for more information on Pattern Humpty techniques.
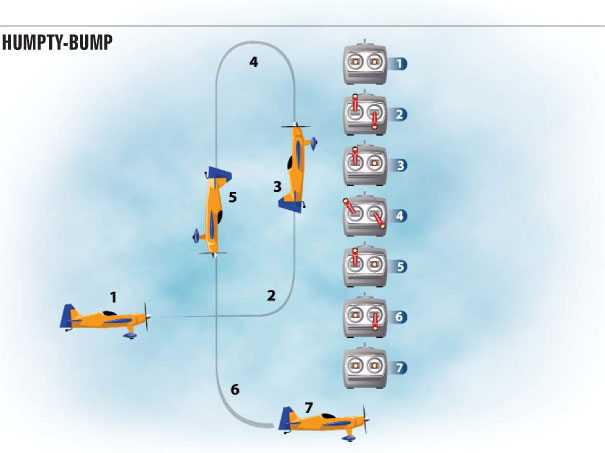
PULL HUMPTY-BUMP
Start the pull Humpty-Bump from a level line with enough throttle to draw a long vertical up-line, but not so much that the model climbs too high to be clearly seen. Execute a 1/4 loop to a vertical up-line. Establish and correct for the vertical line as the model decelerates. As the model slows, you need to gauge the point at which you input full up elevator and fly the model over the top of the Humpty-Bump. The goal for the turnaround is to finish the pull at the same altitude at which you started.
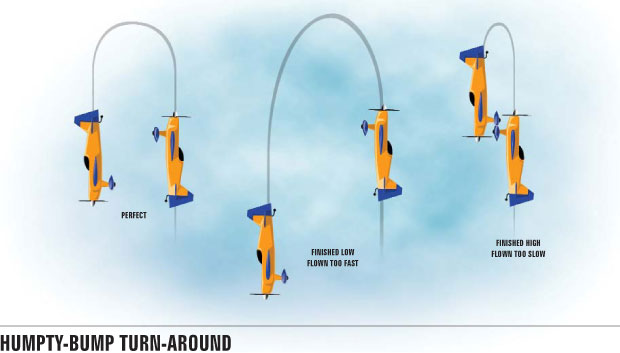
If you pull too early, the model will fly over the top of the Humpty in a half loop, rather than rotate at a minimum airspeed. The model will finish low, or establish the vertical down-line at an altitude below the starting altitude. If the pull is too late, the model will flop over the top of the maneuver and finish at too high an altitude when compared to the starting altitude of the pull.
With practice, you will be able to judge the correct airspeed to initiate the turnaround. At that point, add full up elevator. The nose of the model will instantaneously pitch toward a nose-down attitude. Due to gyroscopic precession, the model will tend to yaw significantly to the right during the pitch change. Add enough left rudder to keep the yaw axis neutral and the model tracking straight. The left rudder application will be required while you are pitching, but you will need to remove it once you near the vertical down-line.
At the top of the Humpty, the airspeed is very low, but the thrust is very high. Torque will have the tendency to roll the model to the left, so correct as necessary with right aileron. If the model buffets or stalls during the pull, relax the up elevator pressure. If flown at the correct airspeed, it will be below the stall speed (very near zero airspeed), yet the model will not buffet or stall because the wing is unloaded through the maneuver. Try pulling at a lower airspeed on the next Humpty if the wing stalls during the pull.
With the nose pointing down, focus on re-establishing a good vertical down-line. Remember to relax the elevator sharply to set the down-line. Avoid hunting for the correct pitch attitude on the down-line. Practice will make hitting this line more precise. Recover with a 1/4 loop pulling back to a level line.
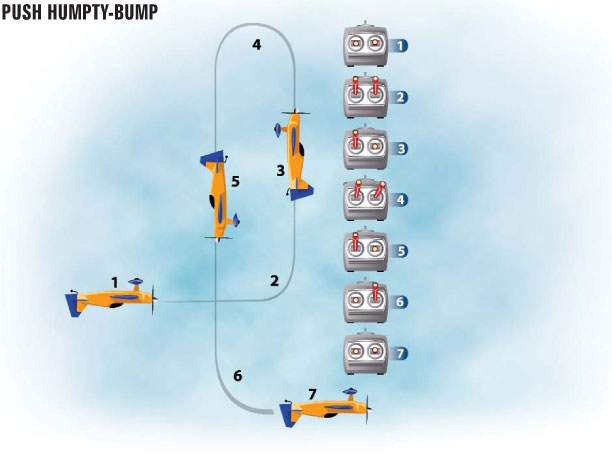
PUSH HUMPTY-BUMP
Begin the push Humpty-Bump from an inverted level line with an appropriate throttle setting. Execute a 1/4 outside loop to the vertical up-line. Correct for yaw during the push and once you are established on the vertical up-line. The push, for a push Humpty-Bump, is flown exactly like the pull Humpty. The big difference is that right rudder may be required to keep the yaw in balance during the push of the push Humpty, instead of the left rudder, which is used during the pull of a pull Humpty. Remember to adjust the amount of right rudder as you approach the vertical down-line.
Adjust the ailerons as well, to compensate for torque’s left-rolling tendency. With precision, hit the vertical down-line. Recover with a crisp 1/4 outside loop back to a level inverted line.
VARIATIONS ON THE HUMPTY-BUMP
Unlike many maneuvers that are very rigid in the nature of the maneuver’s elements, the Humpty-Bump has a wide variety of possible transitions. In each Humpty, the maneuver can start and end with a positive pull or a negative push. If you mix that with the fact that the turn-around at the top of the maneuver can be a pull or push, you can see the variety available. Depending upon the direction of the entry and exit corners (pulls or pushes), the Humpty-Bump can be used as a mid-box maneuvercontinuing the same direction of flight during the maneuver, or as an end box turn-around maneuverchanging the direction of flight during the maneuver.
The name of the maneuver is based on the nature of the elements of the figure. If the maneuver begins with a pull to vertical, a push Humpty turn-around, and a push out to inverted, the maneuver would be referred to as a pull-push-push Humpty. Another example: if the maneuver starts from inverted with a negative push to vertical, a pull Humpty turn-around at the top, and finishes with a positive pull out to level flight, the maneuver would be called a push-pull-pull Humpty.
PATTERN HUMPTY-BUMP
These techniques are not structured or intended as prep for a competition pilot; rather they are an introduction to aerobatics for pilots of all skill levels and offer relatively generic techniques that happen to be compatible with IMAC judging criteria. I would be remiss if I did not mention that Pattern Humpty-Bumps are flown differently from the techniques I outlined above.
Pattern judging criteria require all looping segments in the Humpty-Bump to be the same radius. To accomplish this, the pilot must adjust the entry speed of the initial pull or push and the overall energy level so that there is enough energy to maintain a constant radius during the middle Humpty section. For all practical purposes, the center of thePattern Humpty is flown like a half-loop, matching the radius of the entry and exit segments precisely.
COMMON HUMPTY MISTAKES
– Poor vertical line: this causes the Humpty to be off-axis when initiated.
– Early pull/push for the Humpty: if early, the model will fly the turn-around and finish low.
– Late pull/push for the Humpty: if late, the model will torque excessively, possibly tail slide, and finish high.
CONCLUSION
The Humpty-Bump is one of the most adaptable figures in the FAI catalogue of maneuvers. It can be used as a mid-box maneuver, a turn-around end-box maneuver, and when combined with portions of rolls on the vertical lines, as a wind-correcting cross-box maneuver. I have seen them flown in every category from Sportsman through Unlimited. Fortunately, the Humpty-Bump is simple enough to fly and virtually any model aircraft can be used. Next time you are at the field looking for a maneuver to practice, I hope you’ll give the Humpty a try. Be sure to focus on straight lines, clean verticals, and a nice, smooth pitch transition. Till next time, remember, aerobatics make the world go ’round.
