 Fly RC Magazine WE LIVE RC
As an airline pilot, I get to fly with pilots from every background imaginable—some are civilian trained like myself, and others are military trained pilots who have flown heavy tankers, helicopters, and high performance fighters in their previous lives. While all are excellent airmen, there is one maneuver that illustrates each pilot’s experience quite clearly—the crosswind landing. What is a relatively simple and common maneuver for civilian and heavy drivers is actually something foreign to fighter and carrier based pilots. Fighter pilots simply land in a crab during crosswinds, and carrier pilots have the skipper turn their runway (the carrier) into the wind! No crosswind landings for them at all! I find many RC pilots also lack the basic understanding of the reason for crosswind landings and the techniques required to navigate their model safely when the wind is not down the runway.
Crosswind landing, you say? I thought we were supposed to takeoff and land into the wind. In a perfect world, yes. However, it is not always possible to do so as some fields have only one runway, and it probably isn’t always into the wind. In this article, we will examine why a different technique is required for crosswind landings and learn how to execute that technique perfectly every time.
THE CRAB— NOT ONLY A CRUSTACEAN!
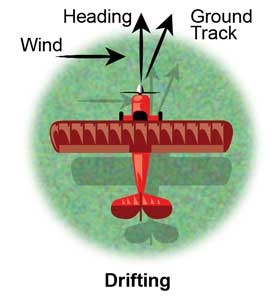
To understand why crosswind landings are different from calm wind landings, it’s important to acknowledge the difference in track over the ground while flying in a crosswind. All airplanes are affected by the speed and wind direction of the air mass in which they are flying. In calm winds, you simply point the airplane in the direction you want it to travel and it will fly a precise course over the ground. If you were to do this in a crosswind, the model would drift slowly downwind.
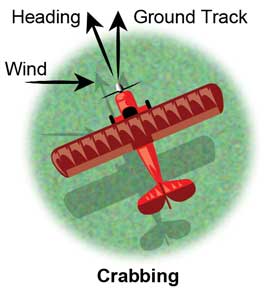
To fly a precise path over the ground in a crosswind, you will need to “crab” into the wind so that a portion of your speed vector is
being used to counter the drift caused by the crosswind. Like the crab walking sideways over the sand (going a different direction than his nose is pointing), we crab the aircraft by turning it slightly into the prevailing wind to allow a precise flight path over the ground on the intended track. If the wind is from the left, then you will need to “crab” the aircraft
slightly to the left into the wind to counter the crosswind.
Crabbing works extremely well when flying a track over the ground in a crosswind. Why can’t we do this same thing when landing in a crosswind? When landing, as you know, it is critical to be aligned with the runway. If you were to allow the model to touch down in a crab, it would contact the runway crooked, which is asking for significant directional control problems or a cartwheel. Conversely, if you point the model down the runway with the wings level in a crosswind, the model will be drifting across the runway at touchdown, also asking for huge problems. The solution is found in the slip.
flight path and cancel crosswind drift. Be prepared to correct any pitch coupling.
THE SLIP
The slip is a maneuver that we will use to help prepare you for crosswind takeoffs and landings. In the most basic sense, slipping flight is uncoordinated flight, with the rudder and ailerons deflected in opposite directions. You probably have been told to use rudder with ailerons in the direction of the turn to maintain coordinated turns in normal non–aerobatic flight. Now we are going to un-link the two controls for crosswind landings.
With a four-channel model, it is possible to yaw the aircraft one direction and roll in the opposite direction, causing any turning vector to be nullified, i.e., the model continues flying straight ahead with reference to the ground, while actually flying sideways through the moving air—this is known as a forward slip as the aircraft continues heading forward or straight. Used in this manner, the slip is a very effective tool to increase drag if you are high during an approach.
It is very useful to practice slips at altitude prior to using them close to the ground or during landing. At altitude, slowly apply rudder in one direction concurrently with aileron in the opposite direction to counter any heading change. You most likely will notice an increase in rate of descent as well as a pitch change. Practice steering the heading with the rudder while keeping the wings level with the ailerons. Another good exercise that directly applies to crosswind landings is to practice keeping a constant heading while varying bank angle, and thus a varying path over the ground.
THE CROSSWIND LANDING
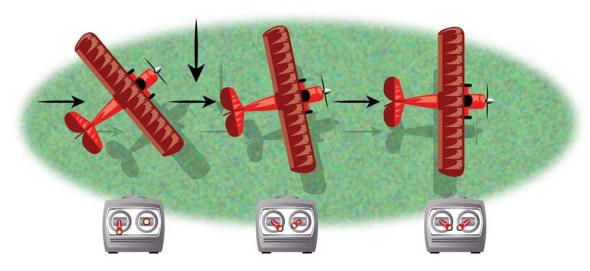
So how do we apply the forward slip to flying crosswind landings? During a crosswind landing, we use the rudder to align the nose of the model down the runway and the ailerons to prevent drift upwind or downwind. By using the cross control inputs of a slip, we can simultaneously counter drift by redirecting part of the lift vector with a slight bank into the wind, while maintaining alignment with the runway centerline directionally with the rudder. The model will touchdown with one wing low on the upwind main tire and the tailwheel first. As the model slows, the downwind tire will touch.
To help prepare your thumbs and brain for crosswind landings, I recommend flying practice crosswind approaches—establish a crab initially and at approximately 20-30 feet, transition into a slip. Use the rudder to align the model’s heading with the runway centerline and the ailerons to adjust the model’s position laterally to remain over the runway. As you approach the runway, execute a go-around. Fly a normal traffic pattern, practicing crabbing throughout the pattern and repeat the approach. As you get comfortable flying the crosswind approach, take it a little lower each time. One item to note: when flying slipping approaches, there is significantly more drag on the model while slipping, so you will notice a higher than normal rate of descent. It may be necessary to fly the approach with a slight amount of power to reduce the rate of descent.
There is one last point to consider as you come down final. The wind is usually stronger farther from the ground. This wind gradient means that you need to reduce your crosswind corrections gradually as you descend.
THE FLARE
Now that you are comfortable flying slipping approaches, it is time to put it all together. I prefer to fly a crabbing crosswind approach, transitioning to the slip relatively late in the approach. Flying airliners in the full-scale world, we often wait to transition to the slip until slightly before or even during the flare for passenger comfort. General Aviation pilots usually set up their slip a lot earlier, often soon after turning final. Try both to find your preferred technique. As the model crosses through the three to five foot altitude range, slowly close the throttle and initiate the flare. Notice that as the model decelerates in the flare, you need to increase the inputs. This increase in control input will continue until and, in fact, beyond touchdown. If you are flying a tailwheel airplane, smoothly add full up elevator after the model touches down and begins decelerating to pin the tailwheel and ensure good directional control during the rollout. As in all landings, use the rudder to maintain directional control on the runway after touchdown.
Because of the crosswind, there will be a strong tendency for the upwind wing to lift during the flare and rollout, so be sure to continue to hold the aileron input in to keep the upwind wing down. Common problems during crosswind takeoffs and landings include inadequate aileron input to cancel the drift, inadequate rudder inputs to counter the weathervaning, and a loss of directional control, especially when landing with a tailwheel model.
CONCLUSION
The crosswind landing takes practice to master. Fortunately, an airline job allows even the ex-Navy pilots plenty of opportunity to practice the art of the crosswind landing! You may find it interesting to know that virtually all full-scale aircraft, including both the Boeing 737 I fly at work and my Sukhoi 26, use the exact technique I outlined above. If you have a PC flight simulator that will let you “fly” along behind your model, you can quickly get a feel for how much cross controlling of the rudder and aileron is needed to maintain runway alignment.
In the RC world, many pilots see crosswinds as a great reason to put their airplanes away. I can’t count the number of times that I’ve seen otherwise competent RC pilots grounded by light winds simply because they were blowing across the runway. I hope that the next time you’re at the field when a light crosswind comes up, you’ll take the opportunity to practice your newfound understanding and skills. A good crosswind landing is a thing of beauty that I appreciate every bit as much as a round loop, clean slow roll, or perfect torque roll. Till next time, remember, “perfect practice” makes perfect.
Words: Scott Stoops Illustrations: David Baker
