| |
|
|
 |
Preparing for another sortie, the author pressurizes the retract gear air tank using a Robart hand pump. |
 |
|
|
SPECS
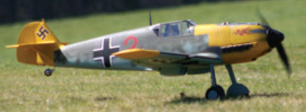
PLANE: Skyshark Bf 109
MANUFACTURER: Skyshark R/C
DISTRIBUTOR: Skyshark R/C
TYPE: 1/6-scale warbird
FOR: Intermediate to experienced modelers
WINGSPAN: 64.8 inches
WING AREA: 719 sq. in.
WEIGHT: 10 lbs. 3 oz. (163 oz)
WING LOADING: 32.5 oz./sq. ft.
LENGTH: 54.4 in.
RADIO: Airtronics RD8000 transmitter with 92778 Receiver and 7 Airtronics 94322Z servos
POWER SYSTEM: AXI 5320-28 motor, custom 18×14 prop (recommend APC electric 18×15) , Jeti advance 90 Plus ESC, FMA Balance Pro 29.6V 8S (2S plus 6S) 3200mAh (20C) Li-Poly pack
FULL THROTTLE POWER: 49 amps, 1450
watts; 8.9 watts/oz., 142 watts/lb.
TOP RPM: 6,450
DURATION: 7 – 10 minutes mixed flying
MINIMAL FLYING AREA: large flying field
with prepared runway, grass or pavement
PRICE: $249.95
COMPONENTS NEEDED TO COMPLETE:
Motor, batteries, speed control, radio
SUMMARY
Skyshark designed this scale Bf-109
for .60 2-stroke to .90 4-stroke size
glow engines, but I decided to convert it to electric flight by installing a power system consisting of an AXI 5320-28 brushless outrunner motor, 8-cell BalancePro HD Li-Poly pack and Jeti Advance 90 Plus speed control. With well over 100 watts per pound, this classic WWII warbird offers unlimited vertical, smooth performance, and a mixed-flying duration of 7 to 10 minutes. This project is a testament to the advantages of electric power for scale warbird
applications. |
Several years ago at Top Gun, I was walking across the field after a day of competition flying with the ¼-scale, electric-powered 1941 Taylorcraft I had developed expressly for that purpose. One of the worlds best known scale designer/fliers was beside me, chatting about scale flying and especially the future of electric power, and he gave me a challenge. Bob, he insisted, these light plane jobs youve got are okay, but for all the guys to take this electric power thing seriously, youve gotta build a big, nasty World War II fighter flaps, retracts and all and then bring it out and fly the heck out of it in front of everybody!
That was a tall order, but it was also a challenge I couldnt refuse. Building and flying a scale model of one of those big, nasty WWII fighters was a good way to separate the men from the boys even before RC flying as we know it today existed. When I built my first radio control airplane over forty years ago, there were only a handful of kits for WWII fighters on the market, and every one of them was seriously compromised by the limited and unreliable control systems of the day. Todays RC systems offer features and functions we didnt even dream about back then, and they are extremely reliable. Electric flight technology wasnt quite up to the challenge that day at Top Gun, but it is now! The scale kits produced by Skyshark R/C represent a selection of the unusual subjects everyone talks about but few of us build.
Their kit engineering is excellent, with sufficient accuracy that an experienced scale modeler could easily use one as the basis of a competition airplane. Thats not all. The strong, light structural design means that conversion to a cutting-edge electric system requires nothing more than putting a motor and battery where the engine and tank used to be.
THE AIRPLANE
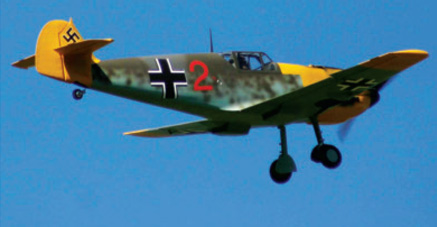
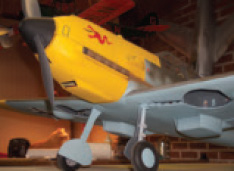
The Messerschmitt Bf 109 (or Me 109, depending on how you interpret the historical references) has always been considered one of the classic fighters regardless of which side you happened to be on. As the Skyshark catalog says, The Me 109 was the standard by which all other fighters of WWII were judged. It served the Luftwaffe in almost every capacity, from interceptor to night-fighter to ground attack and photo reconnaissance. |
|
|
|
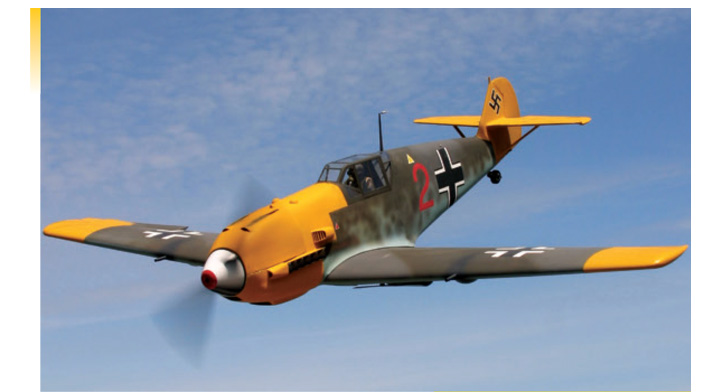 |
The Me 109 was produced in greater numbers than any other plane (approx. 30,000) and remained in use by some countries until 1967.
Germany began production of the Me 109E in early 1939 with the E-1 version. Armament included a pair of cowl-mounted 7.9mm machine guns along with a pair mounted in the wings. The E-3 variant incorporated an MG ff cannon between the engine cylinders that exited through the spinner. Problems with jamming and overheating forced the redesign of the gun in the designation change to E-4. This gun was removed in the later E-5 and E-6 versions. Early 109s used a Daimler-Benz DB601 engine that produced 1175 hp. The later versions used a DB601Aa engine that produced 1200 hp and had a max speed of 290 mph. The maximum range on the E-4 version was 410 miles.
The several E variants were loved by the Luftwaffe pilots who referred to them as their Emil. The 109 is considered to be the classic German Battle of Britain fighter, the deadly opponent of the RAFs Hurricanes and Spitfires. The 109 has also been considered too difficult by generations of model builders who knew better than to risk their time on a model with that narrow, spindly-looking landing gear that was a ground loop waiting to happen. The master modelers who could actually scratch build one also understood that those tiny tail surfaces at the end of a long, skinny fuselage would not work without precise and reliable radio control and pilot skills to match, and the Bf109 earned a reputation as a poor choice for even the most serious scale modelers.
EVOLVING TECHNOLOGY
It used to be that converting a model designed for glow power to electric meant replacing a lot of heavy, clunky balsa structure and lite ply with top-quality lightweight balsa, cutting lightening holes just about everywhere, and redesigning a lot of structure so you could mount your electric motor and big, heavy battery pack.
With todays readily available direct drive outrunner brushless motors and practical Lithium Polymer (Li-Poly) cells, much has changed. A Li-Poly battery can perform with a significant power-to-weight advantage over the old nickel chemistry cells, and a new generation of electric motors offers a variety of power system choices that can easily compete with the .50 to .61 twostroke, and .60 to .91 four-stroke mills otherwise recommended for a warbird of this size. |
AIRBORNE
You cant fake this part you must have some experience with fast, low-wing, aileron-equipped airplanes, and you must be able to handle a tail dragger with confidence, or the 109 will bite you. That does not mean there is anything wrong with the design. Skyshark has done it right, and its Emil handles pretty much the way you would expect the full-scale airplane to behave. Once it is properly trimmed and balanced, this model will fly hands off in level flight, but you need the pilot skills to get it up there and back to enjoy the ride.
All ground handling should be done with full up elevator (stick back) so the prop blast will hold the tail down, and I have learned to hold that control for a second or so after going to takeoff power to prevent nosing over before the airplane has enough speed to give the tail surfaces authority. This is standard, full-scale practice, as is getting off the elevator as the airplane accelerates to avoid forcing it into the air too soon. While all this is going on, you will need plenty of right rudder to keep the nose pointed straight ahead, but once the 109 is in air, it will go pretty much wherever you point it.
Landings are predictable. Lowering the flaps slows the airplane noticeably and produces a slight nose-down pitch that I find just right for setting up a steep approach glide. If you are new to electric power, you must remind yourself to keep a few clicks of throttle on all the way through landing. Full low throttle on an electric job can be so low that there is no appreciable prop blast over the rudder and elevator. If you forget, itll seem as though you have no control authority left just when you need it at touchdown. With all that taken into account, my airplane lands best if I fly it onto the strip just a bit fast, tail up, in a classic wheel landing.
|
|
 Some really big motors will run at currents as high as 60 amps on Li-Poly batteries that will deliver that much juice safely. Just about any airplane designed for glow or gas engines is now fair game for epower. The weight penalty is gone, and so is the limited flight duration that used to be part of electric flight. Some really big motors will run at currents as high as 60 amps on Li-Poly batteries that will deliver that much juice safely. Just about any airplane designed for glow or gas engines is now fair game for epower. The weight penalty is gone, and so is the limited flight duration that used to be part of electric flight.
Thanks to the efficiency of the large, relatively slow turning propellers for which the new motors are designed, there are plenty of electric airplanes flying today that perform better than they would at the same weight using a glow engine that spins a smaller prop at higher rpm. Today there are plenty of kits designed for electric power and more than a few warbirds among them.
|
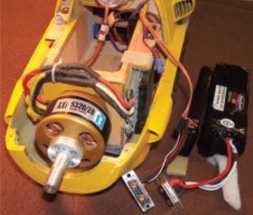
The standard kit engine mount is a plywood box that extends back through two plywood formers. I extended it about three inches to line the AXI 5320/28 up with the front of the cowl and then cut out the top to create an easily accessible battery box. The kit nose cowl is a onepiece fiberglass molding designed to be screwed to blocks on the firewall former. I cut across it at the scale parting line, attached the bottom section permanently, and made the top shell removable for easy access. The two black Li-Poly packs slip into the opening behind the motor and onto short strips of Velcro that keep them from moving around. |
|
SKYSHARKS KIT
The folks at Skyshark R/C made the decision to break new ground by developing kits for subjects beyond the ever-popular (and ever-common) P-51, P-47, Spitfire, etc. CAD and precision laser cutting have made huge advances over the old die-cutting technology. Skyshark took a chance with a whole series of those less common and really interesting designs and all of us who love scale model airplanes are the richer for it.
The Bf 109E is not intended to meet the standards of accuracy youd expect to find at Scale Masters or Top Gun, but Skyshark suggests that with a bit of extra work, that kind of finesse is possible with its kits. I have competed at that level, and I agree. The critical factors for getting a scale kit right the outline and cross sections are pretty close. |
|
|
SKYSHARK E-POWER SYSTEMS
Early on in this project, at about the same time I was working out the details for my electric installation, Skyshark announced that it was going to sell complete electric power systems carefully selected to fit each of its designs. You just build the nose and mounting structure to fit your motor, and make space for a battery pack instead of a fuel tank. Thats it!
Based on an AXI 4130/16 brushless outrunner motor, the AX108 combo suggested for this airplane includes a Jeti JESAP90PW Advance PLUS 90 ESC (Electronic Speed Control), all necessary wiring and connectors, and a Perfect Balance 6S 8000mAh Li- Poly battery pack. Propellers from 14×10 to 16×10 will work best. Skyshark advertises this plug and play system as being equivalent to a .91 four-stroke glow engine, with flight durations of 8 to 10 minutes.
I agree that this 109 will fly exactly as advertised on that power. However, when I began the project, the plug-and-play package had not yet been announced. I decided to use a bit more power than necessary in order to demonstrate an electric-powered fighter with outrageous performance, and installed an AXI 5320/28 motor from Hobby Lobby International, Inc., running on an 8S BalancePro HD Li-Poly pack provided by FMA Direct.
I am flying an 18×14 custom wood propeller from my secret stash of special electric props. However, a stock APC Electric 18×14 will work every bit as well, and the AXI 5320/28 is capable of turning even larger propellers safely. My 109 takes off aggressively from grass at half throttle, and at full power would maintain a vertical climb right out of sight if I let it. Cruising flight and scale aerobatics such as big loops, rolls, chandelles, split-S turns, and Immelmans are effortless without ever touching the throttle stick against the high end stop. I can fly the airplane that way and make only gentle demands on the motor and battery pack, but should I choose to do so, I can also turn the monster loose!
BUILDING THE 109
The Skyshark R/C Messerschmitt 109E is not a project for beginners! The quality engineering and precision laser cutting guarantee a kit box full of some of the best model airplane components you can buy. Imagine one of |
| AIRTRONICS RD8000
I have been using Airtronics radios exclusively in my scale models since I began competitive flying over fifteen years ago. I can honestly report that I never have to think about my radio while I have a model in the air.
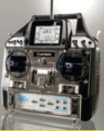
The RD8000 is an eight-channel, ten-model memory radio that can best be described as a top-end sport system. With every one of my models, whether all-out competition jobs, Demo planes like this Messerschmitt, or just the sport-scale ships I fly to relax with my friends, I take the time to set up every parameter and option in the shop using the intuitive software that is part of every Airtronics computer radio. Once thats done, I can concentrate on doing the best possible job of flying my scale models. Suffice to say that anything I want to make the servos in a plane like my Messerschmitt do, the RD8000 will handle easily.
|
|
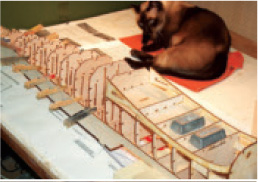
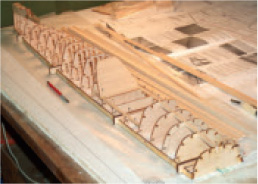 Above: Building the fuselage starts with frame (crutch) that splits the structure into top and bottom assemblies. After all the top formers are glued in place on the crutch, those four alignment blocks are removed.Below: It helps to have good supervision while you get everything properly lined up. Miss Charlotte knows how…she has watched quite a few airplanes go together on her bench. Above: Building the fuselage starts with frame (crutch) that splits the structure into top and bottom assemblies. After all the top formers are glued in place on the crutch, those four alignment blocks are removed.Below: It helps to have good supervision while you get everything properly lined up. Miss Charlotte knows how…she has watched quite a few airplanes go together on her bench.
Above: Here the left wing has been built and the top sheeted. The entire assembly is rotated and blocked in place to build the right wing. You pre-assemble complete wing skins from 1/16-inch balsa sheet and then glue them in place with each panel flat on the board. I use aliphatic resin (Titebond) wood glue to ensure plenty of time to get everything properly aligned.Below: You build the center section first, then prop it up so you can build the first outer panel with the spars flat on the board.
 |
those old-time stick and former rubber power kits. Now make it bigger, include the parts count and complexity necessary to provide strength and maintain the correct scale shape, and add sheet balsa skin where the full-scale airplane used sheet metal. There it is…the best of traditional model airplane building meets state-ofthe- art technology to give you a truly enjoyable experience.It is rare to find a kit for a complex RC scale subject that doesnt require some second-guessing and creative problem solving. I followed the instruction manual to the letter and encountered no problems. You must understand how to fit, glue and assemble all those laser-cut parts to build a truly accurate framework, and know enough about covering complex shapes with balsa sheet to replicate the appearance of an all-metal airplane. If you have the requisite abilities, you will enjoy building the Skyshark Messerschmitt. Everything fits, and everything works without your having to reinvent it. Skyshark got it right.
|
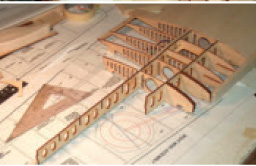
You start building the wing by gluing plywood reinforcements to the appropriate ribs and premounting the flap and aileron servos. Sockethead screws and access covers permit removal for service. |
As I have had excellent results with Robart products in the past, for this airplane I chose the Robart #551RS85 main gear units along with a pair of #660 compression struts, 31/2-inch diamond tread tires, and the comprehensive 188VRX air kit. The 109s used fixed tailwheels, so no retract option is necessary there, and the main gear covers were simple, one-piece doors that left the lower half of each wheel exposed. Laser-cut plywood wheel cover doors are included in the kit, and I used them initially, but for better appearance, I replaced them with a custom set cut from .030-inch aluminum alloy and bent into a gentle curve to match the underside of the wing.
The 109s used simple trailing edge flaps. Each flap was divided into a long outer section and short inner section that moved independently of each other. |
Let me out of this hangar! The Robart retracts and compression struts show up well here. The molded fiberglass radiator housing behind the wheel wells is provided with the kit. I cut out the front and rear faces and inset sections of plastic combs trimmed to fit to simulate radiator grilles. The chin and oil cooler openings are scale. I used them as functional cooling intakes. |
| |
|
RETRACTS AND FLAPS
The builder has the choice of completing the 109 as a fixed gear sport-scale model or including either or both of the landing flap and retract options. Building the flaps involves using several extra pieces of wing structure that are included in the kit, as well as an extra pair of suitable servos. Mounting blocks and formed wire struts for a fixed main landing gear are also furnished. The 109 flies okay with the wheels down, but for me it would not seem right to build a heavy metal fighter without retracts (Skyshark specifies the Spring-Air #704 retract system).
Skyshark has simplified things for you by designing each flap as a single piece, and for a sport-scale model, I see no reason to change that. It would be simple for a builder with Masters-level experience to redesign them for accurate appearance. The flaps work. I use them on every landing, with full extension (40 degrees) as I turn onto final approach with the airplane a bit high and then let the moderate nose-down pitch provide a steep glide that ensures just enough extra speed for a smooth round-out over the end of the runway.
COVERING AND FINISHING
Skyshark has made some of the hard choices, but the builder still has a few decisions left. Full scale 109s used sheet metal skin over an all-metal structure with fabric-covered rudder, elevator and aileron surfaces. This kit employs quality 1/16-inch sheet balsa to reproduce the metal surfaces and uses open structure exactly where the full-size airplane did. You have to decide how to simulate that fabric covering as well as how you are going to seal and finish the metal/sheeted areas. |
|
The instruction manual reports that one of the kit prototypes was built and flown using an iron-on plastic covering. It also suggests that a finish of paint over a lightweight fiberglass cloth and resin base would be a good choice for this model. Those of you who know me wont be surprised that I chose the latter option for my Messerschmitt.
Many years ago, one of the master modelers of the 50s and 60s really got my attention when he stated in a magazine article that once you have the structure built, you are halfway to having your model ready to fly. Covering and finishing are every bit as important as building the structure, and there is nothing wrong with taking the time necessary to do them right. |
FMA BALANCE PRO SYSTEM  The new BalancePro HD Li-Poly battery packs and BalancePro HD 6s charger from FMA Direct are part of a revolutionary new advancement in Lithium Polymer power solutions for RC aircraft. FMAs Safe Charge Connector is a key part of the system. It enables the BalancePro HD 6s charger to monitor individual cells and charge each cell independently to its optimum level. Charge protection dramatically improves pack performance, pack life and charging safety. Each cell is balanced on every charge, providing maximum pack performance. The user need only set one knob and can charge packs at a 3C rate for a 20 minute charge time. The new BalancePro HD Li-Poly battery packs and BalancePro HD 6s charger from FMA Direct are part of a revolutionary new advancement in Lithium Polymer power solutions for RC aircraft. FMAs Safe Charge Connector is a key part of the system. It enables the BalancePro HD 6s charger to monitor individual cells and charge each cell independently to its optimum level. Charge protection dramatically improves pack performance, pack life and charging safety. Each cell is balanced on every charge, providing maximum pack performance. The user need only set one knob and can charge packs at a 3C rate for a 20 minute charge time.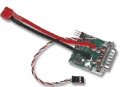 The BalancePro HD 6s Discharge Protection Module (SV6S-DPM) prevents BalancePro HD packs from over discharging in electricpowered aircraft. The DPM monitors individual cells in the pack and provides a warning when voltage gets low. The DPM comes in two versions: Opto and BEC. The BEC version is used with 2S or 3S packs with an ESC that has a built-in BEC. This device works with your existing ESC to provide soft cutoff of the motor at the precise time needed to prevent damage to the batteries. Because the DPM handles low voltage cutoff, you do not require a Li-Poly compatible ESC. Additionally, two DPMs can be daisy chained to provide support for up to 12S battery pack configurations. The BalancePro HD 6s Discharge Protection Module (SV6S-DPM) prevents BalancePro HD packs from over discharging in electricpowered aircraft. The DPM monitors individual cells in the pack and provides a warning when voltage gets low. The DPM comes in two versions: Opto and BEC. The BEC version is used with 2S or 3S packs with an ESC that has a built-in BEC. This device works with your existing ESC to provide soft cutoff of the motor at the precise time needed to prevent damage to the batteries. Because the DPM handles low voltage cutoff, you do not require a Li-Poly compatible ESC. Additionally, two DPMs can be daisy chained to provide support for up to 12S battery pack configurations. |
|
|
In my opinion, no plastic covering would provide the strength and durability, let alone the appearance, that this model deserves. I prefer to use an epoxy-glass surface over all closed (solid or sheeted) structures as a substrate for my paint finish. For my Messerschmitt, I chose 0.75 oz./sq.yd. fiberglass cloth and applied it with Z-Poxy from Robart thinned 25% with denatured alcohol and brushed through the glass into the balsa.
The rest of the job gave me another opportunity to use what may be one of the most overlooked products in modeling…the Stits Lite covering and finishing system. F&M Enterprises makes the entire line of FAA-approved, full-scale covering and finishing materials available to modelers, and I have used it exclusively on all my competition- scale models for over fifteen years. If you have an interest in traditional fabricand- paint finishes for your models, scale fighters or otherwise, you need to know about this stuff. Go to www.stits.com for comprehensive information on how the Stits Process works.
On my Messerschmitt, I used Stits materials by the book. I sealed the raw balsa of the open structure control surfaces with Stits PolyBrush, which is a clear, nonshrinking sealer. I covered the surfaces with PolyFiber fabric using PolyTack adhesive, heat-shrank it exactly per instructions, added Stits pre-cut pinked reinforcing tapes around the edges, and sealed the whole fabric job with a couple coats of PolyBrush.
|
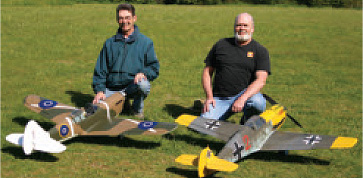
My good friend Gary Ritchie, who did all the action photography for this article, parked his 1/6-scale P-40-E with RNZAF markings next to an old adversary. |
Then I wet sanded the epoxy glass surfaces, and put on several coats of Stits FeatherCoat, a dense, white sanding primer that adheres really well to resin composite materials. I completed the base finish with aluminum-based PolySpray applied everywhere, and wet sanded and resprayed until I was satisfied with the results. My 109 is finished in the markings of the 2/3 Jagdgeschwader based on the French side of the English Channel in 1940, without attempting to replicate a specific aircraft. Except for the Luftwaffe 76 blue-gray, which required some mixing, PolyTone Oak Green, AgCat Gray and Piper J-3 OEM Yellow right out of the can came very close to matching my references. Skyshark provides a good selection of vinyl markings that work with a variety of different color schemes. I used them exactly as supplied and then gave the entire completed model a coat of matte clear PolyTone. |
|
| CONCLUSION
If had bult this airplane without knowing anything about electric power, with a good glow .90 in the nose and the engineering finesse Skyshark R/C has put into a scale model designed to fly, I would have been well pleased. The option of building it for electric power makes it even better. The sound of a big electric job is a confident, hushed note that barely carries beyond the flight line; there are no ungainly model engine bulges to spoil the shape of the nose, and the power system runs squeaky clean and satin smooth. Whether you use the preselected e-power components available from Skyshark or build your own custom electric power system as I did, you can have all these advantages with none of the old penalties of extra weight and short flight times. If you have the modeling experience to do justice to a built-up balsa structure and the pilot skills to handle one of those big, nasty World War II fighters, try this one. Youll like it, too!
Links
Airtronics, www.airtronics.net, (714) 978-1895
FMA Direct, www.fmadirect.com, (800) 343-2934
Hobby Lobby International, Inc., www.hobby-lobby.com, (615) 373-1444
Robart Mfg., www.robart.com, (630) 584-7616
Skyshark R/C, www.skysharkrc.com, (866) 854-6100, (928) 854-6100
Stits Lite by F & M Enterprises, www.stits.com, (817) 279-8045
Z-Poxy is manufactured by Pacer Technology, www.zapglue.com
|
 Fly RC Magazine WE LIVE RC