 Fly RC Magazine WE LIVE RC
Combining Z-Foam, Carbon Fiber and Plywood in a Quique 3D Design
This past February, my dad, grandfather and I went to the WRAM Show in White Plains, New York. This was my first time at a show that featured so many airplanes on display and I was quite taken with all the models. One in particular really caught my eye, and I grabbed dad to show him. In the Horizon Hobby booth was the new Quique Somenzini-designed Carbon-Z Yak 54. It just looked cool sitting up there! I said to him, Thats my favorite out of all the planes here! And, he said, Well, maybe we can get one and you can try it out. That put a smile on my face! Sure enough, we got one; and with his help, Im going to tell you all about it. The Bind-N-Fly versionthe one I receivedcomes with everything except the transmitter, and within a couple of hours, you can have the Yak assembled and ready to fly; its that easy!
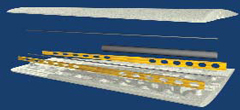 But, what is Carbon-Z Thats the question I had, so I went to E-flites website and watched the video of Quique talking about the new technology (www.flyrc.com/091109). There is an exploded view in the video of one of the Yaks wing panels that shows the top and bottom halves separated with all the internal components spaced apart so you can see how they go together. The wing panels, as well as the Yaks main airframe and tail, are made from Z-Foam, which is fairly dense and can take some abuse. To save on weight, each panels top and bottom halves have hollowed-out areas between the rib bays. In precut slots that run from the root to the tip in both halves of one panel are carbon fiber rods that are located on the wing tubes lateral axis. Then, there is the carbon fiber tube that accepts the wing joiner between these rods and runs from the root out to about 12 inches. Rounding out this composite structure are two plywood spars with lightening holes that run from the root to the tip along the leading and trailing edges.
When its all together, it makes for a strong, rigid and very lightweight wing. Quique demonstrates this by having someone place a 45-pound weight on a wing panel that is supported only by two blocks: one at the root; one at the tip. The wing flexes a tiny bit, but does not snap in half.
Another Yak 54 carbon-fiber feature is the control surface hinges that also include some plastic parts. This combination provides for a friction-free surface movement, thus you get an even smoother response from a control input. There are several other plastic parts on various sections of the airframe.
So, Carbon-Z construction is the combination of the carbon fiber wing tube and struts, along with the hinging and plywood bracing, all integrated into various places to strengthen the Z-Foam airframe.
Now, back to the model. The box contains the pre-built, Carbon-Z-constructed airframe components. The ailerons are prehinged, their digital high-speed metal-gear servos installed and the linkages hooked up. The fuselage has the entire power system, except the battery, pre-installed, and this includes a high-output 25-size brushless outrunner motor, an E-flite 60-amp Pro brushless ESC and the high-performance propeller, which is designed for precision and 3D flying, and spinner. The rudder and elevator servos (same type as the ailerons) are preinstalled and connected to the installed Spektrum 6- channel AR600DSMX receiver, which you find in a compartment on the fuselages bottom that is covered with a plastic hatch secured with a screw and some locking tabs. The horizontal stabilizer is also in halves and the elevators are pre-hinged to them.
Also included are the carbon fiber wing and horizontal stabilizer joining tubes, an E-flite 4S 2800mAh 30C LiPo battery, a 3S/4S variable rate DC LiPo balancing charger, wire landing gear and plastic strut covers, wheel pants, wheels, tailwheel assembly, elevator and rudder carbon fiber pushrods, pre-installed pilot and canopy, a Y-connector for the aileron servos, all the required hardware and an assembly manual in four languages. Its quite the complete package that has about 90 percent of the work done for you.
TIPS FOR SUCCESS
After I took everything out of the box and made sure all the parts were included, I gave the manual a quick read. First thing up is charging the battery, using the supplied balanced charger. To power up the charger, youll need a 12V battery source. While the battery is charging, its assembly time. There isnt much to this one, and it starts with mounting the main landing gear, which is straight-forward, and then installing the wing tube and the wings. They fit very snugly into their respective root cutouts in the fuselage, so you need to be careful when pushing them in. Be sure that the aileron servo wires are not in the way as you do this. Dad and I deviated slightly here, and ran two servo extensions out to the ailerons, rather than use the supplied Y-connector, which gave us individual programming control over the two ailerons.
When you think a wing panel is in as far as it will go, look through the bottom hole where the securing bolt goes and check the alignment. If you cant see the receiving threads, keep working the panel in until you can.
Next attach the rudder to its hinges, starting at the top of hinge and working your way down. The rudder and its connected tailwheel assembly are secured in place with a screw at the bottom of the rudders hinge. Dont over-tighten the screw as it will impede the rudders bindfree movement.
Install the horizontal stabilizer as described, noting that the elevator halves have two plastic parts that interlock when the stabilizer parts are pushed together. As with the wings, if you cant see the receiving threads through the bottom-side bolt-hole openings, keep working the halves in until you can.
When you connect the elevator and rudder to their respective pushrods, note where the instructions tell you to place the pushrod on the servo arm. There is only one hole on each control horn, so no guess work there. The rudders pushrod is the longer one.
Place the fully charged battery in its compartment, which is covered with a magnetically attached hatch that has a handy pull-tab made from tape, and balance the Yak at six inches from the trailing edge. Yes, you read that correctly: trailing edge. The reason for this is the rounded corners of the wings leading edge tips dont ensure an accurate measuring location. I wound up marking that six-inch spot and then running a straight-edge yardstick down the span to the wing root and marking the balance point near the fuselage.
From here, set up the throws, dual rates and expo; there are very specific notes about these, so be sure to follow them exactly. Quique has advanced set-ups for various flight modes listed on E-flites website. Once the programming is finished, the model is ready for it first flight.
 When checking through E-flites web page on this plane, I noticed an Important Product Bulletin that talks about the Yaks motor mounts and how they can crack from vibration owing to an unbalanced prop and its hub or high motor rpm. If you contact them, E-flite will send you a replacement mount that is more durable than the one provided. My dad was able to get one from a company called Small Parts CNC; the mount is machined out of aluminum stock and fits perfectly on the Yak. Although they appear to be factory balanced, we also checked the propeller and its hub, which were spot on.
AIRBORNE
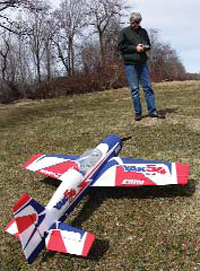
For the test flight, Dad and I had a nice sunny day with a temperature in the 50s. The Yak taxis around quite easily, and if taxiing on a bumpy ground, hold full up elevator to keep the tailwheel firmly planted and maintain positive steering.
 On low rates, the takeoff is quite uneventful, as the model takes about 20 feet of runway at 2/3 power before it lifts off. The usual right rudder input is required to keep the ground track and climb-out on the centerline. Dad felt it was flying a little nose-heavy, so he added a few beeps of up trim, and also added some right aileron trim. It was now flying straight and level, hands-off. For follow on flights, the battery was moved farther aft, thus curing the nose-heavy tendency.
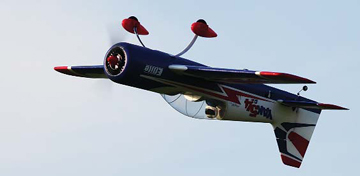
Flying around on low rates, the Yak performs like a pattern plane that has quite a bit of zip to it when you punch up the throttle. Its important to note that the manual cautions against flying at full-throttle, or very fast, on 3D ratesmost likely, that would put quite a strain on the servo gears, but Im confident that the airframe could take the G force without a hitch. Spin rotation stops in 1/4 turn after you return the sticks to neutral.
The motor and prop combination have plenty of thrust for pulls into verticals that seem to go on forever and zipping across the field in a low alpha knife-edge attitude. There is a programming note to mix in some down elevator (about 5 percent) to knife-edge rudder inputs, which prevents the model from pitching toward the canopy. Also on low rates, there is more than enough control throw to accomplish the standard aerobatic sequences, and the poweroff stall is very lethargic with no noticeable wing-dropping tendencies.
Slow it down and switch to the 3D rates and the real fun begins because this airplane can hang on its prop in any attitude. Dad and I did notice that a sharp pull with the full 3D elevator throw results in a high-speed stall (even though you are not at a high speed), so we lessened the amount of high-rate elevator throw to 130 from 150 and programmed in 20 percent elevator-to-flap mixing. These two fixes help to get rid of the high-speed stall.
It can do great high-alpha knife-edge passes all day long and spectacular rolling harriers from one end of the field to the other.
On the included battery pack; with throttle management, you can get around nine minutes. Dad had a 4S 3300mAh Thunder Power pack laying around with the blue E-flite connector on it, so we tried that and got 10-12 minute flights with throttle management.
To land the Yak, you can either drag it in behind the power curve or chop the power at altitude and glide it in. Use low rates for either method, but keep the elevator-to-flap mix on. The Carbon-Z Yak has a very stable glide and only deviates from this path when the sticks are moved. We found that if you use the power-off approach, some added up trim helps to maintain a flatter glide angle. Flare just before the touchdown and the model rolls out to a smooth stop in about 10-15 feet.
SPECS
PLANE: Carbon-Z Yak 54 BNF
MANUFACTURER: E-flite
DISTRIBUTOR: Horizon Hobby Distributors.
TYPE: 3D aerobat
FOR: Intermediate to advanced pilot
WINGSPAN: 48 in.
WING AREA: 525 sq. in.
WEIGHT: 3 lb., 14.4 oz.
WING LOADING: 17.12 oz./sq. ft.
WING CUBE LOADING: 8.96
LENGTH: 48.5 in.
 RADIO: 4 to 5 channels required, with four servos; the pre-installed radio includes a Spektrum 6-channel AR600DSMX receiver and 4 EFLR7140 digital high-speed metalgear servos
POWER SYSTEM: E-flite BL25 1000Kv outrunner brushless motor, E-flite Pro 60-amp brushless speed control with Switch Mode BEC, E-flite 4S 14.8V 2800mAh 30C LiPo Battery, E-flite 12 x 5.25E electric propeller
FULL THROTTLE POWER: 53.5 amps, 796.62 watts, 12.77 watts/oz, 204.26 watts/lb
TOP RPM: 12,180
DURATION: 9 minutes
MINIMAL FLYING AREA: RC club field
PRICE: $399.99
COMPONENTS NEEDED TO COMPLETE: A full range DSM2/DSMX compatible transmitter (with programming capabilities highly recommended)
SUMMARY: I found the Carbon-Z Yak 54 to be easy to assemble, although fitting the wings took a little extra care to ensure bolt-hole alignment. In one to two hours, you can have it ready to fly, and that includes all of the programming, which has specific instructions in the manual, so be sure to follow them. I like the red, white and blue jagged color scheme, too. Its different than the typical stripes or sunbursts you find on many ARFs, and it looks great in the air.
Online Video & Wallpaper: www.flyrc.com/091109
CONCLUSION
So, in two hours time, I had a high-performance, extreme 3D machine ready to go. There is just couple of things to really pay attention to when assembling it, but other than that, it goes together quite easily. Im looking forward to having some 3D fun this summer. And, you should, too, so pick one up. Youll enjoy it!
Links
Bob Smith Industries
www.bsiadhesives.com, (805) 466-1717
E-flite, distributed exclusively by Horizon Hobby Distributors
www.e-fliterc.com, (800) 338-4639
Small Parts CNC
www.smallpartscnc.com, (805) 452-3381
Spektrum, distributed by Horizon Hobby
www.spektrumrc.com, (217) 352-1913
Thunder Power RC
www.thunderpowerrc.com, (702) 228-8883
