Fly RC Magazine WE LIVE RC
|
||||||
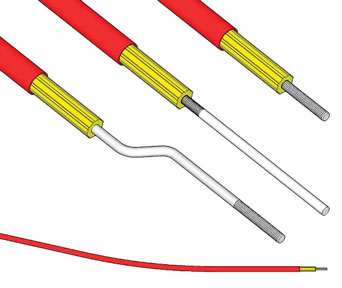
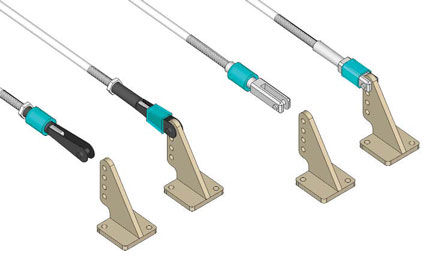
| PUSHROD TYPES First, let’s talk about the pushrods themselves. A pushrod can be as simple as a single piece of wire, or as complicated as a titanium tube with carbon fiber tips, but as this is geared toward the novice, we’ll stick to the more basic types.
Single-Wire Pushrod:
Wooden Dowel:
Guide Tube:
Flexible Nylon or Cable:
|
||||||
|
||||||
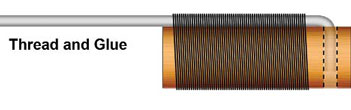
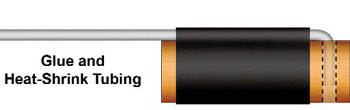
| Dowel and wire pushrods can be assembled by binding with heatshrink tubing or thread and glue. Grooving the dowel from the cross hole to the end will help keep the wire from twisting under load. | ||||||
|
||||||
| Wire Sizes: You may find some very thin pushrod wire on smaller electric or indoor planes, but for many glow planes the standard wire size is for a 2-56 thread. On large scale planes or very advanced .40 – .60-size planes, it’s not uncommon to see people use heavier, 4-40 wire, but for the beginner, 2-56 is usually all you’ll ever need.
|
||||||
|
||||||
| CONNECTORS Now that you have a good idea of what type of pushrod you’ll be using, we come to your next set of options: How to connect the pushrod to the servo and/or control surface. Again, here you have a myriad of options, so let us first break then down into two categories: Adjustable and Non-Adjustable.
|
||||||
| Non-Adjustable Connectors:The most widely used, non-adjustable connections are the “ZBend,” the “L-Bend” and the metal, soldered-on clevis.
The Z-Bend is a double bend in the wire that allows the wire to go through the hole in the servo arm. Once the arm is attached to the servo, the wire cannot pull out. The only disadvantage to using a Z-Bend is that it must be attached to an easily removable object, such as a servo arm, or it will be permanently trapped in place. Visit Find.FlyRC.com/041102 to learn how to make your own Z-bend pliers.
The L-Bend is a single bend which is slid into a hole and secured with a nylon clip. Unlike the Z-Bend, with this method, you can easily disconnect the pushrod by removing the clip.
The Snake Bend is something of a hybrid between the Z- and L-bends. While it has a double bend like the Z-bend, it can be twisted out of its anchor and thus is not as permanent as the Z-bend, and does not require the nylon clip of an L-bend.
Bending these connectors can be done with a conventional pair of pliers, though Zbends are best made with a dedicated tool. You can buy Z-bend pliers at your local hobby shop, or make your own in a few minutes. To find out more about making your own, log onto find.flyrc.com/041102.
A metal, solder-on clevis also allows for an easy connect/disconnect, but it should be noted that with all three of these methods, that end of the pushrod will not be able to pull through a guide tube should you be using one – so plan accordingly!
|
||||||
|
||||||
| Adjustable Connectors: At least one end of your pushrod should have an adjustable connector. Let’s face it, even if you got the length perfect, you still might need to fine tune it later. While you can use the trim buttons on your transmitter for fine tuning, they should be used for minor, in-flight trim only. Likewise, if your transmitter has End Point Adjustment, it too should be used sparingly. Another advantage of adjustable connectors is that they can be removed in case you ever need to pull a pushrod out of its guide tube.
By far the most popular type of adjustable linkage is the steel or nylon screw-on clevis. Often referred to as a “Kwik-Link,” the clevis screws on to the end of your pushrod and can be shortened or lengthened by turning it one way or the other on the threads. The clevis should be screwed on by a minimum of 6 threads, but you will want to plan them so you have a fair amount of adjustment in either direction. For a little added insurance, both types of clevis can be secured with a short piece of fuel tubing to prevent the clevis from opening in flight.
If the screw-on clevis you are using is made of metal, a lock nut should be added. This is not, as many people believe, to keep the clevis from turning, it is to provide a snug fit between the clevis and pushrod. This brings us to another topic, which is: Metal-to-Metal contact. Having a loose, metal-to-metal contact, like a metal clevis attached to a metal throttle arm, can cause radio interference as the two metals vibrate against each other. While this type of interference is not usually a problem, metal-tometal contacts should be kept tight whenever they cannot be avoided.
|
||||||
|
||||||
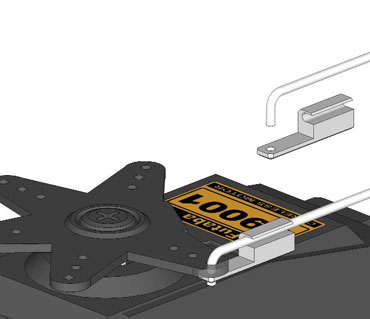
| EZ-Connector: The EZ-Connector is one of the simplest methods of connecting a pushrod, but it’s not without its downfalls. The most common complaint about them is that people have had them come loose. Personally, I have used them for many years without a single failure, but I do make sure to tighten them very well. Adding a drop of thread-locking compound is not a bad idea either. They work well on just about any throttle application, but I would limit their use to 90-size planes and smaller. EZ-Connectors are secured to the servo arm or control horn with either a plastic or metal holder. Either works well, but you should avoid re-using the plastic type. |
||||||
|
||||||
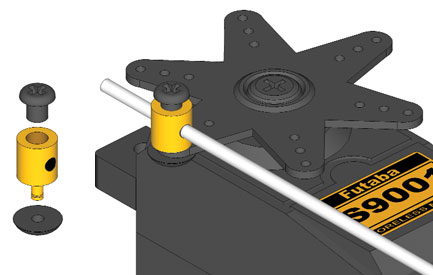
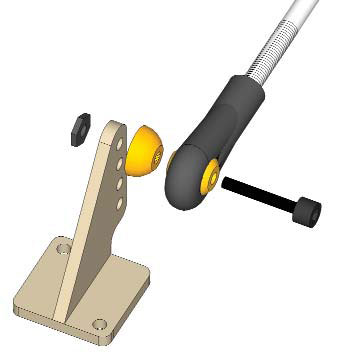
| Ball links come in two basic forms. One looks like a trailer hitch socket and ball with a threaded stud (above) while the second common form (below) has a through bolt to secure the ball in place. Again, a light touch of thread lock will keep the retaining nuts secure. | ||||||
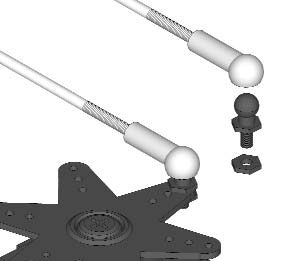
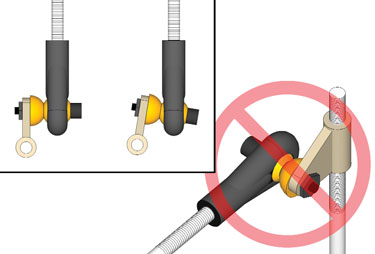
| Ball Links: The final type of linkage I want to cover is Ball Links. Ball links are an excellent way to connect your control surfaces. There are two types of ball links. The first is a nylon cup that screws onto the end of the pushrod and snaps onto a metal ball, which is screwed to the servo arm or control horn. About the only disadvantage to this type of link is that they can be difficult to snap on and off. The other type is a bit more complicated. It is a metal ball that is trapped inside a nylon shroud. The ball has a hole through it which allows it to be screwed to a servo arm or control horn. This is probably one of the most secure connections available, although it can not be removed and replaced as easily as something like a clevis. The only downfall to either of the ball methods is that they can not be used on a “swinging” control horn as they will not hold the horn in a straight line and cause the horn to pivot. |
||||||
|
||||||
| CONCLUSIONI hope this article helps clear up some of the mysteries for the novice. As I said earlier, they are several other ways to make your connections, but you will find that these are by far the most popular and useful. Happy flying!
|
||||||
Links
|