 Fly RC Magazine WE LIVE RC
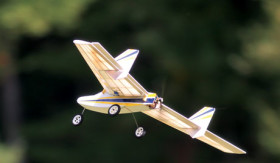
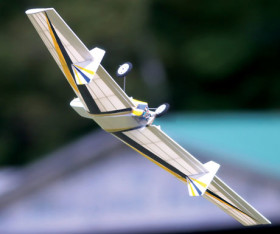
Build And Fly A Unique Flying Wing
 Every now and then you have the opportunity to play with something different like the Alien Aircraft Blinker. Not that flying wings, per se, are that uncommon, but a flying wing with a gondola under it? It is sure to be the only one at the field, and it is not that difficult to build. The Blinker is offered as a kit, so it needs to be assembled, and it is available in three versions. The Deluxe Combo kit, reviewed here, includes everything you need except for a radio system, servos, glue, covering materials and a battery pack. The Basic Combo does not include any electronics and there is also a “kit only” option.
ASSEMBLY TIPS
 The Alien Aircraft Blinker airframe kit consists of two sheets of plans, six sheets of laser cut balsa, one sheet of laser cut ply, some balsa strip-wood, one smaller laser cut sheet of lite ply, and a small plastic bag with ply wing joiners, some small dowels and other assorted fittings. Somewhat to my surprise, the items included in Alien’s Deluxe Combo Kit (the one I am reviewing) were absolutely all that were required in order to complete the model: motor, ESC, propeller, battery connection, three wheels, wheel retainers, elevon horns, elevon pushrods, Velcro, even EZ connectors for the servo arms. The only things I needed to scrounge up were two servos, a receiver and a battery.
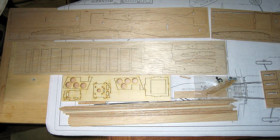 All the furnished items fitted neatly in a plastic bag 24 inches long and four or so inches wide. This, and the handful of tools needed to build this model, would make it ideal to take along on a rainy weekend.
As is common with this type of kit, the 18 pages of detailed step by step assembly instructions, (each step illustrated with a color picture) do not come with the kit, but have to be downloaded from Alien Aircraft’s website. Believe me, downloading these detailed instructions is not optional. Although the kit does include two sheets of plans, it would be very difficult, if not impossible, to build the kit without the help of the written plans.
 IMPORTANT: The wood in my kit was excellent and so was the laser cutting. The cutting was too good, since all the laser cut parts cascaded out of their sheets the minute I touched them. As the parts do not have numbers on them, my first task was to figure out where all those parts belonged. To avoid this, I would strongly recommend downloading the instructions first thing. Page three of these instructions shows a layout of each of your laser cut sheets and the number and position of each part on that sheet. Marking each part with its number before it falls out of the sheet will save a lot of head scratching. Trust me on this.
Since the assembly instructions are excellent, I won’t paraphrase them or give a detailed description of building the Blinker, but will limit myself to a few comments and cautions. You will definitely need a building board of some sort, since flat and straight are important throughout.
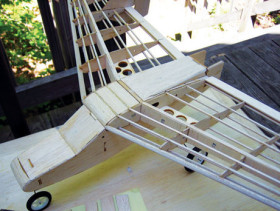
 The airframe of the Blinker consists of only four parts assemblies: the wing, the fuselage, the two rudders (really vertical stabilizers or flat panels that fit vertically midway out on the wing on each side), and elevons (combining the function of ailerons and elevators). The rudders consist of three pieces of laser cut balsa each which you assemble over the plans. The only caution here is to assemble these pieces carefully, since they are a very tight fit on the wing and are fragile.
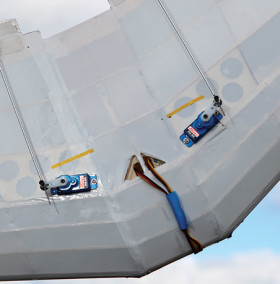
The elevons each consist of two precut pieces of balsa, connected by a precut piece of dowel. Again, glue them together over the appropriate (wing) plan, and make sure the leading edge that will hinge to the trailing edge of the wing is flat and straight.
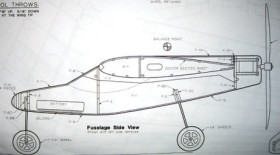
The fuselage assembly is also straightforward. The fuselage, for a change, is not assembled on the plan. But the plan views are still important to aid in determining where and how each part fits, so refer to both the plans and assembly instructions as you proceed.
As I said before, the laser cutting and thus the part fit is very precise. So if a part does not fit easily and exactly, assume you probably have the wrong part or have it turned the wrong way before you reach for your hammer.
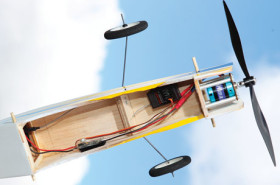
I only have a few comments on assembling the fuselage. One of the first assembly steps (step 3) involves installing four tee nuts in the firewall (F4). My tee nuts would not fit in the intended holes until I had opened the holes slightly (to about 1/8-inch). So check the fit, since I’m pretty sure frame F4 would have broken had I persisted without drilling out the holes.
Second, piece F9, the bottom of the fuselage, curves up fairly sharply at the front. I had to moisten F9 and tack the very front with thin CA, then bend the rest into place once the front had set up. I also held my breath, but that is optional.
Don’t forget to bend up the wire nose gear leg and install it when the assembly instructions suggest. It really, really gets buried a few steps later, and there is no way to make this plane into a taildragger.
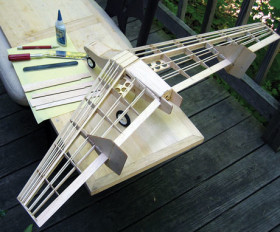
The wing gets assembled over the plan, in three sections, which are eventually glued together into a single solid wing. The most important thing to remember is that the wing is assembled upside down, i.e., the top of the wing towards the building board. Just remember that the support tabs (the odd looking tabs attached to each wing rib) should stay on throughout the building process and should be pinned firmly to your building board or you may end up with a twist in your wing (mega not good).
Another thing to remember is that the wing tapers and gets thinner as you go outboard. Since the top of the wing remains flat on the building board, all the “thinning” occurs on the bottom, creating what amounts to dihedral. One effect of this thinning is that the shear webs (part numbers B-2 through B-7) that are to be glued to the front of the main spars in step 41 of the assembly instructions not only taper from end to end, but also seem to have a square and a tapered side. Again, it really is very important to make sure the center section ribs and inboard wing ribs fit right over the plans and are dead vertical, because you are eventually going to find out how good a job you did when you mate the wings to the center section. (I got an A-).

Do a very careful job bending up the nose and main gear legs over the plans. Get them exactly right. The relationship between the two establishes the angle of attack of the wing, which in turn will determine whether your plane will fly or just run endlessly down the runway. The reason for this is that the Blinker has a fully symmetrical wing, which doesn’t generate any lift until it assumes a positive angle of attack with respect to the apparent wind. The plans recognize this, specifying that the model should have a 3-degree nose up angle while sitting on the ground. Although I could not find anything showing or stating how to measure this, it has to refer to the angle of attack of the wing, so if you have an incidence meter, use it on the wing. For the rest of us, if you try it and it won’t get off the ground, bend out the rear gear legs further and/or replace the nose wheel with a slightly larger one—just be sure to check whether your prop will still clear the ground.
I will admit that my predilection is to leave my models fairly plain, since more than one layer of covering material adds weight, but for this article I dressed the Blinker up some. To save weight, I painted the fuselage and used UltraCote ParkLite covering material for the white overall covering. It was my first time using it, and I did like the fact that, as UltraCote says, you can reposition the covering without fear of losing the color layer. One thing I didn’t like was the extra care I seemed to have to exercise to keep the glue side of the material from touching other parts of the glue side. Once they touched they refused to be parted. Based partly on a hunch and also on some comments on RCGroups.com, we changed out the nose wheel for a larger one before the test flight.
NEED TO KNOW
MANUFACTURER/DISTRIBUTER: Alien Aircraft Corp.
TYPE: Electric sport aircraft flying wing kit
FOR: Intermediate sport pilots
PRICE: Deluxe Combo (reviewed)—$120.99, Basic Combo—$49.99, Kit Only—$39.99
MINIMUM FLYING AREA: Club field
NEEDED TO COMPLETE:
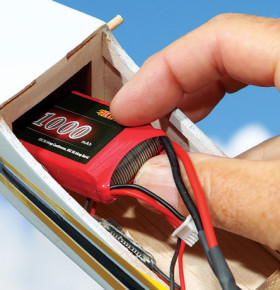
Since the Deluxe Combo kit includes not only the airframe kit, but also a motor, speed control, wheels, motor mount set, pushrods and Velcro, all that is needed to complete the Blinker is two small servos, a radio receiver, glue, covering materials and a battery.

Author’s Opinion
If you enjoy building, the Blinker will not only entertain you for a while, but result in a model that will attract attention and curiosity wherever you fly it.
Pros
• The choice of wood, laser cutting and fits were all top notch
• The downloadable assembly manual is excellent and easy to follow
• The design is original and different
Cons
• Since the attitude sitting on the ground is critical, the wire nose and main gear should be pre-bent
• Since the parts fall out of their sheets, it would be helpful if the parts were numbered
• Nose gear proved overly fragile
SPECS
WINGSPAN: 35.3 in.
WING AREA: 227.2 sq. in.
WEIGHT: As flown, 11.5 oz.
WING LOADING: 7.3 oz./sq. ft.
CUBE LOADING: 5.8
LENGTH: 14.5 in.
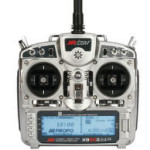
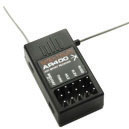
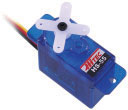
RADIO: JR X9503 transmitter, Spektrum AR400 receiver, two Hitec HS-55 servos
MOTOR: Manufacturer supplied Himax HC-2212-1180 motor and Castle Creations Thunderbird-9 ESC
PROPELLER: GWS EP7060
FLIGHT BATTERY: Kypom 3S 1000mAh LiPo from Radical RC
We Used
TRANSMITTER: JR X9503, JRP2930X
RECEIVER: Spektrum AR400, SPMAR400
SERVOS: Hitec HS-55, 31055S
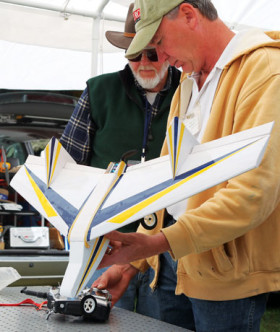
In The Air
Due to scheduling concerns we had to undertake the Blinker’s initial flight off a grass runway, into a 5 to 10 knot wind. Since hand launching was definitely out, (your hand can’t help, but pass through the propeller arc) we were going to have to take off from the grass. Frankly, this is not the design’s strong point. Even using a 7X6 prop, the smallest feasible, there would only be ¾ inch ground clearance and this meant mowing a lot of grass. To give ourselves the best chance of success, we opted to use a 3S 1000mAh LiPo so as to get all the available power from the Himax 2212 -1180 motor.
We shouldn’t have worried. The Blinker got off the grass in about 15 feet and headed uphill at about a 30-degree angle. The rest of the initial flight was a series of very fast swooping low passes for the camera, with a few simple aerobatics thrown in just for fun. We were impressed that even with full aft stick, at or close to stall, it did not fall off either way or show any sign of a tip stall and still retained aileron control. We did conclude, however, that at least in the 3S configuration the Blinker is better suited to a larger flying field than a smaller one.
 We intend in the future to try off a paved runway, with a 2S battery and maybe a slightly further aft CG and suspect this will slow the Blinker down quite a bit, making it suitable for smaller fields.
The Last Word
Between the excellent laser cutting and the clear instructions the Blinker is a cinch to build. And you end up with a speedy flying wing that, if you want, can be tamed down on occasion. Best of all, nobody else will have one just like yours!
CONTACTS
ALIEN AIRCRAFT CORP. alienaircraft.com, (386) 676-0074
HANGAR 9 hangar-9.com, (800) 338-4639
HITEC hitecrcd.com, (858) 748-6948
HOBBYTOWN USA hobbytown.com
JR jrradios.com, (800) 338-4639
KYPOM radicalrc.com, (937) 256-7727
SPEKTRUM spektrumrc.com, (800) 338-4639
TOP FLITE top-flite.com
By: Dave Jackson
davej@flyrc.com
