 Fly RC Magazine WE LIVE RC
What Goes Up Must Come Down, Safely
What a day! You got your brand new airplane to the local field and psyched yourself up for your first flight. After watching tons of videos online and reading everything you could, you are confident enough to get that model airborne and enjoy the great hobby that is flying model airplanes. Once airborne, your nerves start to calm as you get the hang of the controls and within a few minutes you are flying a nice pattern while maintaining altitude. You should be proud of yourself, you got the hang of flying and you start to imagine that instead of a trainer, you are flying a really nice warbird or hot new aerobatic plane. As you are lost in the sky and your dreams of future planes, you notice that your model is losing battery power. Landing? Oh no! Perhaps you read about it or saw some videos on how to do it, but now that you are faced with having to make an actual landing your mind went blank. This is a feeling that all first time pilots have and many people feel that landing is the most difficult part of the flight. Since what goes up must come down, landing is something that you need to master and there is nothing like kicking the birdie out of the nest, as in your battery is dying so it is time to land – NOW!
Honestly, landing is one of the aspects of flying model planes that I like the most. There is nothing like pulling off that perfect scale-like landing and that feeling of accomplishment that you get when you can taxi the model back to you unscathed.
Fear not! In this article we will break down the process of landing a model aircraft and give you the skills you need to be confident when landing time approaches on your next flight.
While practice makes perfect, let’s try and concentrate on practicing perfectly. Learning to master landings the correct way will become as easy as riding a bike. However if you are practicing the wrong way, you will be spending more money on glue to fix your model than you do on fuel to keep it aloft.
THE LANDING CIRCUIT AND APPROACH
You may have heard the term ‘final approach’ before. The word ‘final’ is so negative. I prefer to say that you are setting up for landing. Let’s face it, we are not landing a 747 jumbo jet here, if you setup for a landing and overshoot the runway, providing you have enough battery or fuel left, you can go around and give it another shot. Before we get into setting up for landing, it is important that you keep track of the fuel/battery consumption of your aircraft. I do not recommend running so low that you only have one shot at a landing. There is nothing worse than needing to go around again only to find out your engine/motor dies because you are out of fuel. That will almost never end in a happy situation. I recommend flying your model with someone who is an accomplished pilot for about five minutes and then have him/her land. At that time, measure how much battery is left or view how much fuel is left. You can use this to gauge what a safe flight time would be so you have enough battery/fuel left to make at least two landing attempts. If you do not have a timer on your transmitter, I suggest buying a cheap one at your local Wal-Mart or dollar store.
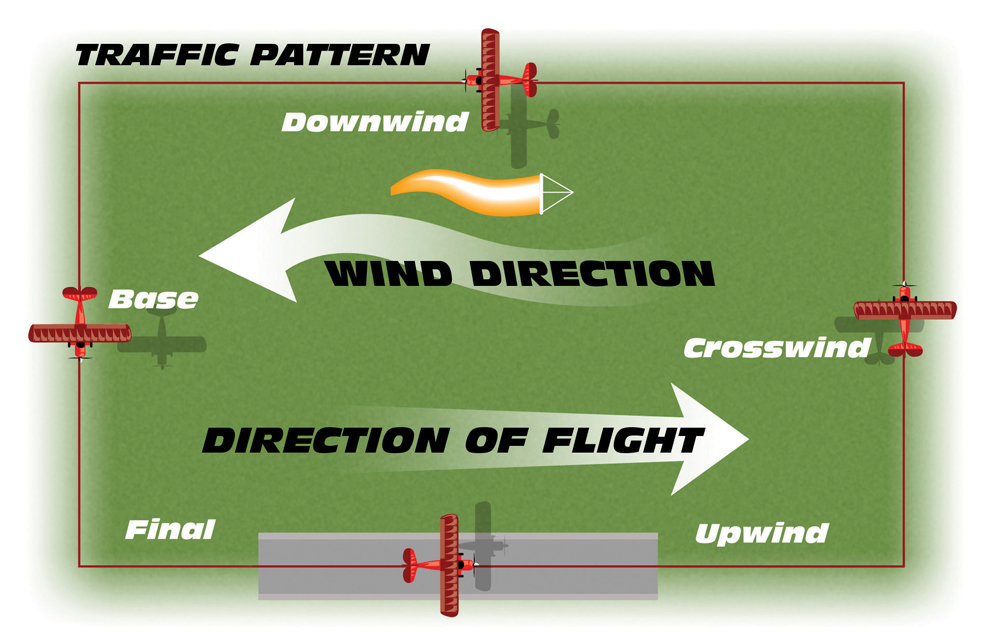
If you are already flying, you should be aware of the term “flying the pattern.” If not, basically what that means is that you are going to always take off into the wind and your flight pattern will remain in that direction. For example, if the wind is blowing from left to right, then you will take off from right to left and your pattern will be in a clockwise direction in front of you.
There are four parts of a typical pattern when flying; crosswind leg, downwind leg, base leg and upwind leg (also final approach when landing). If you are taking off from right to left, then your first turn will be to the right (or away from you), this is called the crosswind leg. Your next turn will be parallel to the direction that you took off which will be your downwind leg. As you make your third turn (back towards you), you are making a base leg. Your final turn will have you flying back over where you took off which would be the upwind leg if you are still flying or ‘final approach’ if you are preparing to land.
When teaching someone to land a model plane, I use the same lessons taught to me when I learned how to fly full-scale aircraft and that is to fly the complete pattern. Doing this really helps with embedding the mechanics of flying in your mind so it becomes second nature. As you progress you will most likely enter the last bit of the downwind leg before turning final and landing, but for now, let’s concentrate on flying nice rectangles in front of you.
OK IT’S TIME TO LAND
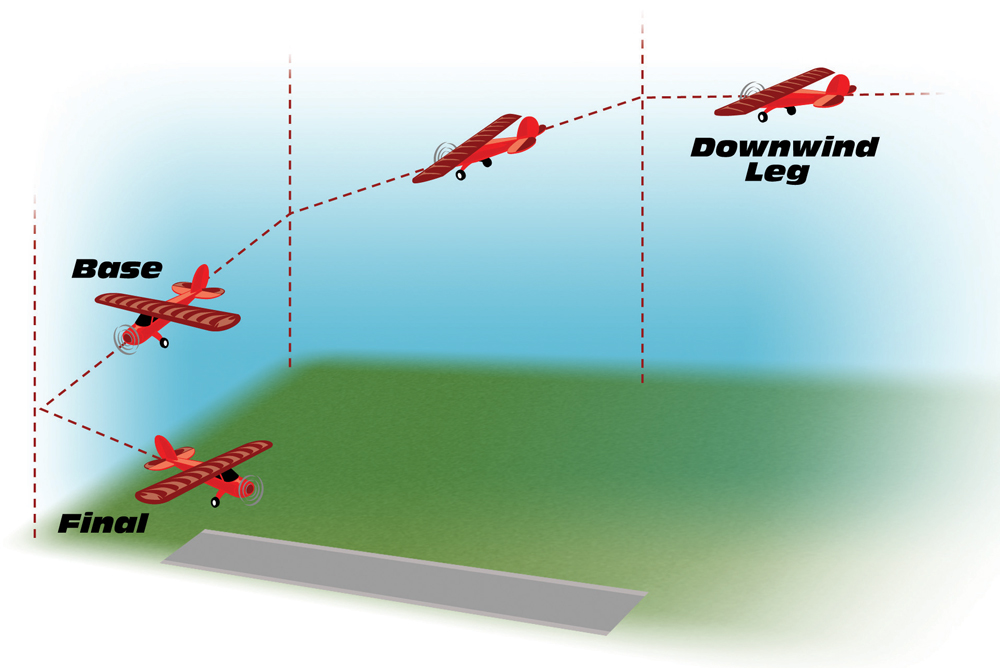
When you decided that it is time to land, the process starts on the downwind leg of the pattern. As you begin the downwind leg, it is a good rule of thumb to keep your altitude at about 30 feet. This altitude may vary based on the size of the model you are flying. If you are flying a micro-sized model you might be able to get away with being six feet off the ground, conversely if you are flying a 100-inch model you might want to be over 50 feet. As you gain experience, you will find an altitude that you prefer and obtaining it will become second nature.
As you fly the downwind leg, continue until you model passes you by 150 feet or so (again, this distance will depend on the size of the model and your comfort level). Next, you will begin the base leg by making a 90-degree turn perpendicular to the runway. Some pilots may find that it is easier to make a smooth 180-degree turn transitioning from the downwind leg to final approach in one maneuver rather than making two 90-degree turns. I do not put a lot of emphasis on this as long as the end result is the same, which is having your aircraft lined up with the runway on final. Keep in mind that as you make this turn the ailerons and rudder controls are reversed as you begin to face the plane. It is important to remember that so you don’t make a left command when you need a right. Again this becomes second nature the more you fly, especially if you practice flying in the pattern often.
As you make this turn from downwind to final (or downwind to base to final) you will slowly reduce power. Keeping the turns shallow will reduce the chances that the aircraft will stall as the airspeed depletes. During this time you will be concentrating on the throttle more than you probably did during the entire flight, making constant adjustments to keep your airspeed up enough for the aircraft to fly, but not so much that you overshoot the runway. Keep your left thumb sharp in case a gust of wind affects your final approach altitude and you need a boost of power quickly.
Once you’ve completed the turn, you are now on your final approach. Use the rudder to keep the plane aligned with the center of the runway and the throttle to control the rate of descent. You can also use the elevator, but just like with a full-scale aircraft, it is the throttle that controls your rate of descent. The elevator will make the model go up and down, but it will also affect the airspeed which ideally you want to keep as constant as possible and as slow as possible without stalling the aircraft.
As the airplane nears the ground (within a foot or two off the runway), reduce the power completely and gently add a bit of up elevator. Doing this reduces the forward speed and reduces the descent rate until the plane touches down. This final maneuver is called a flare and getting the timing correct is critical to a smooth landing. If you flare too soon you can cause your model to stall and crash. If you flare too late the model will touch down too hard and fast and it will most likely bounce back into the air and can potentially cause damage to the landing gear. Getting this right will come naturally with time and practice.
MISSED IT! TRY AGAIN
Missed approaches happen to even the best pilots. There are things that are out of your control like sudden changes in the wind that could wreck havoc on an otherwise perfect landing. This is one of the reasons for making sure you have reserve power at your disposal. It is always better to have multiple missed approaches and a safe landing than to pile drive your model into the ground trying to force a landing. As soon as you feel that you are not going to be able to land and come to a complete stop before the end of the runway, simply relax and apply full throttle and simply fly around for another go.
ENOUGH READING, TIME TO PRACTICE
One of the fun things about this hobby is that once you master landings on one model and you decide to purchase a new model, you will be relearning the landing characteristics all over again. So practicing perfectly will help you as you advance through the thousands of potential models that can fill your hanger in the future. There is no better feeling than making that first “perfect” landing.
