 Fly RC Magazine WE LIVE RC
Simple Techniques to a Scale Looking Model
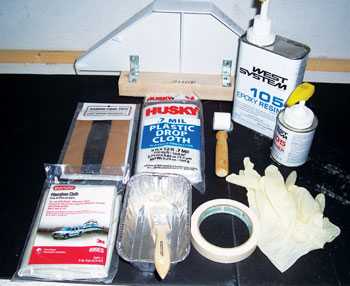
ITEMS YOU WILL NEED
• Latex gloves
• 1” throw-a-way paint brush
• Paper towels
• Isopropyl alcohol for clean up
• Container for mixing the resin
• A small linoleum roller for pressing out excess resin (optional)
• Stir sticks
• Masking tape
• Dave Brown carbon fiber ribbon (as required)
• Fiberglass cloth 6 oz. (as required)
• Epoxy resin (see text)
by William Koster
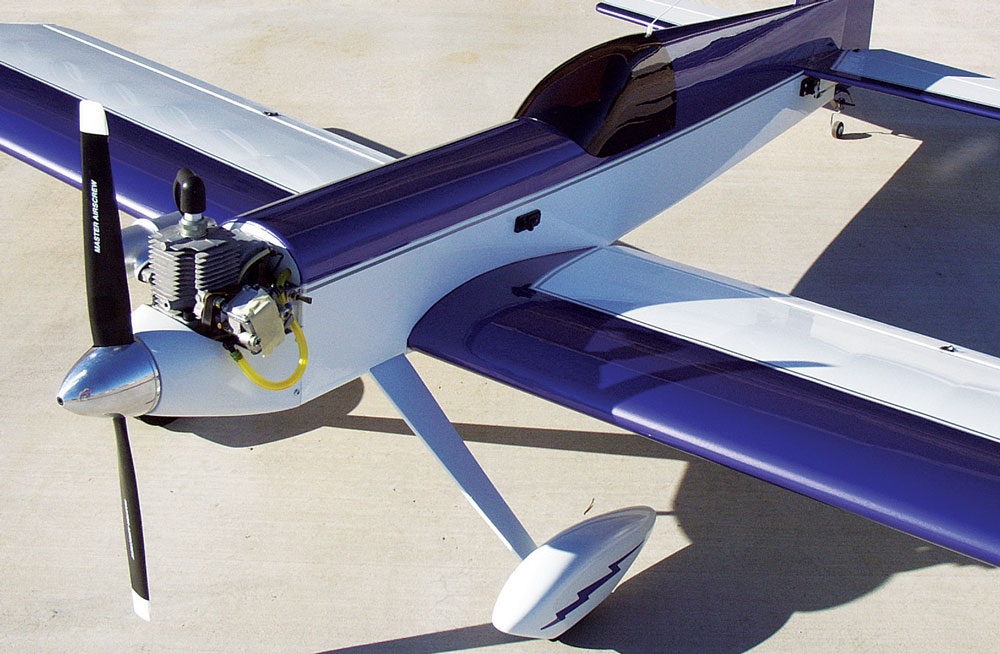
After bending a few aluminum landing gears on hard landings, I decided to make my own out of fiberglass and carbon fiber. My expertise as an engineer was designing carbon fiber structures and components for communication satellites so this endeavor was right up my alley. Many auto makers are now using carbon fiber composites for springs and body parts because they are not only lighter, they absorb energy better than steel and are three times stronger. For those same reasons, RC model airplane landing gear is a perfect application for composites.
If you are looking to replace your existing gear or make one for that new plane, then this article will guide you through the process without the expense and intimidating complexity of vacuum bagging systems. Throughout this article I will use “LG” as an abbreviation for landing gear.
ADVANTAGES OF A COMPOSITE LANDING GEAR
• Virtually indestructible
• Lighter than aluminum (approximately .075 vs .1 lb./cu. in.)
• Won’t take permanent set
• Better energy absorbing than aluminum
• Stiffness can be better tailored to application than aluminum
• High strength-to-weight ratio
• No more multi-hop landings
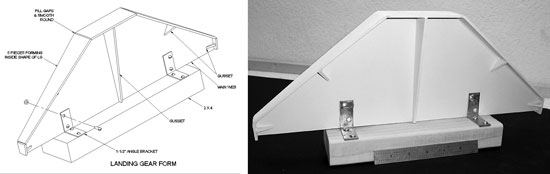
THE FORM
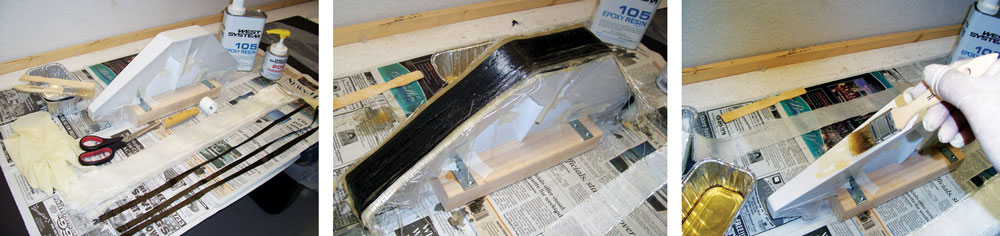
Begin by drawing the front view of the landing gear on 1/8-inch plywood or Masonite. I like Masonite because it is smooth, cuts easily and is relatively cheap. Give the material a coat of white primer first so your pencil lines will be visible. Cut out the main web that will hold the five pieces of the form in place. Remember, the lay-up is to the inside of the LG so you will have to compensate for the material thickness. Next, draw and cut out the five pieces that form the LG. The reason the form is made to the exact shape of the LG is so to leave an imprint on the inside for trimming the finished part.
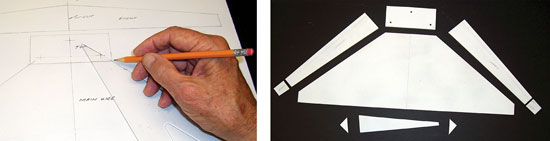
Glue the five LG pieces to the web using masking tape to hold them in place while glue is drying. I use Gorilla Glue because it foams and fills in the gaps. A hot glue gun also works well. Cut a piece of 2×4 for a base and mount the form with steel L brackets or similar. The form needs to be raised up at least 11/2 inches to make room for the excess fiberglass and carbon fiber that will hang down during lay-up.
A curved LG for that Extra or other similar model can easily be made by forming laminates of 1/64 or 1/32-inch plywood over a curved web.
You can also use your existing aluminum gear as a mold if you like, but you’ll have to find a way of supporting it during the lay-up.
PREPARATION
I used Dave Brown carbon fiber ribbon and 6-ounce fiberglass cloth for the lay-up. Caution: use only 6-ounce cloth. I once tried a short cut using 9-ounce cloth to get by with fewer layers and I had a de-lamination since 9-ounce cloth doesn’t wet out as well. You need to use a lot of pressure to force the resin into the weave with heavier cloth. You can buy fiberglass along with your epoxy resin from CST. Many auto parts stores also have an eight-square foot package of fiberglass under the “Bondo” name.
Read the data chart to find the number of laminations for the given weight of your airplane. The number of laminations shown in the chart is a ballpark approximation. Also, the thickness of your LG may vary depending on how much resin is squeezed out. Cut the individual strips of fiberglass cloth at least 1/2 inch wider and one inch longer than needed and set them aside.
Cut enough carbon fiber ribbon in continuous lengths to make up two layers matching the glass cloth strips and set aside. Read the directions that come on the package for cutting, etc. You may find it necessary to separate some of the carbon fiber stands. For the binder, I use West System’s #205 epoxy resin, mixed with either their #205 fast or #206 slow hardener. Although the system is not cheap at almost $60 per quart, it is the best. It sands easy and is very predictable. I have been using this epoxy resin for years with excellent results. West System products are distributed by The Composites Store and are also sold at all West Marine stores. I also suggest purchasing the West System easy dispensing pumps. One pump each and you have the right 5:1 mix ratio.
To extend the pot life of the mixed epoxy resin, I use two small aluminum cake pans purchased in a five-pack from the local market. Put a couple of cubes of ice along with a little water in one pan and mix the resin in the other. Nest the pan with mixed resin on top of the ice water. What fires off epoxy is heat, and the more resin by volume you have the more heat generated. More heat gives a shorter pot life. It’s also best to mix small amounts at a time.
THE LAY UP
Using masking tape, cover the form with a piece of .5 or .7-mil drop cloth. You can use kitchen wrap but I find it wrinkles up and is difficult to work with. The epoxy will not stick to the drop cloth or the kitchen wrap.
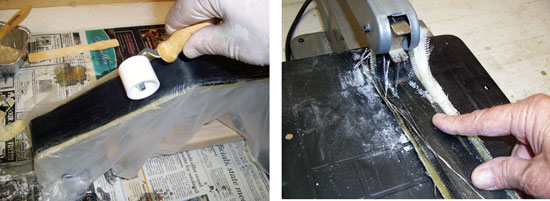
Mix the resin thoroughly and apply a generous amount directly over the drop cloth surfaces using a one-inch throw-a-way “chip” brush. Lay the first laminate over the form, pressing the cloth well into the resin with your gloved fingers. Next, apply enough carbon fiber to completely cover over the previously laid laminate using your gloved finger to smooth out the wetted carbon fiber strands.
Apply the remaining filler cloth layers making sure to wet the previous layer thoroughly before adding the next. Remember, if the chart calls for 17 laminates, you will apply 15 fillers between the carbon fiber laminates. The next to the last laminate is carbon fiber, followed by the last layer of fiberglass cloth. Cover over the final outer fiberglass layer with drop cloth material. Now use a small roller or your fingers to squeeze out any excess resin. You can pull the layup in tight against the form at the ends where it all droops down with masking tape affixed directly to the drop cloth if needed.
Remove the LG from the form after a 12-hour cure and trim to the impression left by the form on the inside. You will find it cuts well with a jigsaw but is hard on blades.
Sometimes the LG will vary in thickness due to inconsistencies in the amount of resin squeezed out. This is no problem, just scab on filler pieces of fiberglass where needed and sand to blend.
All epoxies like a post cure; if you like, you can place the LG in an oven at 200-250 degrees F for about an hour. A bench belt sander works well for final sanding but be sure to wear a face mask. You can fill the weave with slurry of microballoons and epoxy. Add about 25 percent microballons by volume. You will find it sands very easy.

FINAL FINISH & MOUNTING
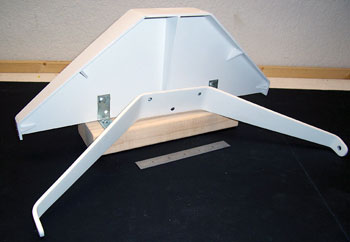
I use Rust-Oleum’s metal primer followed by their gloss paint to match my airplane but leaving it in the natural black is OK too.
I use only three 1/4-20 nylon mounting bolts for mounting the LG blank to the aircraft, with two forward and one aft. The two forward bolts take the tension loads while the aft one is in compression and is more or less along for the ride. I like nylon bolts over steel as I’d rather shear them off on a hard landing than tear out the bottom of the plane.
Okay, now that your new landing gear is all bolted up to your plane, let’s go flying. A few landings will determine if the gear is too stiff or soft. Generally speaking, you will not find it to be too stiff if you’ve made it with the correct number of laminates shown in the data chart. If on the other hand, it’s too soft, just add more layers of fiberglass cloth to the inside of the gear until the desired stiffness is obtained. Remember, excess resin only adds weight. It is much better to add another layer or two of fiberglass and squeeze out all excess resin than to brush on “just another coat.”
Happy landings!!
LINKS
West Systems Epoxy, distributed by CST, cstsales.com, (800) 338-1278
Dave Brown Products, dbproducts.com, (513) 738-1576
